Wednesday, January 11, 2023

Some Favourite Supplies for Beginning Italic Calligraphy at Quietfire School

 I have some suggestions in case you're having trouble finding supplies for Beginning Italic Calligraphy.


First, check John Neal Bookseller for supplies for Beginning Italic Calligraphy - I gave them my wish list right at the start!

Click on the photos below to see more details.  The links below are for Amazon.ca, but you don't have to get them here. My plan is to do links for Amazon.com as well, but when you go to these links, you may be prompted to change to .com.  I hope so!  Let me know if that happens!!  I've been trying to put this on my site, but I'm not sure Amazon links play well with others!  Please ask if you have any questions.

Happy Lettering!
Suzanne


Monday, January 2, 2023

Quietfire School - Beginning Italic Calligraphy

 Have you visited Quietfire School?


It's my latest place to share all that "stuff" that's been accumulating in my brain (and studio) for, um, quite some time!

 
My first class opened in the spring with Beginning Italic CalligraphyIt's a comprehensive course on getting started in calligraphy.  We use easy-to-get supplies and I break the course down into little bits so you can take in as much or as little as you want in one sitting.

What you'll know when you finish this course!


  • You'll be on your way to making your own cards or creating frame-able art for friends and family.
  • You will know how to make beautiful broad-edged italic letters with tools that are easy to get.
  • You’ll understand the shape relationships between the letters which makes it so much easier for you when you put pen to paper.
  • You’ll have developed fundamental skills that will help with all your lettering creations and begin to develop your own style. You can't break the rules till you know them! And we're going to really know the rules!
  • You’ll know how to critique your own letterforms.
  • You will have gained so much confidence and satisfaction with practice.

You have lifetime access to this course so you can drop in at any time.

Students in the class are welcome to join the Facebook Beginner Italic Calligraphy Group where you can ask relevant questions and I will drop in with little videos and other things.
 If you have any questions, please feel free to contact me through my website, or use the contact link in the sidebar of this blog.

I look forward to seeing you in class!
Suzanne

Tuesday, February 22, 2022

Vintage Multimedia Baby Project

 
I'm delighted to be sharing a super sweet newborn inspired scrapbook page on Creative Scrapbooker Magazines' VIP group!
 
We're going to crackle, die cut, colour blend, stencil (with precut digital cut files) and mask among other things! 
The Facebook Live will be on their VIP Facebook Group.  You can get more information about this busy group HERE!
 
 
If you'd like to purchase the digital cutting files as a bundle, please use this link! 
They are also available individually at my Silhouette Store
The supply list is below!
 

Project Supply List:

Tea Dye Distress Ink
Brushes
Ranger Texture Paste Opaque Crackle
Palette Knife

White ribbon

Baby bootie charms

Super Stock - from Creative Scrapbooker Magazine
Plain White Cardstock

Digital Cutting Machine

Quietfire Digital Cutting Files: Silhouette Store Or Bundle

Be-Leaf In Yourself Stencil Card
Happy Birthday Basketweave Stencil Card
Sweet Dreams Layered Stencil Card
Twinkle Twinkle Stencil Card
Berry Branch Stencil Card
Butterfly Stencil Card
Leafy Branch Stencil Card
Small Leaves Branch Thinking of You Stencil Card

Quietfire Cherish Die

Kells Gold Modern Gilding Powder
Heat Tool

Versa Mark Ink Pad

Flower Molding Tools

Glue Dots - Mini and Micro
Tape Runner

Thanks for looking!

Happy creating, Suzanne

Tuesday, December 21, 2021

Joy Gift Bag


Hey Quietfire Fans! For today's project I'm sharing with how to create this easy to make Joy Gift Bag for adding that special touch to those little gifts. I've combined a variety of Quietfire Design Stamps and Modern Gilding Powders which were all perfect for creating this gift bag. You'll want to grab a cup of your favourite beverage and learn how to recreate my Joy Gift Bag at home.

To start, you'll need a cotton bag of whatever size you'd like. Apply Vermillion Archival Ink to the Merry Christmas Background and stamp at the bottom of the tag. Reapply ink to the stamp and continue stamping to the top of the bag. 


Die cut a 2 1/2" Stitched Indented Rectangle out of a piece of cream cardstock.


Die cut a 3" Stitched Indented Rectangle out of a piece of red cardstock. 


Apply Emboss It Ink to the tree stamp from the Have Yourself A Merry Little Christmas stamp set and stamp on the cream rectangle. Sprinkle Copper Scroll Modern Gilding Powders over the stamped tree. Tap off the excess powder and emboss with a heat tool. 
Die cut a 2 1/4" Stitched Circle out of a piece of kraft cardstock. Apply Emboss It Ink to the Joy word from the Bright Holiday Words Stamp Set and stamp onto the circle. Sprinkle Kells Gold Modern Gilding Powders overtop of the joy word. Tap off the excess powder and emboss with a heat tool.
Distress the edges of both rectangles and circle. Ink the edges of both rectangles and circle using Walnut Stain Distress Ink and a blending tool with foam.


Adhere the 2 1/2" rectangle to the 3" rectangle. Foam square the 3" rectangle to the middle of the bag.


To finish the bag, use adhesive and foam squares to adhere the joy circle to the bottom right corner of the bag.


Here are a few closeups of the finished gift bag.


Here is the finished Joy Gift Bag.


Quietfire Design Supplies Used:


Other Supplies Used:

- Elizabeth Craft Designs: Pizza Box Die (Stitched Circle) and Stitched Indented Rectangle
- Ranger Ink: Emboss It Dabber and Vermillion Archival Ink
- Tim Holtz for Ranger Ink: Distress Ink - Walnut Stain and Blending Tool with Foam
- Simple Stories: Color Vibe Texture Cardstock - Winter Pack
- Misc: Bag, Cream Cardstock and Kraft Cardstock

Thanks so much for joining me today and I hope that I have inspired you to recreate your own version of my Joy Gift Bag at home.

- Katelyn


Tuesday, December 7, 2021

Season's Greetings Christmas Card


Hey Quietfire Fans! For today's project I'm sharing with how to create this vintage Season's Greetings Christmas Card. I combined a variety of Quietfire Design Stamps, A Way With Words Dies and Modern Gilding Powders which were all perfect for creating this Christmas Card. You'll want to grab a cup of your favourite beverage and learn how to recreate my Season's Greetings Christmas Card at home.

To start, you'll need a piece of red patterned cardstock. Die cut a 4" Stitched Indented Rectangle out of the cardstock piece. Distress the edges of the rectangle. Ink the edges of the rectangle using Walnut Stain Distress Ink and a blending tool with foam.


Next, you'll need a piece of dark green patterned cardstock. Die cut a 3 3/4" Fitted Indented Rectangle out of the cardstock piece. Apply Emboss It Ink to the Merry Christmas Background stamp and stamp onto the rectangle. Reapply ink to the stamp and continue stamping on the rectangle as desired. Sprinkle Kells Gold Modern Gilding Powders over the stamped background. Tap off the excess powder and emboss with a heat tool. Distress the edges of the rectangle. Ink the edges of the rectangle using Walnut Stain Distress Ink and a blending tool with foam.


Die cut a 3/4" Diagonal Stitched Fishtail out of a plain piece of red cardstock. Apply Emboss It Ink to the Season's Greetings sentiment from the Poinsettia Banner & Sentiments stamp set and stamp onto the fishtail. Sprinkle Kells Gold Modern Gilding Powders over the stamped sentiment. Tap off the excess powder and emboss with a heat tool. Distress the edges of the banner. Ink the edges of the banner using Walnut Stain Distress Ink and a blending tool with foam.


From the Flourished Candle, die cut the whole candle image out of a piece of copper foil paper. Die cut the candle edge and flame out of a piece of White Cardstock. Using a blending tool with foam, blend Squeezed Lemonade Distress Ink over the entire surface of the flame.


Adhere the 3 3/4" rectangle to the 4" rectangle. Adhere the 3/4" fishtail 1/4" from the bottom and all the way to the left hand side of the 3 3/4" rectangle.


Adhere the flame to the flame on the copper piece. Adhere the candle edge to the candle edge on the copper piece. 


Use foam squares to adhere the flourished candle 1" from the bottom and 1/2" from the left of the 3 3/4" rectangle.


To finish the card, cut a cardbase out of white cardstock that measures 4" x 10 1/2", score at 5 1/4". Adhere the cardfront to the cardbase.


Here are a few closeups of the finished Christmas Card.


Here is the finished Season's Greeting's Christmas Card.


Quietfire Design Supplies Used:


Other Supplies Used:

- Elizabeth Craft Designs: Stitched Indented Rectangle, Fitted Indented Rectangle and Diagonal Stitched Fishtails
- Ranger Ink: Emboss It Ink
- Tim Holtz for Ranger Ink: Distress Ink - Walnut Stain and Blending Tool with Foam
- Simple Stories: Color Vibes Textured Cardstock - Winter Pack
- Misc: Copper Foil Paper and White Cardstock

Thanks so much for joining me today and I hope that I have inspired you to recreate your own version of my Season's Greetings Christmas Card at home.

- Katelyn


Tuesday, November 23, 2021

Don't Even Think About It Gift Tag


Hey Quietfire Fans! For today's project I'm sharing with how to create this quick and easy Don't Even Think About It Gift Tag. I combined a variety of Quietfire Design Stamps and Modern Gilding Powders which were all perfect for creating this gift tag. You'll want to grab a cup of your favourite beverage and learn how to recreate my Don't Even Think About It Gift Tag at home.

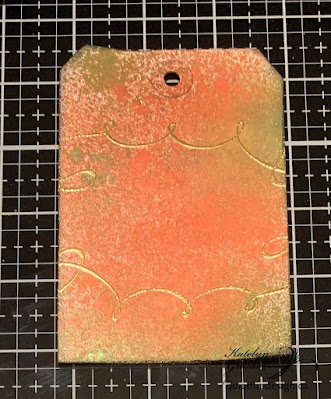
Start by trimming a tag down to 3 1/8" x 4 5/8". Spritz the tag with Tree Lot and Peppermint Stick Distress Mica Stain. Allow the tag time to dry.


Die cut a 2 1/2" stitched circle out of a piece of white cardstock. Spritz Peppermint Stick Distress Mica Stain on the circle. Once the circle has dried, apply Emboss It Ink to the Don't Even Think quote from the Christmas Sweet & Sassy Stamp Set and stamp in the middle of the circle. Sprinkle Kells Gold Modern Gilding Powders on the stamped quote. Tap off the excess powder and emboss with a heat tool. Distress the edges of the circle. Ink the edges of the circle using Black Soot Distress Ink and a blending tool with foam.


Distress the edges of the tag. Ink the edges of the tag using Black Soot Distress Ink and a blending tool with foam. From the To Appreciate the Beauty of a Snowflake stamp, you'll need the swirly stamp. Apply Emboss It Ink to the stamp and stamp on the top portion of the tag as desired. Reapply ink to the stamp and stamp on the bottom portion of the tag as desired. Sprinkle Kells Gold Modern Gilding Powders over the stamped images. Tap off the excess powder and emboss with a heat tool.


From the To Appreciate the Beauty of a Snowflake stamp, you'll need the snowflake stamp. Apply Emboss It Ink to the stamp and stamp on the top portion of the tag where the swirly image has been embossed. Reapply ink to the stamp and stamp on the bottom portion of the tag where the swirly image has been embossed. Sprinkle Forever Platinum Modern Gilding Powders over the stamped images. Tap off the excess powder and emboss with a heat tool.


From the Christmas Sweet & Sassy stamp, you'll need the snowflake stamp. Apply Emboss It Ink to the stamp and stamp randomly on the tag as desired. Reapply ink to the stamp and stamp three to four more times as desired on the tag, apply ink to the stamp as needed. Sprinkle Forever Platinum Modern Gilding Powders over the stamped images. Tap off the excess powder and emboss with a heat tool.


Foam square the circle to the middle of the tag as desired.


To finish the tag, tie a piece of twine through the top of the tag.


Here are a few closeups of the finished gift tag.


Here is the finished Don't Even Think About It Gift Tag.


Quietfire Design Supplies Used:


Other Supplies Used:

- Elizabeth Craft Designs: Pizza Box Die (Stitched Circle)
- Ranger Ink: Emboss It Dabber
- Tim Holtz for Ranger Ink: Distress Ink - Black Soot and Blending Tool with Foam
- Misc: White Cardstock, Tag and Twine

Thanks so much for joining me today and I hope that I have inspired you to recreate your own version of my Don't Even Think About It Gift Tag at home.

- Katelyn


Related Posts Plugin for WordPress, Blogger...