Showing posts with label To appreciate the beauty of a snowflake. Show all posts

Tuesday, November 23, 2021

Don't Even Think About It Gift Tag


Hey Quietfire Fans! For today's project I'm sharing with how to create this quick and easy Don't Even Think About It Gift Tag. I combined a variety of Quietfire Design Stamps and Modern Gilding Powders which were all perfect for creating this gift tag. You'll want to grab a cup of your favourite beverage and learn how to recreate my Don't Even Think About It Gift Tag at home.

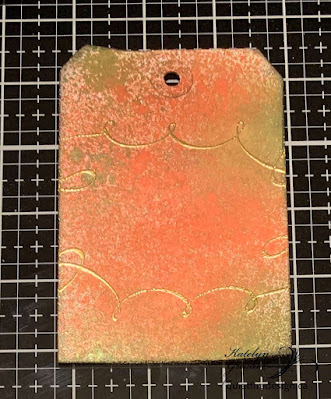
Start by trimming a tag down to 3 1/8" x 4 5/8". Spritz the tag with Tree Lot and Peppermint Stick Distress Mica Stain. Allow the tag time to dry.


Die cut a 2 1/2" stitched circle out of a piece of white cardstock. Spritz Peppermint Stick Distress Mica Stain on the circle. Once the circle has dried, apply Emboss It Ink to the Don't Even Think quote from the Christmas Sweet & Sassy Stamp Set and stamp in the middle of the circle. Sprinkle Kells Gold Modern Gilding Powders on the stamped quote. Tap off the excess powder and emboss with a heat tool. Distress the edges of the circle. Ink the edges of the circle using Black Soot Distress Ink and a blending tool with foam.


Distress the edges of the tag. Ink the edges of the tag using Black Soot Distress Ink and a blending tool with foam. From the To Appreciate the Beauty of a Snowflake stamp, you'll need the swirly stamp. Apply Emboss It Ink to the stamp and stamp on the top portion of the tag as desired. Reapply ink to the stamp and stamp on the bottom portion of the tag as desired. Sprinkle Kells Gold Modern Gilding Powders over the stamped images. Tap off the excess powder and emboss with a heat tool.

From the To Appreciate the Beauty of a Snowflake stamp, you'll need the snowflake stamp. Apply Emboss It Ink to the stamp and stamp on the top portion of the tag where the swirly image has been embossed. Reapply ink to the stamp and stamp on the bottom portion of the tag where the swirly image has been embossed. Sprinkle Forever Platinum Modern Gilding Powders over the stamped images. Tap off the excess powder and emboss with a heat tool.


From the Christmas Sweet & Sassy stamp, you'll need the snowflake stamp. Apply Emboss It Ink to the stamp and stamp randomly on the tag as desired. Reapply ink to the stamp and stamp three to four more times as desired on the tag, apply ink to the stamp as needed. Sprinkle Forever Platinum Modern Gilding Powders over the stamped images. Tap off the excess powder and emboss with a heat tool.


Foam square the circle to the middle of the tag as desired.


To finish the tag, tie a piece of twine through the top of the tag.


Here are a few closeups of the finished gift tag.


Here is the finished Don't Even Think About It Gift Tag.


Quietfire Design Supplies Used:


Other Supplies Used:

- Elizabeth Craft Designs: Pizza Box Die (Stitched Circle)
- Ranger Ink: Emboss It Dabber
- Tim Holtz for Ranger Ink: Distress Ink - Black Soot and Blending Tool with Foam
- Misc: White Cardstock, Tag and Twine

Thanks so much for joining me today and I hope that I have inspired you to recreate your own version of my Don't Even Think About It Gift Tag at home.

- Katelyn


Tuesday, December 4, 2018

Monochromatic Beauty of a snowflake

Even though it is not officially winter here in the United States, I think it's safe to say many of us have winter on the brain.  The best part about winter is the snow (besides Christmas!) and like Wanda yesterday, I've got snow on the brain even though we've only had one snow day here.  You know the kids are praying for a blizzard just to miss school!

Suzanne has this new snowflake stamp set To Appreciate the Beauty of a Snowflake that I finally had a chance to ink up.  I went with a monochromatic card (because sometimes choosing coordinating colors are just too hard on my brain!) and I love it that I could layer both stamps and dies without it being overwhelming.


 My base layer uses the snowflakes from the same stamp set and then single snowflakes stamps from Let It Snow Flourished Snowflakes that were clear embossed.  I then white embossed the quote on a lighter blue cardstock.  The popped up and double matted quote was then surrounded by snowflake dies from Love Nicole.


Full disclosure though - I think I can fully appreciate the beauty of a snow from inside with a cup of hot coffee in my hand just fine.


To Appreciate the Beauty of a Snowflake, Set of 3 Stamps - Mounted

Let it Snow Flourished Snowflakes - Set of 6 Stamps - Mounted


Tuesday, October 30, 2018

How to Make a Wintry Card with Reduction Stenciling


Hi!!  I really like today's card... and... I'm glad it is not snowing outside!!!  I have, however, been outside on a day when the snow was falling and the temperature was just right to see each snowflake when it landed.  Truly beautiful!!!!

1. Glue Tissue Wrap to cardstock with Collage Medium.  Trim excess from the edges and check to be sure the tissue wrap is adhered all the way to each edge.  Apply a thin layer of Collage Medium over Tissue Wrap.


2.  Paint over the tissue wrap with a mix of Snowflake and Pewter paint allowing it to cover some areas and keeping it thin in other areas to let the print show through.  Go back in with just Pewter on some areas.  Let dry completely.


3.  For this next part you need your paints, the stencil you are using and a baby wipe ready to go.  You don't want the baby wipe too wet.  I used my finger to paint on Blue Oyster and Glass Blue blending in some areas and keeping the center more Blue Oyster with the Glass Blue more around the edges.  While the paint is still wet, set the stencil on and use the baby wipe to remove paint by rubbing it in the open areas of the stencil.  Move the stencil to another area and repeat.  If you want, clean the back of the stencil in between moves which I did when moving the stencil to the center.  Let dry completely.


4.  I did all the stamping using a Stamp Platform.  Stamp quote with Manganese Blue.  I thought it would be fun to pull in some purple so I stamped the flourish with Majestic Violet.  After stamping I didn't like it (so glad I was using the stamp platform), so I stamped it again with Manganese Blue.  This made a deep blue color.  The snowflakes were stamped with VersaMark ink and embossed with Snowflake Tinsel.


5.  Let it Snow was die cut from white cardstock.  I added color by lightly rubbing the ink pad over the die cut.  I rubbed over the die cuts with both Majestic Violet and Manganese Blue so it would match the color of the flourish.


6.  Again I used both colors to rub direct-to-paper around the edges of a white cardstock panel so the next layer would also match.  


7.  I inked the edges of the main panel with Emboss It Dabber and embossed with Snowflake Tinsel.  Attached it to the inked layer.  Wrapped it with silver fiber.  Attached the layers to a folded white card.  Glued on "let it snow".  Die cut the snowflakes from white cardstock and added them to the card with foam tape.


Quietfire Supplies --


Other Supplies --

- PaperArtsy Fresco Finish Paints: Snowflake, Pewter, Blue Oyster, Glass Blue
- Ranger Ink: Snowflake Tinsel Embossing Powder, Emboss It Dabber, Manganese Blue Archival Ink, Majestic Violet Archival Ink
- Tim Holtz for Ranger: Distress Collage Medium Matte
- Kool Tak Clear Foam Adhesive
- Scotch Create Tacky Glue
- Tim Holtz Stamping Platform
- Tim Holtz Idea-ology Tissue Wrap - Postale
- Misc: White Cardstock, Heat Tool, Silver Fiber, Baby Wipe


Related Posts Plugin for WordPress, Blogger...