Tuesday, January 26, 2021

Love You Gift Tag


Hey Quietfire Fans! For today's project I'm sharing with you my Love You Gift Tag, perfect to adding to a little gift for Valentine's Day. I combined a variety of dies, stamps and Modern Gilding Powders, which were all perfect for creating this gift tag. You'll want to grab a cup of your favourite beverage and learn how to recreate my Love You Gift Tag at home.

To start, you'll need to die cut a tag or just grab a tag out of your stash. I used the Planner Essentials - 2 die to die cut the large tag out of a piece of white cardstock. From the Love & Hearts Collection Stamp Set, you'll need the heart border. Apply Worn Lipstick Distress Ink to the border and randomly stamp on the tag. I stamped a total of ten times. Reapply ink to the stamp as needed.


From the Love Joy & Peace Christmas Ornament, you'll need to die cut the Christmas Ornament out of a piece of white cardstock. Using a blending tool with foam, blend Candied Apple Distress Ink over the entire surface of the ornament.


Apply Emboss It Ink to the Love You stamp from the Love & Hearts Collection Stamp Set and stamp onto a piece of white cardstock. Sprinkle Copper Scroll Modern Gilding Powders over the stamped sentiment. Tap off the excess powder and emboss with a heat tool. Die cut the sentiment out using a 1 3/4" Stitched Circle die.


Apply Emboss It Ink to the plain heart from the Love & Hearts Collection Stamp Set and stamp onto a piece of white cardstock. Sprinkle Kells Gold Modern Gilding Powder over the stamped heart. Tap off the excess powder and emboss with a heat tool. Repeat the previous steps to create another two hearts. Apply Emboss It Ink to the Heart stamp and stamp into one of the plain hearts. Reapply Emboss It Ink to the same stamp and stamp into another one of the plain hearts. Sprinkle Armenian Pink Modern Gilding Powders over the stamped hearts. Tap off the excess powder and emboss with a heat tool. Apply Emboss It Ink to the Love stamp and stamp into the remaining plain heart. Sprinkle Dragon Berry Modern Gilding Powders over the stamped heart. Tap off the excess powder and emboss with a heat tool. Fussy cut the hearts out.


Apply Picked Raspberry Distress Ink to the two single hearts from the Love & Hearts Collection Stamp Set and stamp onto a white piece of cardstock. Repeat the previous step. Fussy cut the four stamped hearts out.


Adhere the Christmas ornament to the left hand side of the tag.


Foam square the Love You circle to the bottom right side of the Christmas Ornament. Use adhesive and foam squares to adhere the embossed hearts around the sentiment and Christmas Ornament as desired.


Adhere the remaining four stamped hearts as desired on the tag.


To finish the tag, tie a piece of twine through the hole at the top of the tag.


Here is a closeup of the finished gift tag.


Here is the finished Love You Gift Tag.


Quietfire Design Supplies Used:


Other Supplies Used:

- Elizabeth Craft Designs: Stitched Circles and Planner Essentials - 2
- Tim Holtz for Ranger Ink: Distress Ink - Candied Apple, Picked Raspberry & Worn Lipstick and Blending Tool with Foam
- Ranger Ink: Emboss It Dabber
- Misc: White Cardstock and Twine

Thanks so much for joining me today and I hope that I have inspired you to recreate your own version of my Love You Gift Tag at home.

- Katelyn


Tuesday, January 12, 2021

2021 Weekly Tag Challenge!


Join us any time or every time!

 
You can use any tag, any size! You can use commercial tags, diecut tags or digitally cut tags.
If you are a digital cutting person, I’ve created a tag and storage/display box for your tags which you can download here: http://bit.ly/3rVzKZW from my Dropbox account (please do not give these files away. If someone wants them, tell them to join us!). It’s free! 
 
 But you don’t have to use it.
 
We plan to give you ideas each week, but that’s only if you have no ideas and need a place to start. We want you to be happy creating and not stuck to any rules, although we’d like you to use at least one Quietfire product (dies, stamps, stencils, digital cutting files, Modern Gilding Powder).
 
So go ahead and paint, ink, stamp, diecut – add digital diecuts (I’ve made some tag files for my Silhouette page http://bit.ly/2oAR9e6.) Try Modern Gilding Powder, add some glitter or foil. Work on your favourite paper, use up some scraps, try watercolour paper and maybe Yupo.
Experiment!
 
 No photo description available.  No photo description available.  Image may contain: 1 person  No photo description available.
 
Share your weekly tag on the Suzanne Cannon Fan Page Facebook Group any time, but especially Sunday for #showmesunday! Go ahead and post your creation on your Instagram account, too. Use #qfd2021tagchallenge
  
Happy creating! Suzanne and Robyn
Just ask us if you have any questions.
 
Need some Quietfire "stuff"?
Elizabeth Craft Designs makes my die designs as well as stencils and clear stamps
Emerald Creek makes my Modern Gilding Powders and carries many of the old rubber stamps.
Silhouette Design Store carries all my digital cutting files and fonts.
 
When you use the above links, I may receive a very small commission at no cost to you.  Thanks!

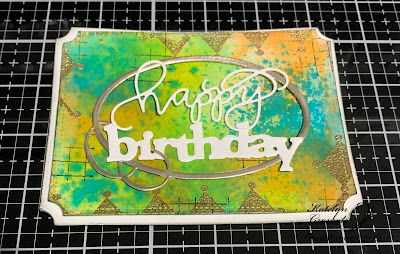
Happy Birthday Card


Hey Quietfire Fans! For today's project I'm sharing with you my Happy Birthday Card. I combined a variety of dies, stamps and Modern Gilding Powder, which were all perfect for creating this card. You'll want to grab a cup of your favourite beverage and learn how to recreate my Happy Birthday Card at home.

To start, die cut a 3 1/2" Stitched Indented Rectangle out of a piece of watercolour cardstock. Spritz the rectangle with water. Spritz the watered rectangle with Dylusions Ink Spray in Vibrant Turquoise, Squeezed Orange and Fresh Lime. To remove the excess ink spray, dab the rectangle with paper towel. Allow the rectangle to dry.


Apply Emboss It Ink to the Dotted Harlequin Background Stamp and stamp as desired on the rectangle. Stamp another six times on the rectangle as desired. Reapply ink to the stamp as needed. Sprinkle Kells Gold Modern Gilding Powders over the stamped areas. Tap off the excess powder and emboss with a heat tool. 


Apply Jet Black Archival Ink to the Grid Background Stamp and stamp as desired on the rectangle. Stamp the grid background another six times. Reapply ink to the stamp as desired. Distress the edges of the rectangle. Ink the edges of the rectangle using Black Soot Distress Ink and a blending tool with foam.


From the Happy Birthday 3 Die, die cut the Happy Birthday word out of white cardstock.


Die cut the Flourished Oval Frame out of white cardstock. Apply Emboss It Ink to the frame and sprinkle Forever Platinum Modern Gilding Powders over the entire surface of the frame. Tap off the excess powder and emboss with a heat tool.


Die cut a 3 3/4" Fitted Indented Rectangle out of a piece of white cardstock. Distress the edges of the rectangle. Ink the edges of the rectangle using Black Soot Distress Ink and a blending tool with foam.


Foam square the 3 1/2" rectangle to the 3 3/4" rectangle.


Foam square the Flourished Oval Frame to the middle of the 3 1/2" rectangle.


Adhere the Happy Birthday words to the middle of the Flourished Oval Frame.


To finish the card, cut a cardbase out of white cardstock that measures 3 3/4" x 10", score at 5". Adhere the cardfront to the cardbase.


Here is a closeup of the finished card.


Here is the finished Happy Birthday Card.


Quietfire Design Supplies Used:


Other Supplies Used:

- Elizabeth Craft Designs: Stitched Indented Rectangles and Fitted Indented Rectangles
- Dylusions for Ranger Ink: Ink Spray - Vibrant Turquoise, Squeezed Orange and Fresh Lime
- Tim Holtz for Ranger Ink: Distress Ink - Black Soot and Blending Tool with Foam
- Ranger Ink: Jet Black Archival Ink and Emboss It Dabber
- Misc: White Cardstock and Watercolour Cardstock

Thanks so much for joining me today and I hope that I have inspired you to recreate your own version of my Happy Birthday Card at home.

- Katelyn


Monday, January 4, 2021

Sending Smiles

 I'm done with winter.  If it's not going to give me a beautiful snowfall, let's just move along.  Haha - I wish it was that easy but it is in my craft room.  I needed a cheery card and I always love butterflies in season and out of season.  So here is my happy versions of Sending Smiles in a slimline format.


I started by using an old leaf stencil by Art Impressions and sponging in some different shades of green with my Distress Oxides.  I then cut the Symbol background out of pastel green foil by Recollection and used trimmed it to use the smaller halves to flank the sides of my slimline base.


The Sending Smiles and butterflies from the Butterflies Spray and Butterfly Pocket Insert were cut from the same slightly different shades of blue cardstock.


Supplies Used:
A Way with Words Sending
A Way with Words Sweet Smiles
A Way with Words Butterflies Spray

Related Posts Plugin for WordPress, Blogger...