

Showing posts with label With Sympathy die. Show all posts
Showing posts with label With Sympathy die. Show all posts
Monday, May 29, 2017
Stenciled Stars Sympathy Easel - Quietfire Quick FX Blog Hop

Monday, June 20, 2016
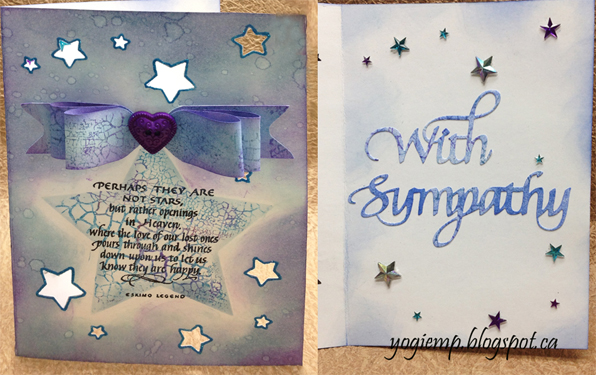
With Sympathy die - Perhaps They Are Not Stars - Paper Bow

Scored and folded my white card.
Created a stencil using Spellbinders "Stars Five" set, die cutting with the largest die in the center of a larger piece of scrap cardstock. Placed the stencil where I wanted it on my card front. Inked the crackle stamp using Distress pads ("Broken China" all over, "Faded Jeans" & "Wilted Violet" here and there), misted with water and stamped. Used some of the unused portions of the stamp to stamp the unstamped sections. Sponged some of the faded jeans around the edges of the stencil to define the star shape. Dried thoroughly.
Stamped the quote ("Perhaps They Are Not Stars...") using Versafine Black Onyx and clear embossed.
 Punched and die cut the various stars (McGill star punch for the medium stars and Fiskars star punch for the smallest stars), and the smallest of the Spellbinders stars. Used a Quickie glue pen to outline each of the stars and sprinkled with Ritz micro fine glitter "Royal Blue".
Created a background paper for the bow using the crackle background stamp and the same ink pads as above (see pic below). After cutting the bow pieces, sponged them with the blues and violet to get deeper tonal values. Also sponged the backs of the pieces since they are partially visible. (The larger the bow, the more visible is the underside...)
When the front of the card was completed, kept it closed to adhere various sized rhinestone stars through each opening to the inside of the card using Glossy Accents. (See pic at the top)
 Inside: Sponged some blue around the edges with a dirty sponge.
Die cut the "With Sympathy" (also available on Quietfire Design HERE) from a scrap piece of the background, then sponged more "Faded Jeans" to bring out the color. Adhered to inside.
See instructions for "Paper Bow" below. When completed, adhered to card front adding a purple heart button to the center.
To see the step by step pics, check out the post I did in Feb 2014 (PS I used slightly different sizes for this bow)
http://quietfirecreations.blogspot.ca/2014/02/a-smile-that-you-send-out-paper-bow.html

Step 1: ink stamp with various colors, mist with water and stamp. Repeat as necessary to create a large enough background. I stamped twice to create a piece 8.5"w x 3.5"h

Step 2: Sponge with same colors to create depth.
Step 3: Cut background paper 1"h x the various sizes (1 pce 6.5"w; 1pce 5.5"w & 1 pce 4.5"w)

Use your envelope punch to punch the notch in the middle of each piece. Turn each piece 180º and repeat. On the shortest piece also notch both ends to create the picot.
Use the corner round of the envelope punch to round the edges of the 2 longest strips to create what the image looks like.
PS if you don't have an envelope punch, using a square or rectangle punch to create your notches and a basic corner rounder punch for the ends will work as well, although it probably won't give you the same roundness to those center notches, but that gets hidden anyways with the center embellishment if large enough....
After punching the notches and corners etc, use a pencil or other round shape to massage your paper so it rolls nicely (similar to curling curling ribbon), to both longest pieces. Adhere the ends matching the notch shape of the longest strip, then do the same for the medium sized strip. Adhere both of these together at the center, then adhere these to the smallest strip. Voila, your bow is made. Adhere to your card and add a center embellishment.
Friday, March 18, 2016
With Sympathy - May Each Treasured Memory

Yogi here today. I used the sympathy die the other day, so it was still laying on my table... and then the Phoenix die is one of my newer dies that hasn't been put away yet... and you know the rest - one thing let to the next.
I'm using one of the "A WAY WITH WORDS dies from Elizabeth Craft Designs "With Sympathy" ("designed by Suzanne Cannon (also available HERE).
I'm also using a quote stamp on the inside "May Each Treasured Memory..." from Quietfire Design
Silhouette OnLine store: ("Butterfly Circle Frame")
I'm also using a quote stamp on the inside "May Each Treasured Memory..." from Quietfire Design
Silhouette OnLine store: ("Butterfly Circle Frame")
Side folded my brownish toned card and spliced on another piece to create a 7"w x 5"h card.
Inked the embossing folder (Cuttlebug Anna Griffin "Climbing Rose") using Distress "Ground Espresso", ran through e,bossing machine and then sponged "Antique Linen" all over, then used the Linen pad direct to paper to add depth. Trimmed down and adhered to front leaving a 1/8" border all around.
Adhered a piece of 1"h cream toned cardstock across the center, the width of my card. Adhered a piece of cream toned gauze ribbon.
Die cut 4 of the "Phoenix" shapes (Creative Expressions Sue Wilson Gemini Dies), sponged with "Wild Honey" on the flower, "Twisted Citron" on the leaves and "Mermaid Lagoon" on the scrolls. Adhered them together to create the frame and then fussy cut the excess overlap from the outer edges. Adhered to card front.
Die cut the "With Sympathy" (also available on Quietfire Design HERE) from white cardstock, inked with Versafine "Vintage Sepia" and embossed with Emerald Creek Hot Stuff "Burnt Copper Leaves" embossing powder. Adhered to card front. Final touch added white glitter enamel dots to the flower centers.
Inked the embossing folder (Cuttlebug Anna Griffin "Climbing Rose") using Distress "Ground Espresso", ran through e,bossing machine and then sponged "Antique Linen" all over, then used the Linen pad direct to paper to add depth. Trimmed down and adhered to front leaving a 1/8" border all around.
Adhered a piece of 1"h cream toned cardstock across the center, the width of my card. Adhered a piece of cream toned gauze ribbon.
Die cut 4 of the "Phoenix" shapes (Creative Expressions Sue Wilson Gemini Dies), sponged with "Wild Honey" on the flower, "Twisted Citron" on the leaves and "Mermaid Lagoon" on the scrolls. Adhered them together to create the frame and then fussy cut the excess overlap from the outer edges. Adhered to card front.
Die cut the "With Sympathy" (also available on Quietfire Design HERE) from white cardstock, inked with Versafine "Vintage Sepia" and embossed with Emerald Creek Hot Stuff "Burnt Copper Leaves" embossing powder. Adhered to card front. Final touch added white glitter enamel dots to the flower centers.
On the inside: stamped the quote ("May Each Treasured Memory...") using Distress Picket Fence pad, and embossing with white detail embossing powder.
Created an eCut file of the Peonies (Altenew), cut with my electronic cutter on CP watercolor paper (smooth side), stamped the Peonies then colored with Tombows, then spraying with Perfect Pearls "Perfect Pearls" mist. Adhered to inside.
The glittered butterflies are from eons ago eCut (Quietfire "Butterfly Circle Frame") from white cardstock colored with various distress colors and Stickles Dry Glitter "Star Dust" sprinkled on. (PS this eCut makes a ton of beautiful butterflies...)
Created an eCut file of the Peonies (Altenew), cut with my electronic cutter on CP watercolor paper (smooth side), stamped the Peonies then colored with Tombows, then spraying with Perfect Pearls "Perfect Pearls" mist. Adhered to inside.
The glittered butterflies are from eons ago eCut (Quietfire "Butterfly Circle Frame") from white cardstock colored with various distress colors and Stickles Dry Glitter "Star Dust" sprinkled on. (PS this eCut makes a ton of beautiful butterflies...)
As a final touch added the white gel pen faux stitched border.
Click on any image to enlarge. Enjoy

Subscribe to:
Posts (Atom)
