Thursday, November 12, 2020

2020 Christmas release

I am so excited about Suzanne's new Christmas release!  This release will be available online on the 15th but it may be available at your local store already. Els of Elizabeth Craft Designs did a live video showing the new release on Wednesday.  As always, they are super elegant and versatile - each die so beautiful on its own that you don't need much else but also fun to combine to make more elaborate cards.  I tend to go the clean and simple route but I do love wreaths for Christmas so here are two as clean a card as I can make with wreaths.

For my first card, I made a wreath by cutting the candy cane die set 7 times and rotating them around.  It looks rather complicated but by some selective coloring, this wreath is made with just that one die set.  


To keep the white of the candy cane clean, I die cut the backing of the candy cane with blue painters tape.  Tip: Place some painters tape on a piece of  Elizabeth Craft Design release paper to easily remove the tape.  Use the tape to mask the candy cane and use different shades of green distress oxide inks to color all the flourishes.  I went back later and added a darker shade with Copic makers to the portion of the flourishes that are right next to the candy cane to really make the candy canes pop.


In the center of a 4 3/4" x 4 3/4" white square, I sponged the same distress oxide inks and splattered some water over it.  After adding a red backing to each of the 7 candy canes, I placed them in a circle as best as I could.  I then used a piece of Press and Seal wrap to keep them in that same position.


I flipped it over and then added foam tape to the candy canes.


Using Press and Seal ensured that my wreath stayed round and well spaced.  Too often I get everything laid out just right only to mess it up when I lifted the pieces to glue them down.  


I added a die cut of Joy to the center using a black layer behind a gold layer and also a thin red matte on top of the white card base.


For my second card, I used a rainbow of the rounded leave sprig against a soft gray background.  Again I laid them around a penciled circle and once satisfied, I used that Press and Seal again.


I then flipped over the wreath and added glue.  To make the "Merry Christmas" stand out above such a colorful wreath, I stacked 5 layers of white die cuts.  I then traced the metal die on a sheet of vellum and fussy cut the vellum as a backing for the stacked die cuts.


I added the layer to a white card base to bring out the white of the Merry Christmas die.


Thank you for reading my long post!  Happy Christmas crafting!


Supplies used:
Supplies used:
Merry Christmas 4


Flourished Christmas Minis 3


Create A Wreath


Tuesday, November 10, 2020

New Christmas release from Elizabeth Craft Designs/You had me at ho ho ho

Hey Y'all!
Robyn here excited to share new Christmas Dies from 
Suzanne's a Way with Words
for Elizabeth Craft Designs.
The new dies are now shipping to stores and will be available online on the ECD site next week.

Get out your die cutter and cut a bunch of all the mini elements and you will find oodles of
inspiration for all your holiday card making and decorating!

Flourished Christmas Minis 3


Create a Wreath

Flourished tree

The border is created with ECD tape and Silk Microfine Glitter.
Clear Stamps


Watch this blog and ECD blog for a group reveal of all the new dies and lots of 
projects, support and inspiration.
Christmas Collection

Supplies
Please join us at
on Facebook


Comments and Questions warmly welcomed!


Christmas 2020 Dies from Elizabeth Craft Designs!


Flourishes and Foliage! Meet the 2020 Quietfire Christmas dies from Elizabeth Craft Designs.  They are available to store owners today and to individuals online at Elizabeth Craft Designs next week.

I'm so excited to share my brand new dies with you!  They are soooo versatile. You'll be able to mix and match and combine to your heart's content.  They can be combined with all the other Quietfire Design A Way With Words Christmas dies, too!

First is the Create a Wreath set which has holly leaves, pine branches, broad leaves and twigs as well as the berries.  Not only can you create the full wreath, you can make single type wreaths such as all holly, or all twig wreaths! How cool is that?  Included is a fun calligraphic bow you can use on all types of projects!

 
Next are the Christmas Accents. This set includes two smaller sized poinsettias which you can use as a feature in your projects or as an accent.  This set has two pine cones, one larger and one smaller.  Use them as a feature or an accent.  And of course, use them with the Create a Wreath dies, too!! 

We have a fun new set of Flourished Christmas Minis!  These are designed to fit inside the Love Joy Peace Christmas Ornament, but can be used on their own! There is a flourished gingerbread man, a flourished candy cane and a flourished gift. Combine them with the Create a Wreath dies and/or the Christmas Accents.  (Keep in mind, the gift doesn't need to be used for Christmas!)


Now here is a fun beauty!  The Flourished Christmas Tree. You can use this in so many way depending on how much you cut!  It comes with the star and ball ornaments. 

And what would an A Way With Words release be without a flourished word (or two!)?  Here is a new version of Merry Christmas, called Merry Christmas 4, which is surrounded in calligraphic flourishes and comes with a separate snowflake.
 

 Want to see a few projects made with these dies? Scroll down!
Make sure you keep tuned to this blog and our Facebook Page where you'll see lots more in the next few weeks!
I hope you love them as much as we do!
Thanks for dropping in.  Happy creating, Suzanne


Sunday, November 8, 2020

Autumn is the Hush...


Hello Quietfire fans!  Betsy on the blog here today.  I'll be sharing this
beautiful fall card using:


I was very inspired by this paper (from Honey Bee Stamps) and the color palette.  I knew
it would work perfectly with this quote!
Let me show you how I made my card!

I like to assemble all my parts first.


I die cut the vine and cut it in half.  I cut a panel
of the gray plaid that measures 1 1/2".  My leaf panel measures 4" x 5 1/4".
I cut the gray stripe paper bigger than I needed and heat embossed my
sentiment using Modern Gilding Powders in Kells Gold.


I trimmed that panel to a final size of 1 3/4" x 3 1/4".  I rounded the
corners of this panel.  I made a standard A2 size top folding card base
from gray card stock.  I adhered my flowered panel to it and also
the plaid piece.


I just love how these paper coordinate.  And I especially love the touches of blue
in the papers.  


I adhered my die cut vine pieces across the center of the plaid piece.  Then I adhered
my embossed sentiment panel in the center of that using foam tape.
As an embellishment I used Nuvo Crystal Drops in Blue Ice.  The color matched
perfectly!  And that finished my card!


I hope you enjoyed today's tutorial.  I love making autumn cards and I'm always
sad to see the beginning of winter!

You can find this stamp set at:


You'll find many Quietfire Design stamp sets and dies there!

Thank you so much for stopping by today!

Betsy


Friday, November 6, 2020

You Shine Slimline Card

 
Hey there!  It's Suzanne popping in with a super simple slimline card (why is it that I always want to type slimeline.....?).

I've made a similar card before using this washi tape, but never in a slimline format!

Supplies:

A Way With Words Thank You:  ECD

A Way With Words Shine ECD  |  ECreek

Wide washi tape (this one is from Altenew)
Cardstock
Glue Dots - Micro

Instructions:

  1. Form a tent-fold card base measuring 8.5 x 3.75" from any coloured cardstock. 
  2. Cut a piece of washi tape larger than the card front, apply it to the card front and trim.
  3. Die cut the "you" from Thank You and Shine from shiny foil cardstock and adhere to the card front with Glue Dots.
  4. Give to someone special!!

Of course you can do this with any patterned paper, but when you have this perfect galaxy washi tape, how can you resist?

Happy creating! Suzanne 


Monday, November 2, 2020

Step by step tutorial: Vintage Christmas card using Modern Gilding Powders


Hello Crafty Friends!

Are you a member of the Suzanne Cannon Fan Group on Facebook?  Every Sunday it is Show Me Sunday and this past Sunday I gave a sneak peek of this vintage holiday card.  It is easy to make and the results are stunning.  

The card features the lovely stamp: Have Yourself A Merry Little Christmas

The beautiful rubber stamp is available at Emerald Creek Craft Supplies.  Of course, Suzanne's gorgeous Modern Gilding Powders are available at Emerald Creek.  (They are also available at Simon Says Stamp.)  Today's card uses the yummy Celtic Mint Modern Gilding Powder.

Now, before we start the instructions, I wanted to tell you some exciting news: I have a new camera!  I took photos while I created the card...but my craft room is a little dark.  I do hope that you pardon my photos as I am still learning how to use my camera and I obviously work in a cave.  LOL.

Instructions:

1-  Use a watermark ink (such as Versamark) with stamp onto white card stock.  Heat emboss using Celtic Mint Gilding Powder.


2-  Pick out an oval die.  (I chose an ornate oval die.)  First die cut the stamped image, keep the die cut in the die and then dry emboss.  Leave the die cut in the die and apply a light vintage tan along the edges as shown.
3-  Die cut white card stock from a slightly larger oval die.  Apply watermark ink along edges and heat emboss using Celtic Mint.
4-  Next, pick some snowflakes from other Suzanne Cannon stamp sets (she has so many pretty snowflakes to choose from!).  Cut a piece of white card stock that will be matted onto your card base.  (my card base is 4.25 x 5.5 so I cut a piece of card stock to 4 x 5.25)  Use watermark ink and randomly stamp snowflakes along the outer edge.  Heat emboss using Celtic Mint.
5-  Apply the same vintage light tan ink along edges.
6-  Mount snowflake mat and then the larger oval onto the card base using double sided adhesive tape.
7-  Apply foam tape to the back of the stamped die cut and apply to card base.
8-  Adhere bow (I used hot glue) to top of card.  For extra detail, add either Glitter Drops, gems, or pearls to the rounds on the Christmas tree.

The vintage holiday card is complete!  I adore the soft Celtic Mint color and how easily it can be used to create a vintage style card.

I do hope you enjoyed the card!  Please feel free to share your take on this card on the Suzanne Cannon Fan Group!

Have a happy, crafty day.
Big Hugs,
Kathy Jo


Twinkle & Sparkle Gift Tin


Hey Quietfire Fans! For today's project I'm sharing with you myTwinkle & Sparkle Gift Tin. I combined a variety of dies, stamps and Modern Gilding Powder, which were all perfect for creating this gift tin. You'll want to grab a cup of your favourite beverage and learn how to recreate my Twinkle & Sparkle Gift Tin at home.

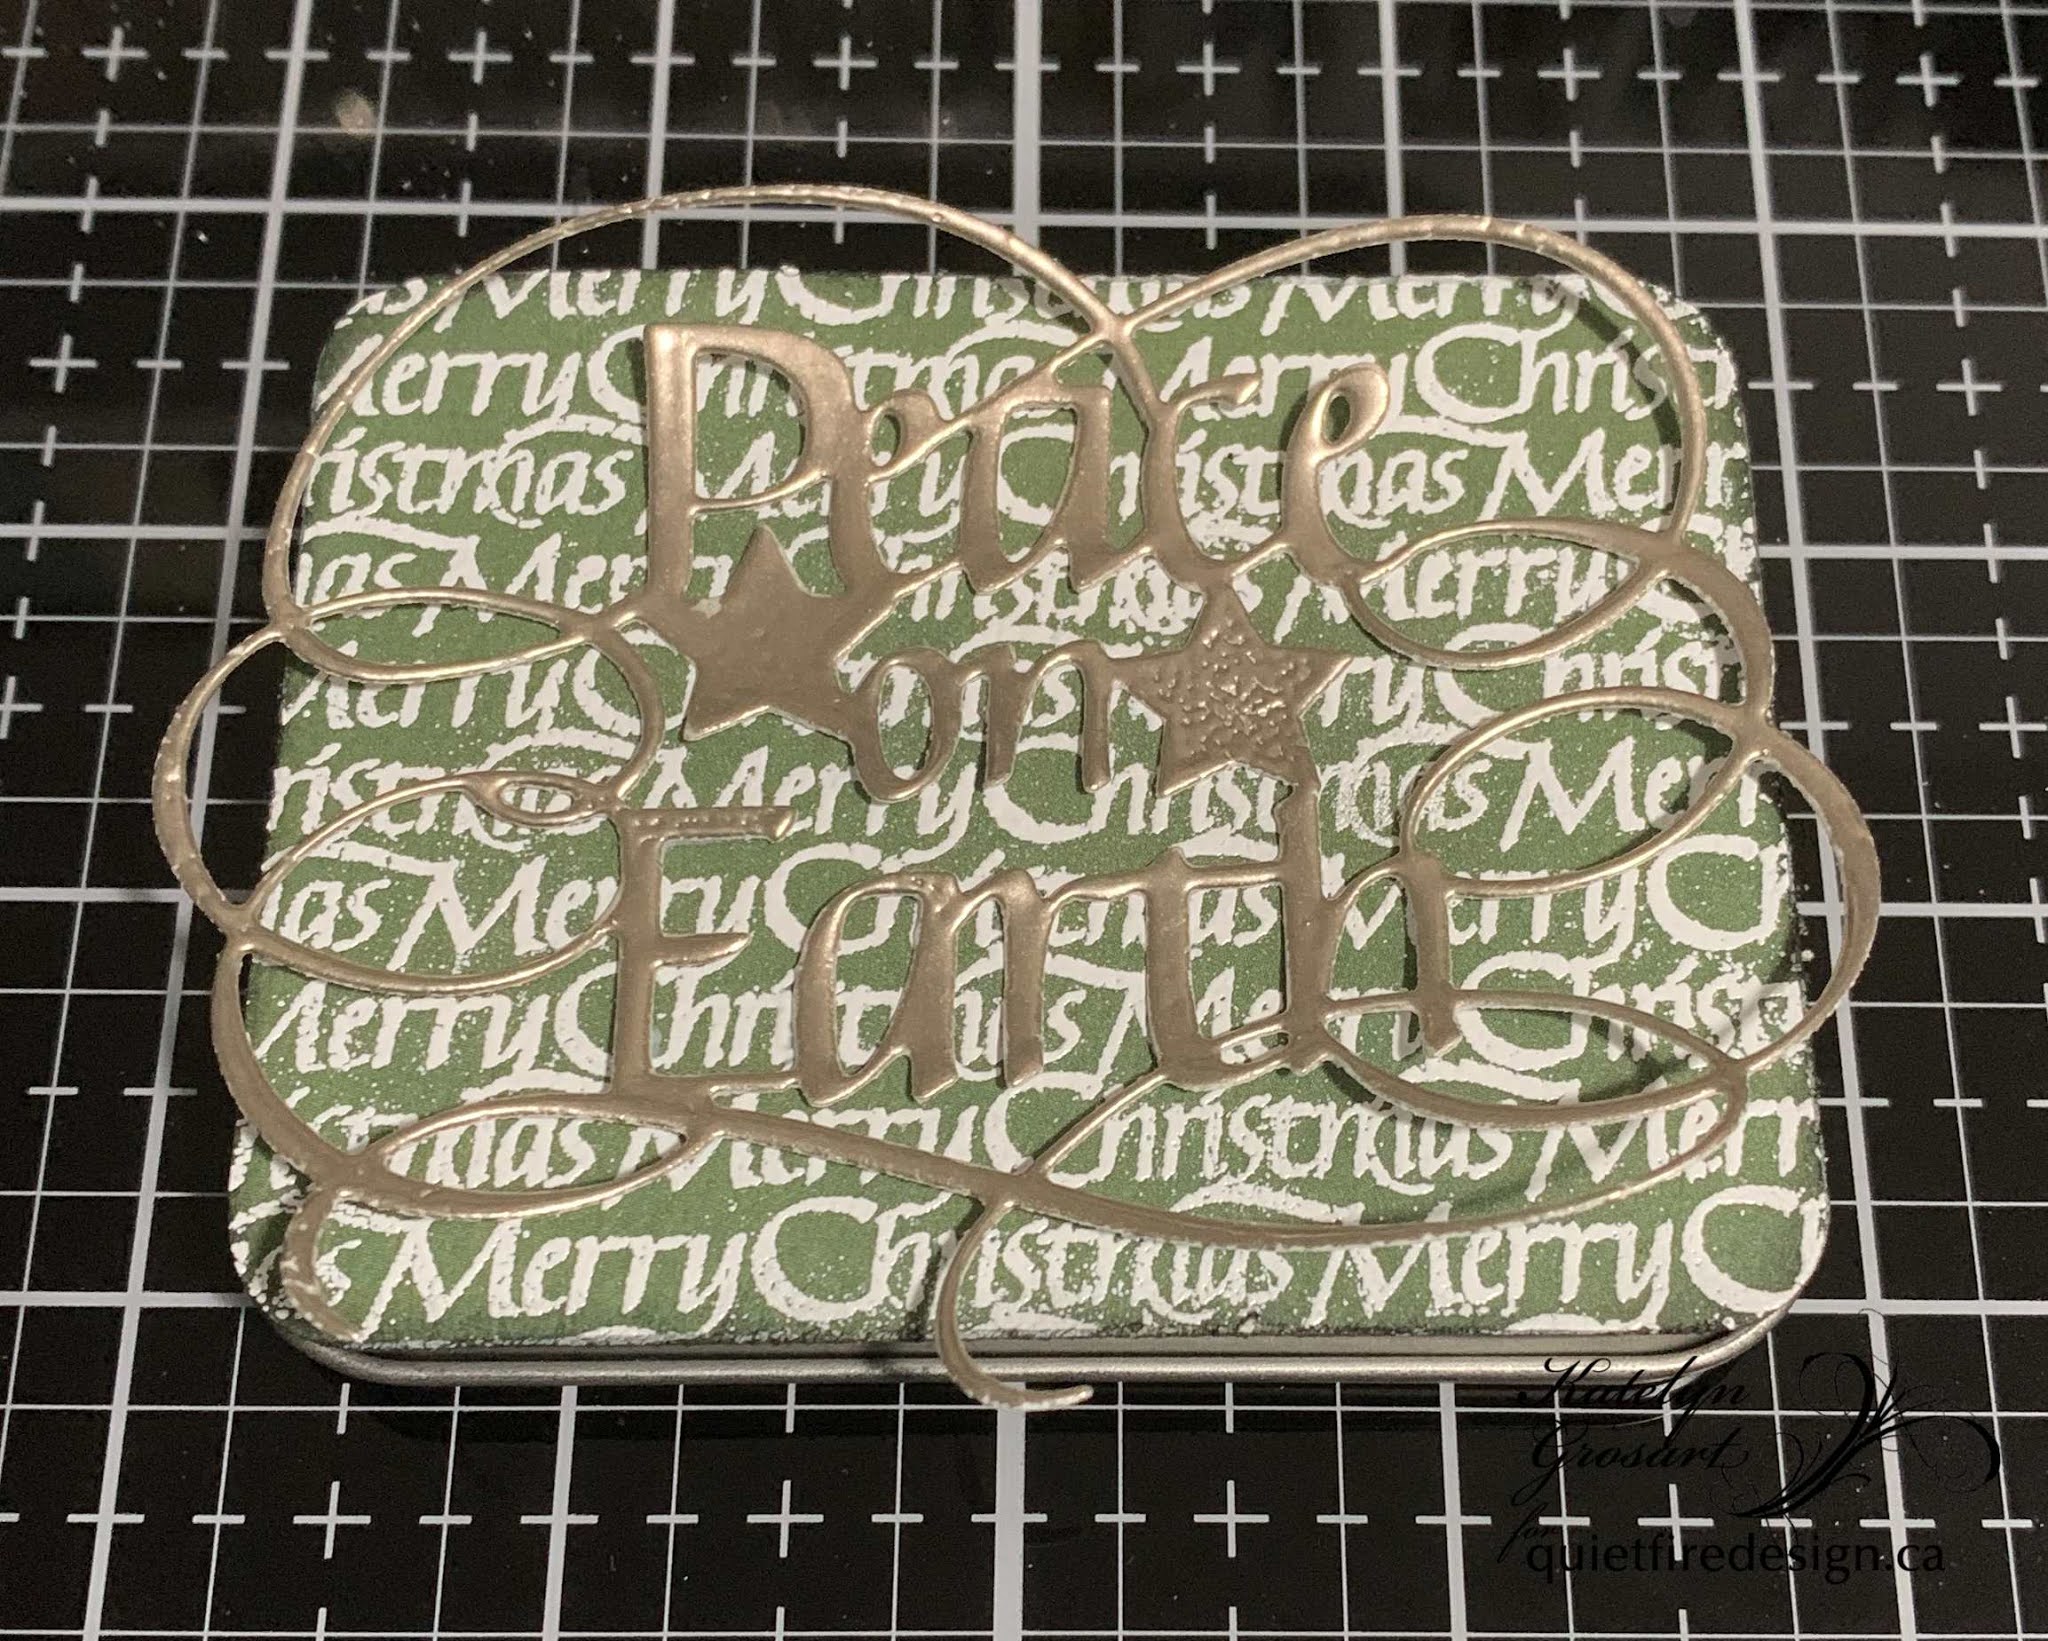
Cut a piece of green cardstock that measures 2 5/8" x 3 3/8". Round all four corners. Apply Emboss It Ink to the Merry Christmas Background and stamp onto the cardstock piece. Sprinkle White Gesso Modern Gilding Powder over the stamped area. Tap off the excess powder and emboss with a heat tool. Distress the edges of the cardstock piece. Ink the edges of the cardstock using Black Soot Distress Ink and a blending tool with foam.


Die cut the Peace on Earth out of white cardstock. Apply Emboss It Ink to the Peace on Earth. Sprinkle Forever Platinum Modern Gilding Powder over the entire surface. Tap off the excess powder and emboss with a heat tool.


On a piece of white cardstock, apply some Emboss It Ink. Sprinkle Kells Gold Modern Gilding Powder over the inked area. Tap off the excess powder. Emboss with a heat tool. Once the embossed area has cooled, die cut the stars from the Peace on Earth Die twice. You will need six of the stars. Ink the edges of all the stars using Black Soot Distress Ink and a blending tool with foam.


Apply Emboss It Ink to the Twinkle & Sparkle words from the Bright Holiday Words stamp set and stamp onto a piece of white cardstock. Sprinkle Copper Scroll Modern Gilding Powder over the stamped words. Tap off the excess powder and emboss with a heat tool. Fussy cut the words out. Ink the edges of the words using Black Soot Distress Ink and a blending tool with foam.


Choose a piece of Christmas patterned paper. Die cut a 2 1/4" Stitched Indented Square out of the patterned paper. Distress the edges of the square. Ink the edges of the square using Black Soot Distress Ink and a blending tool with foam.


You will need a metal tin that measures 3 1/2" x 2 3/4".


Adhere the Merry Christmas paper to the top of the tin. Adhere the Peace on Earth on top of the Merry Christmas paper.


Foam square the square to the middle of the Peace on Earth. Make sure to cover up the words. Foam square the Twinkle & Sparkle words to the middle of the square.


To finish the gift tin, adhere the six stars around the words as desired.


Here are a few closeup photos of the finished gift tin.


Here is the finished Twinkle & Sparkle Gift Tin.


Quietfire Design Supplies Used:


Other Supplies Used:

- Elizabeth Craft Designs: Stitched Indented Square
- Tim Holtz for Ranger Ink: Distress Ink - Black Soot and Blending Tool with Foam
- Ranger Ink: Emboss It Dabber
- Simple Stories: Simple Vintage North Pole Paper Pack
- Misc: White Cardstock, Green Cardstock and Metal Tin

Thanks so much for joining me today and I hope that I have inspired you to recreate your own version of my Twinkle & Sparkle Gift Tin at home.

- Katelyn


Related Posts Plugin for WordPress, Blogger...