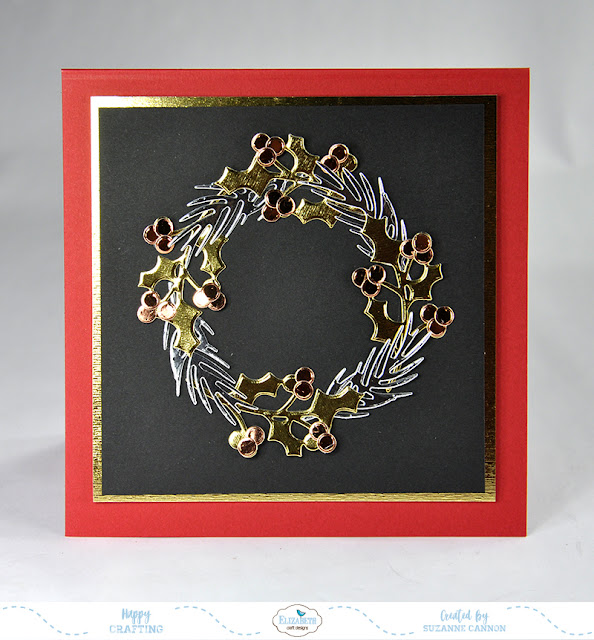
Hey Artlets! It's Suzanne here today with a gorgeous project using the new dies from the A Way With Words Christmas release from Elizabeth Craft Designs.
You know how you imagine a design in your head? Then you try to make it happen on paper and it never seems to be as cool? Well, for a change, I was delighted with this one!
Metallic foiled papers are really hard to photograph, so just image this in real life! What's even better about this project is that it's easy and quick to put together.
Here is how you can make it, too!
Supplies:
Create a Wreath
Clear Double Sided Adhesive
Fitted Circles
Gold foiled cardstock
Silver foiled cardstock
Rose Gold foiled cardstock
Black cardstock
Red cardstock
Glue Dots - Micro
Scrapbook Adhesives 3D Foam Squares
chalk pencil
Instructions:
- Die cut four pine boughs from silver cardstock. Die cut four holly boughs from gold cardstock. Die cut a whole bunch of berries from rose gold cardstock. Adhere the berries to the holly.
- Form a 6" square tent-fold card base from red cardstock.
- Use the 4th smallest circle from the Fitted Circles die set as a template and use a chalk pencil to trace the shape onto black cardstock. Cut the black cardstock into a square panel measuring 5" with the circle in the middle.
- Cut a slightly larger mat panel from gold cardstock and attach to the black.
- Lay out your foliage along the circle the way you want it. You can refer to the photo to help you. I like to use Glue Dots to attach the branches - just a couple are needed in case you want to move something. You can add more later.
- If any of the chalk circle is showing, just rub it off with your finger.
- Adhere the panels to the card base with 3D Foam Squares and you're done!
Great job! Pretty glitzy, huh?
Merry Christmas! Thanks for stopping by!
Suzanne


1 comment:
Simply gorgeous!
Post a Comment