Showing posts with label Butterflies/Dragonflies. Show all posts

Thursday, May 21, 2020

Look For The Dream Art Journal Page


Hey Quietfire Fans! For today's project I'm sharing with you my Look For The Dream Art Journal Page. By combining a variety of stamps, dies and the Modern Gilding Powders, they were perfect for creating my page. You'll want to grab a cup of your favourite beverage and learn how to recreate my Look For The Dream Art Journal Page at home.

To start, choose two pages in your art journal. Using a paintbrush, cover the two pages in a light coat of White Gesso. Once the gesso has dried, spritz Dylusions Spray Ink in Vibrant Turquoise, Fresh Lime and Lemon Zest on the two pages. Spritz the spray ink with water. Use a paper towel to remove the access ink. Allow the pages to dry.


With the pages dry, apply Emboss It Ink to the Grid Background stamp and stamp randomly six times on the right hand page. Reapply ink to the stamp as needed. Sprinkle Copper Scroll Modern Gilding Powder onto the stamped grid pattern. Tap off the excess powder and emboss with a heat tool. Apply Emboss It Ink to the Grid Background stamp and stamp randomly five times on the left hand page. Reapply ink to the stamp as needed. Sprinkle Copper Scroll Modern Gilding Powder onto the stamped grid pattern. Tap off the excess powder and emboss with a heat tool. 

Apply Emboss It Ink to the Leafy Acanthus Background stamp and stamp randomly seven times on the right hand page. Reapply ink to the stamp as needed. Sprinkle Forever Platinum Modern Gilding Powder onto the stamped leafy acanthus pattern. Tap off the excess powder and emboss with a heat tool. Apply Emboss It Ink to the Leafy Acanthus Background stamp and stamp randomly six times on the left hand page. Reapply ink to the stamp as needed. Sprinkle Forever Platinum Modern Gilding Powder onto the stamped leafy acanthus pattern. Tap off the excess powder and emboss with a heat tool. 


Apply Jet Black Archival Ink to the Grid Background and stamp onto a piece of Collage Paper. Reapply ink to the background stamp and stamp two more times on the same paper. Apply Jet Black Archival Ink to the Leafy Acanthus Background and stamp onto the same piece of collage paper. Reapply ink to the stamp and stamp onto the same piece of paper.


Tear up pieces of the Leafy Acanthus collage paper and the Grid Background paper. On the right hand page, adhere two pieces of Leafy Acanthus paper and one piece of Grid paper using a glue stick as desired on the page. On the left hand page, adhere one piece of Leafy Acanthus paper and two pieces of Grid paper using a glue stick as desired on the page. 

Using the Peacock Feathers Distress Crayon, rub crayon along the edges of both pages. To add some highlighting around the embossed areas and collage papers, rub Distress Crayon in Twisted Citron and Squeezed Lemonade as desired. 


Die cut a 2 1/2" Stitched Oval out of a piece of watercolour cardstock. Spritz Vibrant Turquoise, Fresh Lime and Lemon Zest onto the oval. Spritz the ink with water. Remove the excess ink with a piece of paper towel. Dry the oval with a heat tool. Apply Jet Black Archival Ink to the Look for the Dream stamp and stamp onto the middle of the oval. Apply Jet Black Archival Ink to the grid background and stamp randomly onto the oval as desired. Ink the edges of the oval using Black Soot Distress Ink and a blending tool with foam.


Die cut the Flourished Oval Frame out of black cardstock.


Apply Peacock Feathers Distress Ink to the medium Flourish Corner stamp from the Flourished Corners stamp set and stamp onto a piece of white cardstock. Reapply ink to the stamp and stamp on the same piece of cardstock. Apply Squeezed Lemonade Distress Ink to the medium Flourish Corner stamp and stamp onto the same piece of white cardstock. Reapply ink to the stamp and stamp on the same piece of cardstock. Fussy cut all four corners out. Ink the edges of all four corners using Black Soot Distress Ink and a blending tool with foam.


From the Flourished Frame die, die cut two scroll piece using black cardstock.


From the Butterfly Flourish die, die cut two small butterflies, one medium butterfly and one large butterfly out of white cardstock.


Apply Jet Black Archival Ink to the large dragonfly from the Butterflies/Dragonflies stamp set and stamp onto a piece of watercolour cardstock. Apply Emboss It Ink to the Dragonfly word from the same stamp set and stamp onto a piece of white cardstock. Colour the dragonfly in using Turquoise and Lime Scribble Sticks with a waterbrush. Sprinkle Forever Platinum Modern Gilding Powder over the word. Tap off the excess powder and emboss with a heat tool. Fussy cut the dragonfly and dragonfly word out. Ink the edges of the dragonfly and word out of Black Soot Distress Ink and a blending tool with foam.


Apply Jet Black Archival Ink to the Tea ring from the Tea & Thee stamp set and stamp onto a piece of white cardstock. Reapply ink to the stamp and stamp onto the same piece of white cardstock. Fussy cut both rings out. Remove the center from one of the rings as well as the knob. Ink the edges of the rings using Black Soot Distress Ink and a blending tool with foam.


Now we will start assembling the left hand page. Adhere the two scrolls 1/4" from the left and 2 1/2" from the top of the page. Adhere the peacock feathers corner 3/4" from the left and 1 1/4" from the top of the page. Adhere the squeezed lemonade corner 3" from the left and 1 5/8" from the bottom of the page.


Adhere the flourished oval frame to the oval. Foam square the oval 3/4" from the left and 1 5/8" from the top of the page. Adhere the medium butterfly to the bottom left side of the oval. Adhere one small butterfly to the right side of the oval. Adhere the remaining small butterfly to the right of the peacock feathers corner.


Now we will start assembling the right hand page. Adhere the peacock feathers corner 1" from the right and 1 3/4" from the bottom of the page. Adhere the squeezed lemonade corner 2 5/8" from the right and 1 3/8" from the top of the page. Adhere the large butterfly 2" from the right and 7/8" from the top of the page.


Foam square the tea ring that doesn't have the center cut out 1 1/8" from the right and 1 3/4" from the top of the page. Use adhesive and foam squares to adhere the other tea ring 1 1/2" from the right and 1 7/8" from the bottom of the page. Adhere the dragonfly to the middle of the tea rings. Use adhesive and foam squares to adhere the dragonfly word 1/2" from the right and 1 3/4" from the bottom of the page.


Here are a few closeup photos of the finished art journal page.


Here is the finished Look For The Dream Art Journal Page.


Quietfire Design Supplies Used:


Other Supplies Used:

- Tim Holtz for Ranger Ink: Distress Ink - Black Soot, Peacock Feathers & Squeezed Lemonade, Distress Crayon - Peacock Feathers, Squeezed Lemonade & Twisted Citron and Blending Tool with Foam
- Dylusions for Ranger Ink: Dylusions Ink Spray - Vibrant Turquoise, Fresh Lime and Lemon Zest
- Dina Wakley for Ranger Ink: White Gesso, Scribble Sticks Set #1 - Lime & Turquoise and Collage Paper
- Ranger Ink: Jet Black Archival Ink and Emboss It Dabber
- Elizabeth Craft Designs: Stitched Ovals
- Misc: Black Cardstock and White Cardstock

Thanks so much for joining me today and I hope that I've inspired you to recreate my Look For The Dream Art Journal Page.

- Katelyn


Monday, May 11, 2020

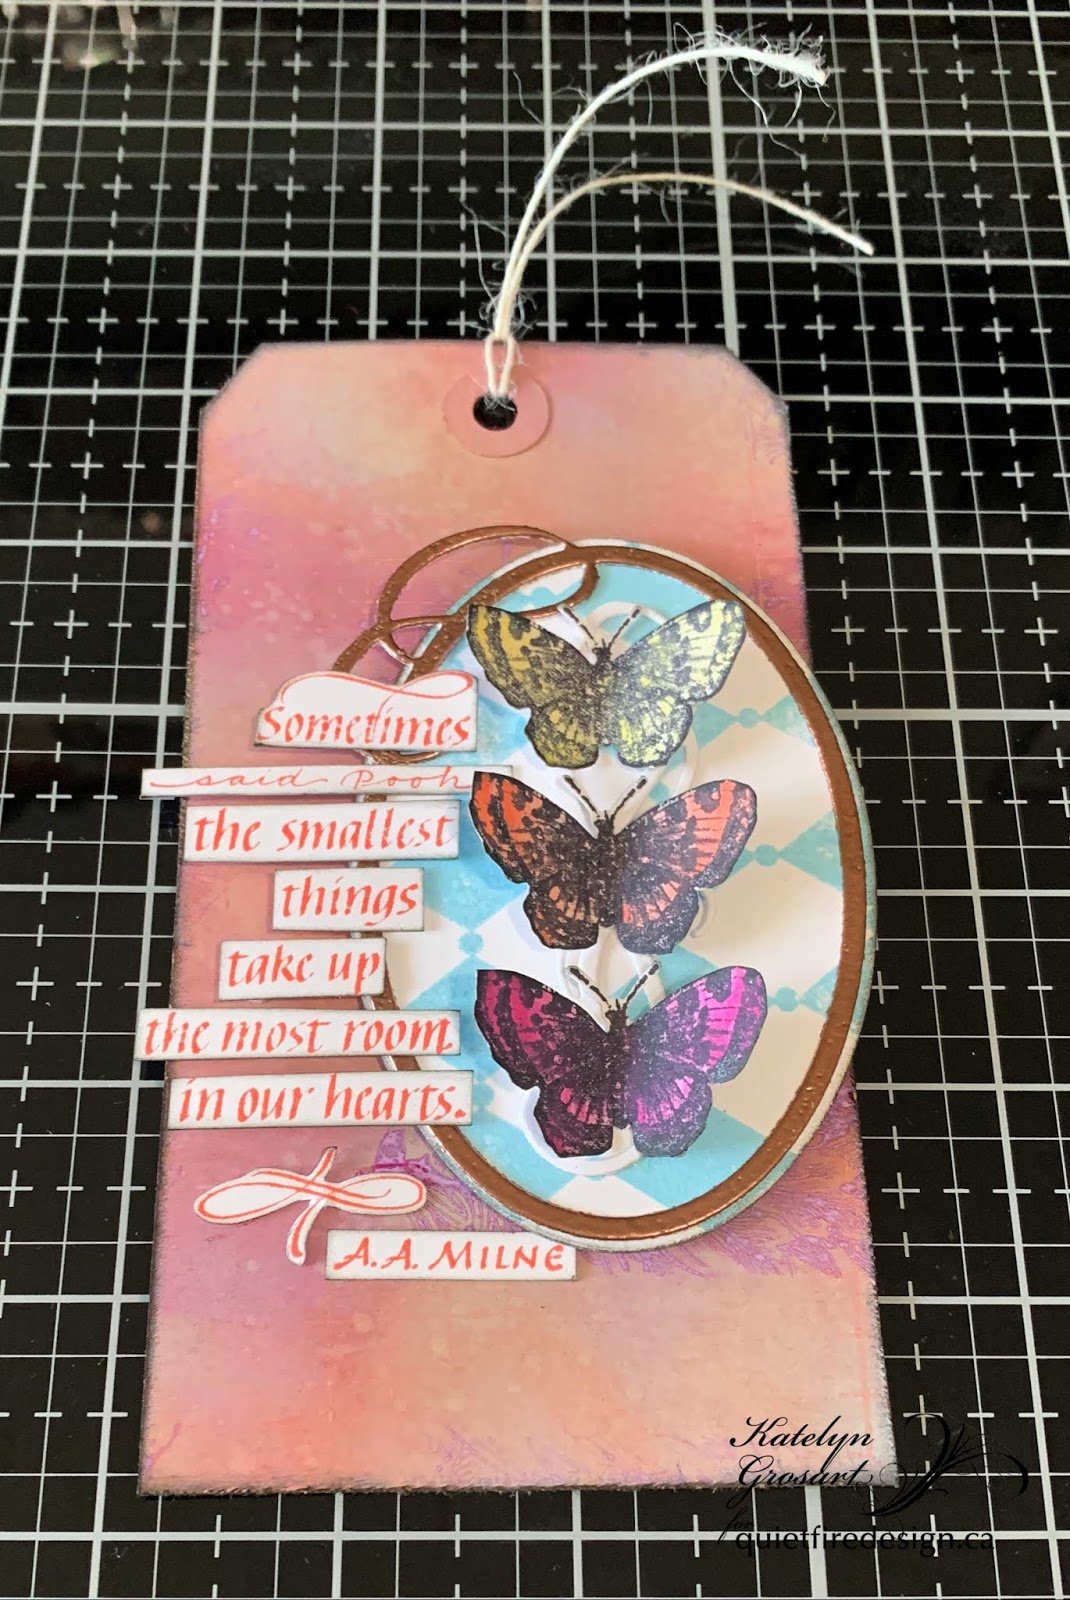
The Smallest Things Tag


Hey Quietfire Fans! For today's project I'm sharing with you my The Smallest Things Tag. By combining a variety of stamps, dies and the Modern Gilding Powders, they were all perfect for creating my tag. You'll want to grab a cup of your favourite beverage and learn how to recreate my The Smallest Things Tag at home.

To start, die cut a 2 1/2" Stitched Oval out of white cardstock. Apply Tumbled Glass Distress Oxide Ink to the Dotted Harlequin Background stamp and stamp onto the oval. Distress the edges of the oval. Ink the edges of the oval using Black Soot Distress Ink and a blending tool with foam.


From the Flourished Frame die, die cut the scroll out of white cardstock.


Die cut the Flourished Oval Frame out of white cardstock. Apply Emboss It Ink to the frame. Sprinkle Copper Scroll Modern Gilding Powder over the entire surface of the frame. Tap off the excess powder and emboss with a heat tool. 


Next, you'll need the small butterfly from the Butterflies/Dragonflies stamp set. Apply Jet Black Archival Ink to the small butterfly and stamp onto a piece of watercolour cardstock. Reapply ink to the stamp two more times and stamp onto the same piece of watercolour cardstock. Using a waterbrush and Seedless Preserves Distress Oxide Ink, colour in one of the butterflies. Using a waterbrush and Squeezed Lemonade Distress Oxide Ink, colour in a second butterfly. Using a waterbrush and Abandoned Coral Distress Oxide Ink, colour in the last butterfly. Fussy cut the butterflies out. Ink the edges of all three butterflies using Black Soot Distress Ink and a blending tool with foam. 


Apply Abandoned Coral Distress Oxide Ink to the Sometimes, Said Pooh stamp set and stamp onto a piece of white cardstock. Cut the quote into strips as desired. Ink the edges of the quote strips using Black Soot Distress Ink and a blending tool with foam.


Next, you'll need a tag that measures 3 1/8" x 6". Using a blending tool with foam, blend Squeezed Lemonade, Abandoned Coral, Seedless Preserves and Tumbled Glass Distress Oxide Ink over the entire surface of the tag. Spritz the tag with water. Dry the tag with a heat tool. 


Apply Abandoned Coral Distress Oxide Ink to the Grid Background stamp and stamp randomly seven times on the tag as desired. Reapply ink to the stamp as needed. Distress the edges of the tag. Ink the edges of the tag using Black Soot Distress Ink and a blending tool with foam.


Apply Seedless Preserves Distress Oxide Ink to the Leafy Acanthus Background stamp and stamp half of it on the right hand side of the tag. Reapply ink to the stamp and stamp randomly on the tag five times. 


Adhere the flourished oval frame to the stitched oval. Adhere the scroll to the middle of the stitched oval. Foam square the stitched oval slightly overtop of the leafy acanthus background. 


Adhere the three butterflies as desired overtop of the scroll.


Using adhesive and 3D foam squares to adhere the quote strips to the left side of oval as desired. To finish the tag, tie a piece of white twine through the top of the tag.


Here are a few closeup photos of the finished tag.


Here is the finished The Smallest Things Tag.


Quietfire Design Supplies Used:


Other Supplies Used:

- Tim Holtz for Ranger Ink: Distress Oxide Ink - Squeezed Lemonade, Seedless Preserves, Tumbled Glass & Abandoned Coral, Distress Ink - Black Soot and Blending Tool with Foam
- Ranger Ink: Emboss It Dabber
- Elizabeth Craft Designs: Stitched Ovals
- Misc: Tag, White Twine, White Cardstock and Watercolour Cardstock

Thanks so much for joining me today and I hope that I have inspired you to recreate my The Smallest Things Tag.

- Katelyn


Monday, March 16, 2020

The Real Voyage of Discovery Art Journal Page


Hey Quietfire Fans! I've been working in my art journal, so for today's project I'm sharing with you my The Real Voyage of Discovery Art Journal Page. By combining a variety of stamps, dies and the Modern Gilding Powders, they were all perfect for creating my page. You'll want to grab a cup of your favourite beverage and learn how to recreate my The Real Voyage of Discovery Art Journal Page at home.

To start, apply Jet Black Archival Ink to the small dragonfly from the Butterflies/Dragonflies stamp set and stamp onto a piece of watercolour cardstock. Reapply ink to the dragonfly two more times and stamp again onto the same piece of cardstock. Colour the three dragonflies using Scribble Sticks and a waterbrush. Once the dragonflies are coloured, fussy cut them out. Go over each dragonfly with the Clear Glitter Wink of Stella Pen. Ink the edges of the dragonflies using Black Soot Distress Ink and a blending tool with foam.


Die cut the Flourished Oval Frame out of black cardstock.


Die cut a 2 1/2" Stitched Oval out of white cardstock. Apply Emboss It Ink to the The Real Voyage stamp from the Every Day is a Journey Stamp Set and stamp onto the middle of the stitched oval. Sprinkle Gothic Black Modern Gilding Powder over the stamp quote. Tap off the excess powder and emboss with a heat tool. Ink the edges of the oval using Black Soot Distress Ink and a blending tool with foam.


For my art journal page, I used the 6x6 White Art Journal from Dina Wakley, but you can use which ever journal you'd like. Using a brayer and paint these colours from PaperArtsy's Fresco Finish Chalk Acrylics: Sage, Hint of Mint, Glacier Ice, Vintage Lace, Venice Blue and Spanish Mulberry I created my background. I brayered on each colour one at a time as desired. Allow the paint to dry before moving onto the next step. 


Still using the brayer, brayer PaperArtsy Fresco Finish Chalk Acrylic Paint in Snowflake onto the Grid Background Stamp. Stamp randomly on the page as desired. Reapply paint to the stamp as needed.


Place the Big Squovals Stencil from Dina Wakley or another stencil of your choosing onto the right hand side of the page. Using a blending tool with foam, blend Snowflake PaperArtsy Fresco Chalk Acrylic Paint through the stencil. Making sure you end up with three squovals.


Make a template out of a sticky note that will fit overtop of the squoval. Place the template onto the bottom squoval. Apply Stormy Sky Distress Ink to the Dotted Harlequin Background stamp and stamp on the bottom squoval. Move the stencil to the middle squoval. You may want to place a piece of scrap paper at the bottom of the template. Apply Victorian Velvet Distress Ink to the Leafy Acanthus Background stamp and stamp on the middle squoval. Move the stencil to the top squoval. You may want to place a piece of scrap paper at the bottom and top of the template. Apply Shabby Shutters Distress Ink to the Dotted Harlequin Background stamp and stamp on the top squoval. Dry the ink with a heat tool. Trace around the squovals using a black gel pen.


Rub Black Soot Distress Crayon along the edges of the page as desired. 


Adhere one of the dragonflies to each of the squovals.


Adhere the flourished oval frame to the stitched oval. Foam square the stitched oval 1 1/4" from the bottom and 1 3/4" from the right of the page. 


To finish the page and add some interest around the oval, I added three strips of washi tape to the top right side and bottom left side of the oval.


Here are a few closeup photos of the finished art journal page.


Here is the finished The Real Voyage of Discovery Art Journal Page.


Quietfire Design Supplies Used:


Other Supplies Used:

- Elizabeth Craft Designs: Stitched Oval
- Tim Holtz for Ranger Ink: Distress Crayon - Black Soot, Distress Ink - Black Soot, Stormy Sky, Victorian Velvet and Shabby Shutters and Blending Tool with Foam
- Dina Wakley for Ranger Ink: White Journal 6x6, Scribble Sticks 1&2, Big Squovals Stencil and Washi Tape Set #1
- Ranger Ink: Emboss It Ink and Jet Black Archival Ink
- PaperArtsy: Fresco Finish Chalk Acrylics: Snowflake, Sage, Hint of Mint, Glacier Ice, Vintage Lace, Venice Blue and Spanish Mulberry
- Wink of Stella - Clear Glitter Pen
- Misc: Black Cardstock, White Cardstock, Watercolour Cardstock and Black Gel Pen

Thanks so much for joining me today and I hope that I have inspired you to recreate your own version of my The Real Voyage Art Journal Page.

- Katelyn


Related Posts Plugin for WordPress, Blogger...