Showing posts with label leafy acanthus background. Show all posts

Monday, May 11, 2020

The Smallest Things Tag


Hey Quietfire Fans! For today's project I'm sharing with you my The Smallest Things Tag. By combining a variety of stamps, dies and the Modern Gilding Powders, they were all perfect for creating my tag. You'll want to grab a cup of your favourite beverage and learn how to recreate my The Smallest Things Tag at home.

To start, die cut a 2 1/2" Stitched Oval out of white cardstock. Apply Tumbled Glass Distress Oxide Ink to the Dotted Harlequin Background stamp and stamp onto the oval. Distress the edges of the oval. Ink the edges of the oval using Black Soot Distress Ink and a blending tool with foam.


From the Flourished Frame die, die cut the scroll out of white cardstock.


Die cut the Flourished Oval Frame out of white cardstock. Apply Emboss It Ink to the frame. Sprinkle Copper Scroll Modern Gilding Powder over the entire surface of the frame. Tap off the excess powder and emboss with a heat tool. 


Next, you'll need the small butterfly from the Butterflies/Dragonflies stamp set. Apply Jet Black Archival Ink to the small butterfly and stamp onto a piece of watercolour cardstock. Reapply ink to the stamp two more times and stamp onto the same piece of watercolour cardstock. Using a waterbrush and Seedless Preserves Distress Oxide Ink, colour in one of the butterflies. Using a waterbrush and Squeezed Lemonade Distress Oxide Ink, colour in a second butterfly. Using a waterbrush and Abandoned Coral Distress Oxide Ink, colour in the last butterfly. Fussy cut the butterflies out. Ink the edges of all three butterflies using Black Soot Distress Ink and a blending tool with foam. 


Apply Abandoned Coral Distress Oxide Ink to the Sometimes, Said Pooh stamp set and stamp onto a piece of white cardstock. Cut the quote into strips as desired. Ink the edges of the quote strips using Black Soot Distress Ink and a blending tool with foam.


Next, you'll need a tag that measures 3 1/8" x 6". Using a blending tool with foam, blend Squeezed Lemonade, Abandoned Coral, Seedless Preserves and Tumbled Glass Distress Oxide Ink over the entire surface of the tag. Spritz the tag with water. Dry the tag with a heat tool. 


Apply Abandoned Coral Distress Oxide Ink to the Grid Background stamp and stamp randomly seven times on the tag as desired. Reapply ink to the stamp as needed. Distress the edges of the tag. Ink the edges of the tag using Black Soot Distress Ink and a blending tool with foam.


Apply Seedless Preserves Distress Oxide Ink to the Leafy Acanthus Background stamp and stamp half of it on the right hand side of the tag. Reapply ink to the stamp and stamp randomly on the tag five times. 


Adhere the flourished oval frame to the stitched oval. Adhere the scroll to the middle of the stitched oval. Foam square the stitched oval slightly overtop of the leafy acanthus background. 


Adhere the three butterflies as desired overtop of the scroll.


Using adhesive and 3D foam squares to adhere the quote strips to the left side of oval as desired. To finish the tag, tie a piece of white twine through the top of the tag.
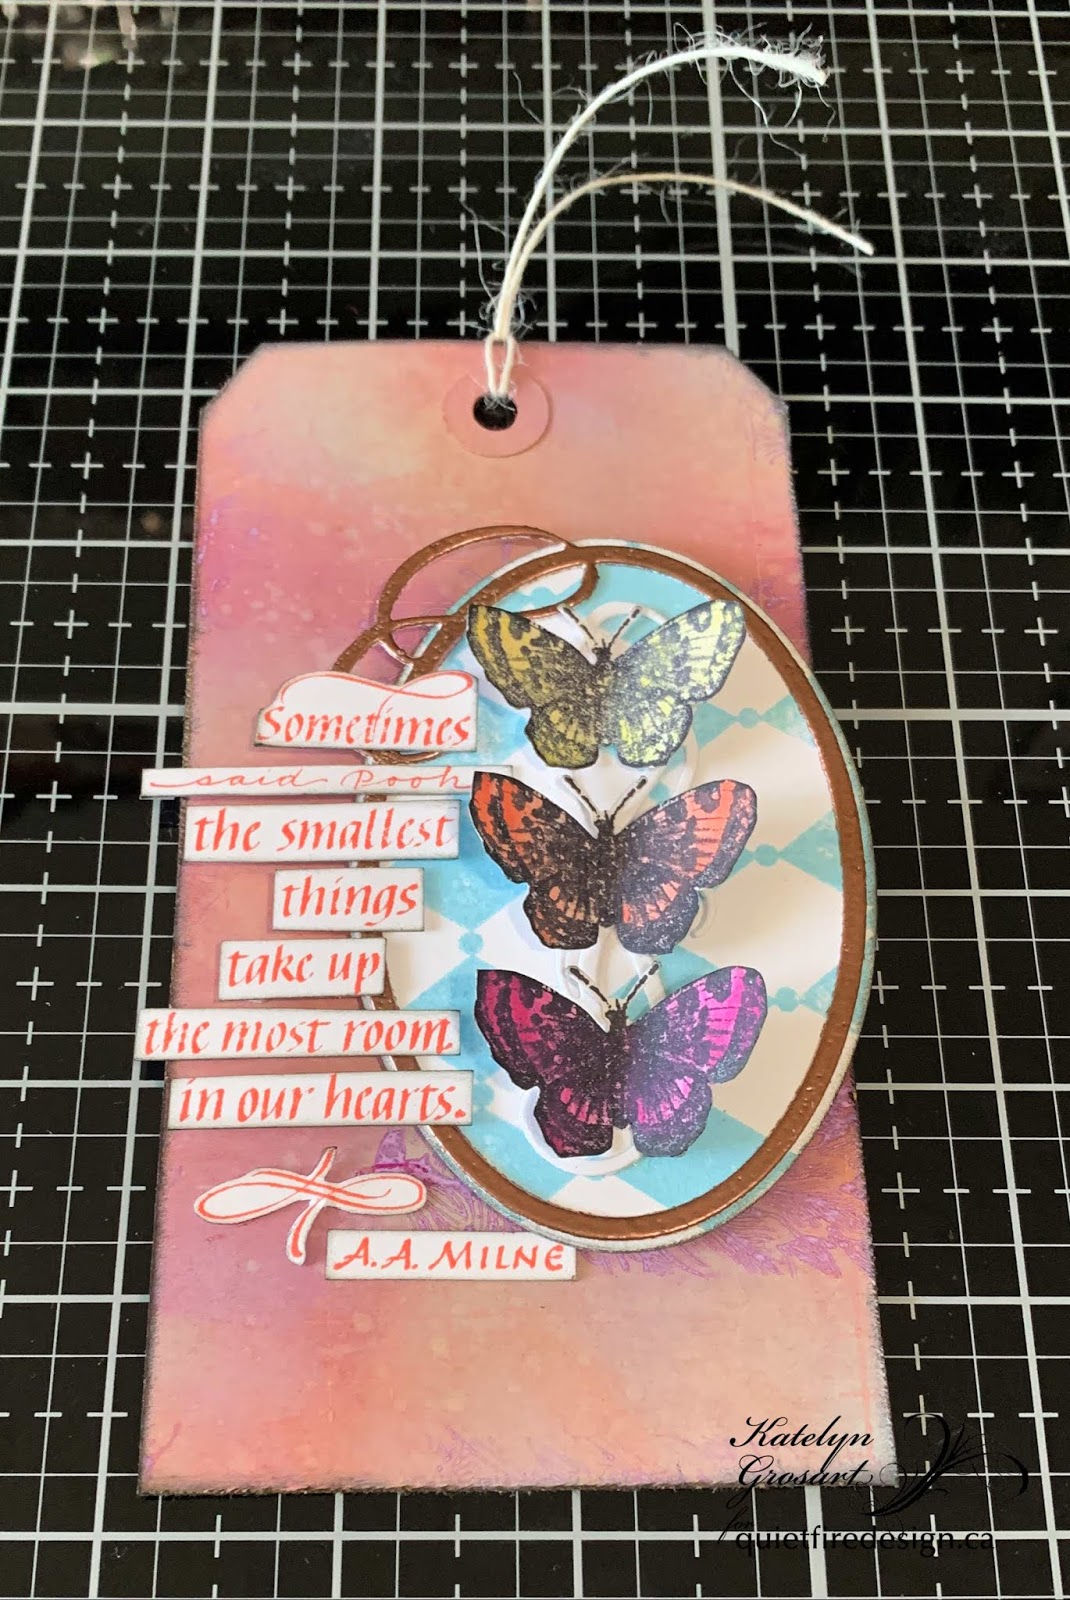

Here are a few closeup photos of the finished tag.


Here is the finished The Smallest Things Tag.


Quietfire Design Supplies Used:


Other Supplies Used:

- Tim Holtz for Ranger Ink: Distress Oxide Ink - Squeezed Lemonade, Seedless Preserves, Tumbled Glass & Abandoned Coral, Distress Ink - Black Soot and Blending Tool with Foam
- Ranger Ink: Emboss It Dabber
- Elizabeth Craft Designs: Stitched Ovals
- Misc: Tag, White Twine, White Cardstock and Watercolour Cardstock

Thanks so much for joining me today and I hope that I have inspired you to recreate my The Smallest Things Tag.

- Katelyn


Tuesday, April 28, 2020

Everyday is a Journey Notecard


Hey Quietfire Fans! For today's project I'm sharing with you my Everyday is a Journey Notecard. By combining a variety of stamps, dies and the new Modern Gilding Powders, they were all perfect for creating my notecard. You'll want to grab a cup of your favourite beverage and learn how to recreate my Everyday is a Journey Notecard at home.

To start, die cut a 3 1/2" Stitched Rectangle out of white cardstock. Apply VersaMark Ink to the Leafy Acanthus Background stamp and stamp on the right side of the rectangle. Reapply ink to the stamp and stamp on the left hand side of the rectangle. If the background doesn't match up completely, it's okay as there will be other elements layered up on the card. Ink the edges of the rectangle using Black Soot Distress Ink and a blending tool with foam.


Die cut a 2 1/2" Stitched Rectangle out of a piece of book page. Ink the edges of the rectangle using Black Soot Distress Ink and a blending tool with foam.


Die cut a 2" Stitched Rectangle out of white cardstock. Apply VersaMark Ink to the "Everyday is a journey" quote and stamp in the middle of the rectangle. Sprinkle Armenian Pink Modern Gilding Powder over the stamped image. Tap off the excess powder and emboss with a heat tool. Ink the edges of the rectangle using Black Soot Distress Ink and a blending tool with foam.


Die cut the Flourished Oval Frame out of white cardstock. Apply VersaMark Ink to the frame. Sprinkle Celtic Mint Modern Gilding Powder over the entire surface of the frame. Tap off the excess powder and emboss with a heat tool. 


Apply VersaMark Ink to a piece of white cardstock. Sprinkle Dilly Dilly Lavender Modern Gilding Powder. Tap off the excess powder and emboss with a heat tool. Die cut the butterflies from the Butterflies and Stars Spray out of the embossed paper. Apply VersaMark Ink to another piece of white cardstock. Sprinkle Armenian Pink Modern Gilding Powder. Tap off the excess powder and emboss with a heat tool. Die cut the butterflies from the Butterflies and Stars Spray out of the embossed paper. You'll need a total of three purple butterflies and two pink butterflies.


Adhere the 2" stitched rectangle to the 2 1/2" stitched rectangle. Foam square the 2 1/2" rectangle to the middle of the 3 1/2" stitched rectangle.


Adhere the Flourished Oval Frame to the middle of the 2 1/2" rectangle.


In the top right corner of the frame, adhere two purple butterflies and one pink butterfly. In the bottom left side of the frame, adhere one purple butterfly and one pink butterfly.

To finish the card, cut a cardbase out of white cardstock that measures 3 1/2" x 9 1/2", score at 4 3/4". Adhere the cardfront to the cardbase.


Here are a few closeup photos of the finished notecard.


Here is the finished Everyday is a Journey Notecard.


Quietfire Design Supplies Used:


Other Supplies Used:

- Elizabeth Craft Designs: Stitched Rectangles
- Imagine Crafts: VersaMark Ink
- Tim Holtz for Ranger Ink: Distress Ink - Black Soot and Blending Tool with Foam
- Misc: Book page and White Cardstock

Thanks so much for joining me today and I hope that I have inspired you to recreate your own version of my Everyday is a Journey Notecard.

- Katelyn


Monday, March 16, 2020

The Real Voyage of Discovery Art Journal Page


Hey Quietfire Fans! I've been working in my art journal, so for today's project I'm sharing with you my The Real Voyage of Discovery Art Journal Page. By combining a variety of stamps, dies and the Modern Gilding Powders, they were all perfect for creating my page. You'll want to grab a cup of your favourite beverage and learn how to recreate my The Real Voyage of Discovery Art Journal Page at home.

To start, apply Jet Black Archival Ink to the small dragonfly from the Butterflies/Dragonflies stamp set and stamp onto a piece of watercolour cardstock. Reapply ink to the dragonfly two more times and stamp again onto the same piece of cardstock. Colour the three dragonflies using Scribble Sticks and a waterbrush. Once the dragonflies are coloured, fussy cut them out. Go over each dragonfly with the Clear Glitter Wink of Stella Pen. Ink the edges of the dragonflies using Black Soot Distress Ink and a blending tool with foam.


Die cut the Flourished Oval Frame out of black cardstock.


Die cut a 2 1/2" Stitched Oval out of white cardstock. Apply Emboss It Ink to the The Real Voyage stamp from the Every Day is a Journey Stamp Set and stamp onto the middle of the stitched oval. Sprinkle Gothic Black Modern Gilding Powder over the stamp quote. Tap off the excess powder and emboss with a heat tool. Ink the edges of the oval using Black Soot Distress Ink and a blending tool with foam.


For my art journal page, I used the 6x6 White Art Journal from Dina Wakley, but you can use which ever journal you'd like. Using a brayer and paint these colours from PaperArtsy's Fresco Finish Chalk Acrylics: Sage, Hint of Mint, Glacier Ice, Vintage Lace, Venice Blue and Spanish Mulberry I created my background. I brayered on each colour one at a time as desired. Allow the paint to dry before moving onto the next step. 


Still using the brayer, brayer PaperArtsy Fresco Finish Chalk Acrylic Paint in Snowflake onto the Grid Background Stamp. Stamp randomly on the page as desired. Reapply paint to the stamp as needed.


Place the Big Squovals Stencil from Dina Wakley or another stencil of your choosing onto the right hand side of the page. Using a blending tool with foam, blend Snowflake PaperArtsy Fresco Chalk Acrylic Paint through the stencil. Making sure you end up with three squovals.


Make a template out of a sticky note that will fit overtop of the squoval. Place the template onto the bottom squoval. Apply Stormy Sky Distress Ink to the Dotted Harlequin Background stamp and stamp on the bottom squoval. Move the stencil to the middle squoval. You may want to place a piece of scrap paper at the bottom of the template. Apply Victorian Velvet Distress Ink to the Leafy Acanthus Background stamp and stamp on the middle squoval. Move the stencil to the top squoval. You may want to place a piece of scrap paper at the bottom and top of the template. Apply Shabby Shutters Distress Ink to the Dotted Harlequin Background stamp and stamp on the top squoval. Dry the ink with a heat tool. Trace around the squovals using a black gel pen.


Rub Black Soot Distress Crayon along the edges of the page as desired. 


Adhere one of the dragonflies to each of the squovals.


Adhere the flourished oval frame to the stitched oval. Foam square the stitched oval 1 1/4" from the bottom and 1 3/4" from the right of the page. 


To finish the page and add some interest around the oval, I added three strips of washi tape to the top right side and bottom left side of the oval.


Here are a few closeup photos of the finished art journal page.


Here is the finished The Real Voyage of Discovery Art Journal Page.


Quietfire Design Supplies Used:


Other Supplies Used:

- Elizabeth Craft Designs: Stitched Oval
- Tim Holtz for Ranger Ink: Distress Crayon - Black Soot, Distress Ink - Black Soot, Stormy Sky, Victorian Velvet and Shabby Shutters and Blending Tool with Foam
- Dina Wakley for Ranger Ink: White Journal 6x6, Scribble Sticks 1&2, Big Squovals Stencil and Washi Tape Set #1
- Ranger Ink: Emboss It Ink and Jet Black Archival Ink
- PaperArtsy: Fresco Finish Chalk Acrylics: Snowflake, Sage, Hint of Mint, Glacier Ice, Vintage Lace, Venice Blue and Spanish Mulberry
- Wink of Stella - Clear Glitter Pen
- Misc: Black Cardstock, White Cardstock, Watercolour Cardstock and Black Gel Pen

Thanks so much for joining me today and I hope that I have inspired you to recreate your own version of my The Real Voyage Art Journal Page.

- Katelyn


Thursday, October 10, 2019

Trick or Treat Tag


Hey Quietfire Fans! Halloween is only 21 days away and I'm excited to be back on the blog as I've created this spooky Trick or Treat Tag. By combining a variety of stamps as well as dies from A Way With Words, they were the perfect for my tag. You'll want to grab a cup of your favourite fall beverage and learn how to recreate my tag at home.

To start, you'll need the Something Wicked stamp set. Apply Jet Black Archival Ink to the Trick or Treat sentiment and stamp onto a piece of white cardstock. Apply Jet Black Archival Ink to the tree and stamp onto the same piece of white cardstock. Reapply ink to the tree and stamp again on the same piece of white cardstock. Apply Jet Black Archival Ink to the Bat stamp and stamp onto the same piece of white cardstock. You'll need to repeat the previous step three more times. Fussy cut the trees, sentiment and seven trees out. Ink the edges of the trees, sentiment and seven trees using Black Soot Distress Ink and a blending tool with foam.


Next, you'll need a #8 Distress Tag. Using a blending tool with foam, blend Carved Pumpkin, Twisted Citron and Wilted Violet Distress Oxide Ink. Spritz the tag with water. Dry the tag with a heat tool.


Apply Emboss It Ink to the Leafy Acanthus Background stamp and stamp on the right hand side of the tag. Sprinkle Gothic Black Modern Gilding Powder overtop of the stamped image. Tap off the excess powder and emboss with a heat tool. Apply Wilted Violet Distress Oxide Ink to the Crackle Background stamp and stamp randomly on the tag. Reapply ink to the stamp as needed. Apply Twisted Citron Distress Oxide Ink to the Crackle Background stamp and stamp randomly on the tag. Dry the tag.


The tag was missing something, so I applied Emboss It Ink to the Leafy Acanthus Background and stamp randomly on the edges of the tag. Sprinkle Gothic Black Modern Gilding Powder over top of the stamped image. Tap off the excess powder and emboss with a heat tool. 


Die cut a 2 1/2" Stitched Oval out of White Cardstock. Using a blending tool with foam, blend Carved Pumpkin and Twisted Citron Distress Oxide Ink over the entire surface of the oval. Spritz the oval with water. Dry the oval with a heat tool. Apply Wilted Violet Distress Oxide Ink to the Crackle Background stamp and stamp randomly on the oval. Reapply ink to the stamp as needed. Apply Twisted Citron Distress Oxide Ink to the Crackle Background stamp and stamp randomly on the oval. Dry the oval.


Die cut the Flourished Oval Frame out of white cardstock. Apply Emboss It Ink to the frame and sprinkle Gothic Black Modern Gilding Powder. Tap off the excess powder and emboss with a heat tool. 


Distress the edges of the tag and oval. Ink the edges of the tag and oval using Black Soot Distress Ink and a blending tool with foam.


Adhere the Flourished Frame to the oval. Use foam squares to adhere the oval to the middle of the tag.


Adhere one tree to the top right side of the oval. Adhere the other tree to the bottom left side of the oval. Foam square the Trick or Treat sentiment to the middle of the tag.


Adhere the seven bats as desired onto the tag. To finish the tag, tie a piece of black twine to the top of the tag.


Here are a few closeup photos of the finished tag.


Here is the finished Trick or Treat Tag.


Quietfire Design Supplies Used:


Other Supplies Used:

- Elizabeth Craft Designs: Stitched Ovals
- Ranger Ink: Jet Black Archival Ink and Emboss It Dabber
- Tim Holtz for Ranger Ink: Black Soot Distress Ink, Distress Oxide Ink - Carved Pumpkin, Twisted Citron & Wilted Violet, Distress Sprayer, Distress Tags #8 and a Blending Tool with Foam
- Misc: White Cardstock and Black Twine

Thanks so much for joining me today and I hope that I have inspired you to recreate your own version of my Trick or Treat Tag!

- Katelyn


Related Posts Plugin for WordPress, Blogger...