Showing posts with label I don't tell you enough set. Show all posts

Monday, July 24, 2017

Beautiful You - I Don't Tell You - Stamped Die Cut Technique

    
Yogi Here today with a stamped die cut technique. A Crafting friend pointed me to one of Jennifer McGuire's recent uTube videos - Stamping on die cuts, so I decided to try it right away.

I'm using a couple of an A Way With Words die "Amazing Beautiful" 2pce set and "Wishing You a" 3pce set from Elizabeth Craft Designs, also available on Quietfire Design HERE and HERE

And I'm using a sentiment stamp set from Quietfire Design ("I Don't Tell You Often Enough" 5pce set); 


Scored and folded my pink toned cardstock to create the easel (7"w x 5"h easel closed). Cut another piece same size as front and adhered.

Created my stamped background and the stamped die cut layer (see pics and instructions below).

Trimmed down my background to 7"w x 5"h, then punched around the sides using an EK Success "English Ivy" border punch. I positioned the punch in the center of a side and worked the punch to the left and then to the right. Repeated on the opposite side. Then continued on the other 2 sides, stopping before it hit the edge. Manually trimmed down the corners. Adhered to front.


On the floor: Embossed a piece of white cardstock using the Cuttlebug "Happy Birthday" embossing folder. Hit the high points direct to paper with "Spun Sugar". Trimmed down to size.

Stamped the sentiments on another piece of white cardstock using Versafine Black Onyx and clear embossed. Die cut it and the pink layer using Elizabeth Craft Designs "Stitched Rectangle" set. Adhered both layers together.

Adhered a piece of narrow blue satin ribbon to the Birthday
embossed piece, then adhered the sentiment assembly. Adhered all this to the floor with 3D foam tape to act as my stopper.

Tied a bow and adhered with  hot glue. Adhered some heart/pearl rhinestone to the ribbon.


DIE STAMPING TECHNIQUE:

Using my Misti (so that I could register my images for the die cutting and assembly) and the Penny Black "Magnolia Rhapsody" stamp. Inked the stamp using Distress mini pads - "Picked Raspberry" all over the flowers and buds,  "Wilted Violet" flicked on the base of the flowers and buds, then hit here and there on the flowers and buds with "Fossilized Amber".

All over the leaves and branches with "Mowed Lawn", here and there on the leaves with "Forest Moss" and here and there on the branches with "Ground Espresso". Misted with water and stamped onto white cardstock.

Repeated the process to stamp on another piece of white cardstock.

Placed the 2 dies on a desirable area of one of the stamping and die cut piees. (that's the above image)

You'll notice that some of that image has the background colored... I experimented on it to pick my blue watercolor for the background.


I filled a waterbrush with water and some of that blue color. Squeezed some out while painting around my stamped image to get a nice wet on wet technique. I also picked up some of the blue paint to add intensity is some areas, blending and moving the color around. I purposely touched part of the stamped image which became activated with the wetness giving a diffused edge. Allowed my background to dry.
I die cut 2 more layers of the words from white cardstock and adhered them to the stamped die cut (adds height to my words). Used the negative die cut piece aligned with my painted background piece to position my die cut words to fall exactly on the correct area of the  stamped image. Glued them down. Used a pencil and then a Zig Writer to shadow the letters on the bottom and right side of each letter.

Click on any card image to enlarge. Enjoy 


Tuesday, January 24, 2017

You are the best!


Hello everyone,
Yvonne here sharing a new card using Quietfire Design's stampset "I don't tell you enough"(a set of 5 stamps).


The card is really simple to make.
  • Fold a white cardbase and layer with grey cardstock.
  • Then glue upon a piece of  blue embossed cardstock and white cardstock.
  • Stamp the Quietfire Design sentiment upon the white cardstock using a black inkpad.
  • die-cut a silver border and glue upon the card.
  • Finish the card with cotton lace, mulberry flowers and leaves, ribbon and self-adheisive pearls.

I hope my card is inspration to create your own beautiful Quietfire Design card.
Thanks so much for stopping by.

With hugs from Holland,
Yvonne

Tuesday, July 5, 2016

I am Thankful for all You do....


Hello everyone,
Yvonne here with a card which is about saying "thank you".
Sometimes the littlest things in life can mean the world to me and thus are Big things to be thankful for :-)
This card is made with such a special person in mind....

For my card I used a stamp from the the Quietfire Design set "I don't tell you enough" (a set of 5 stamps).

Used materials:

I hope you like the card and hope to have inspired you to make a card for a special person in your life.

Thanks so much for stopping by
and with hugs from Holland,
Yvonne


Thursday, June 9, 2016

The new Crackle Backround stamp

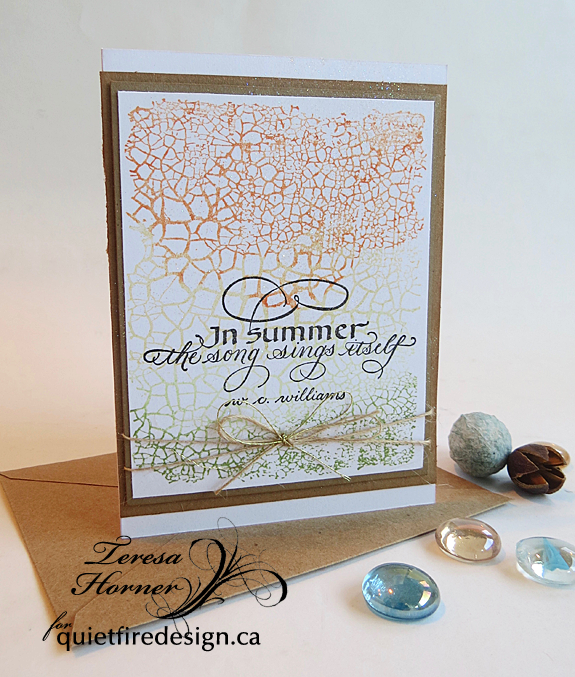
Hi everyone and welcome to our blog today on this beautiful Thursday.  We are all sharing lots of ideas using the new release of stamps that you can find on the Queitfire blog here.   There are so many beautiful ones i had a hard time choosing but the new crackle stamp really caught my eye so i grabbed a handful of inks and set out to create something fun with it and 2 new other stamps.


Watercoloring is all the rage again so i thought i would try and use different colors and stamps to show the versatility of this new Crackle backround stamp and create a watercolor effect.  I used Tsukineko inks in green, yellow,  and orange to give it a bright and warm summer effect. And i made sure that I didn't press hard in the yellow area so that it would out more muted and was a better color to stamp the In Summer stamp in black.  I just used simple kraft cardstock and matted it and then adhered it to a white card with a little twine i had in my stash.  I really love this new crackle stamp and i hope you will get a chance to try one too.


For this one i used a whole different palette of colors and then matted it in some of the same bright solids to make it pop.  I wanted it to be a little glittery so i sprayed on some pixie dust in a spritzer bottle.  The stamp is from one of the brand new sets called "I don't tell you often enough" and it too has lots of other words to use that would be perfect on their own or with one of the new dies.


Here is a closeup of the crackle card and the stamp is below.  Imagine how much fun you can have with embossing powders or even use a little paint and stamp it on wood.  Guess that's another project i will have to do and share.. Oh and if you love the stamp---You can find it to order here.


Thanks so much for stopping over and have fun creating something beautiful today!!  Teresa

Related Posts Plugin for WordPress, Blogger...