Showing posts with label silhouette cameo. Show all posts

Thursday, January 10, 2019

The Love We Give Away Mixed Media Card


Hello!!!  I hope you are doing well.  Today I have a fun card to share with you.  

I cut a stencil from heavy cardstock using the digital cut file, Hearts Background.  I'll use this "cardstock" stencil as much as I can and then I'll cut it up to use in projects.  Fun!!!


Onto a piece of watercolor paper cut to 4 1/4" x 6" I added Texture Paste Opaque Matte through the stencil.  After removing the stencil from the watercolor paper I scraped all excess paste off the cardstock stencil and then just left it to dry.


After allowing the paste to dry completely on my watercolor panel, I added color by dripping on Bubblegum Pink Dylusions Ink Spray and then spraying with water tipping my paper to allow the color to run both up and down and also using my finger to dab color around.  Later I also splattered Bubblegum Pink (no water added) over the panel.


I die cut the heart, Calligraphic Elements 1, from white cardstock.  I made a cut along the right inside edge of the heart so I could pass my stamped vellum piece through the heart.


I then embossed the heart using embossing ink and Mixed Media Powder, Punch.


Love, from the Baby Love set, was also cut from white cardstock and then embossed with Queen's Gold embossing powder.


I also embossed the edges of the next layer with the Queen's Gold powder.


I attached the watercolor panel to the Queen's Gold embossed panel.  The quote, The love we give away, was stamped onto vellum with Archival Ink Jet Black, dried, and the vellum torn as shown.  I put the vellum piece through the heart as shown, wrapped the ends of the vellum strip to the back and taped them down.  I added glue under some of the heart to help hold things in place.


Love was glued on as shown.  The panels were attached to a folded pink card.  Nuvo Glitter Drops, Honey Gold, were added as shown. 


I hope you like today's card!!!  It was really fun and easy to make.  If you have time, leave me a comment.  Thanks for following along!!!

Hugs, Wanda (ArtByWanda)

Wednesday, December 14, 2016

Christmas is the Day Scrapbook Layout with Merry and Deer with Flourished Antlers Cut Files

Hello, Connie Nichol here today with a festive Christmas layout featuring two sets of Quietfire Design stamps and two different Quietfire Design electronic die cutting files.


I started out with a plain piece of kraft cardstock, and using watermark ink (Versamark would give a similar effect), randomly stamped snowflakes from the Let it Snow Flourished Snowflake set to create a subtle background.  This is a set of six beautiful stamps - imagine the possibilities for winter scrapbook layouts!

Let it Snow Flourished Snowflakes - Set of 6 Stamps - Mounted


I then cut the title and flourished deer out of red cardstock using these cut files and the Silhouette Cameo.  The cut files are available in the Silhouette store here.  Electronic cut files are just so versatile for scrapbooking because you can customize them so easily.  For example, I decided that I just wanted the Merry from this cut file, so I deleted the '& bright' part and resized Merry to fit the page and cut it out of red cardstock.  You might think about asking Santa for a Silhouette Cameo for Christmas.  
Here's the deer with flourished antlers cut file.  So pretty.  


I embellished the page with some scraps of patterned paper and washi tape and added a Quietfire Design Christmas stamp that brings the page together beautifully.

Christmas Is the Day - Mounted

Merry Christmas!  Be sure to take some photographs with your loved ones and capture some memories.

Supply List:  Stampin Up cardstock, patterned paper, punch, corner rounder and washi tape, Clearsnap ink, Quietfire Design stamps and cutting files, Silhouette Cameo die cutting machine, Elizabeth Craft designs stitched circle dies, Scrapbook Adhesives by 3L


Friday, April 8, 2016

Sleeping Under a Quilt

It's Suzanne sneaking in today between all the usual awesomeness!  This week I released four quilt block cards over on the Silhouette store.  I wanted to make the files simple to assemble with very few pieces and yet still have the look of a true quilt block.


Here is an easy card I created using my Sleeping Under a Quilt stamp and the Star Quilt Block Card.  Instead of making the cutfile cardbase, I assembled the quilt block on the front of a larger card with enough room to stamp the quote.
Quietfire Digital Cutting Files available at the Silhouette Design Store

Here are the four quilt block cards over on the Silhouette site.  There is a Cathedral Window, a Dresden Plate, a Star and a Flying Geese Quilt Block.
I used Maja Designs cardstock* and Core'dinations Atoll Aqua cardstock to create these and cut everything with the Silhouette Cameo.  I have totally fallen in love with the Maja papers!  
Your own cards could be in any colour pathway you wish - even more subtle than this or bright and beautiful.  Each card measures 5x5", so you can enlarge them.  For more detailed instructions (although they're so simple, you probably won't need them), see the file description.

Thanks for stopping by!
Happy cutting and stamping, Suzanne

*If you're in Canada, I found mine at Scrap Addicts in Edmonton.

Wednesday, October 7, 2015

Cuts of the Week - Halloween Card in a Box Tutorial

Hello my spooky lovelies!  It's Suzanne here today with a tutorial on the new Quietfire Halloween Card in a Box.  You may find this project on the Silhouette America site here.  And it's brand new!


You can find templates all over the web for these kinds of cards, but I wanted to have the basic shape at my fingertips for use any time and never have to measure any of the elements. (Yes, I'm *that* lazy!  But really, it's more of a time thing.) Expect to see a few variations of the Quietfire Card in a Box soon!

Here is how you make the Halloween Card in a Box.


Supplies:
Halloween Card in a Box: https://www.silhouettedesignstore.com...
Core’dinations Nightfall Cardstock
American Crafts Cardstock in Apricot, Ash, Stone and Butter
Black 80# Cardstock from Quietfire
Tombow Stamp Runner 
ThermoWeb 3D Foam Squares & Glue Dots http://www.quietfiredesign.ca/Glue-Do...
Bone Folder http://www.quietfiredesign.ca/Bone-Fo...
Double Sided Tape http://www.quietfiredesign.ca/Be-Crea...
 
Thanks for stopping by and having a look!
Suzanne

Here are some of the other Quietfire digital cutting files available at the Silhouette Store.


Sunday, July 5, 2015

Butterfly Edge Card

Happy Monday everyone!  It's Suzanne here with a project that's just about as simple as it gets.... As long as you're into digital cutting!


This card is cut from 140# Arches Hot Press Watercolour paper using my Silhouette butterfly edge card available on the Silhouette Online Store .  My original plan was to use watercolour just over the butterflies, but to do a decent job of it seemed beyond my ability that particular day.  My Dad used is say there was nothing that couldn't be fixed.  Well, in this case I would agree!               

Being in a need of some retail therapy, I recently ordered the set of 24 colours of Brushos* (from Amazon, if you're interested) and here was an opportunity to test drive them.  Brushos are powdered dyes (I assume) that are brilliantly coloured.  You can simply wet down a surface, sprinkle different colours onto the wet surface and the final look is a lot like a watercolour wet in wet technique.  The only problem is knowing when to stop!

Okay, that's it.  Let it dry. 
So, in case you missed it.... Step 1: Cut.  Step 2: Colour 
And away you go! You might stamp a sentiment on it, tie on a bow, add some bling.  But for me, it's done!
Thanks for stopping in and having a look.  Happy creating! Suzanne

*Ken Oliver has a similar product called Color Burst that comes in 6 colours.

Tuesday, September 30, 2014

Quietfire and Walnut Hollow Blog Hop - Harvest Blessings!

HarvestBlessingsSide2

Good morning!  Sherry here and it’s my turn to welcome you to the Walnut Hollow & Quietfire Design 2014 Blog Hop!  We’re pleased you’re joining us and know you’ll find lots of creative inspiration for combining Quietfire stamps and/or digital cutting files with the beautiful Walnut Hollow wood products. 

QFD WH BlogHop 09 14

For my project, I chose to work with the Walnut Hollow Tabletop Sign (Item No. 40187)

40187

and Quietfire Design Silhouette Digital Cutting File Harvest Blessings.  

Image001

To begin, the Tabletop Sign was painted white, antiqued with different shades of browns and then sanded.  I love the distressed look achieved using my palm sander!

HBStep1

The Silhouette Cameo and vinyl were used to make a stencil of the sentiment, Harvest Blessings.  

HBStep2

The stencil was cut in two parts, covered with contact paper and then applied in stages to the sign.  

HBStep3

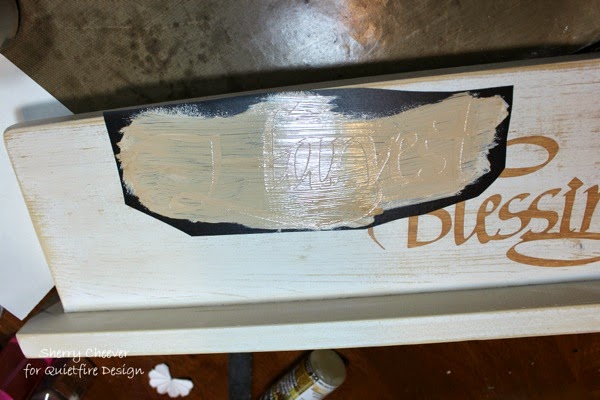
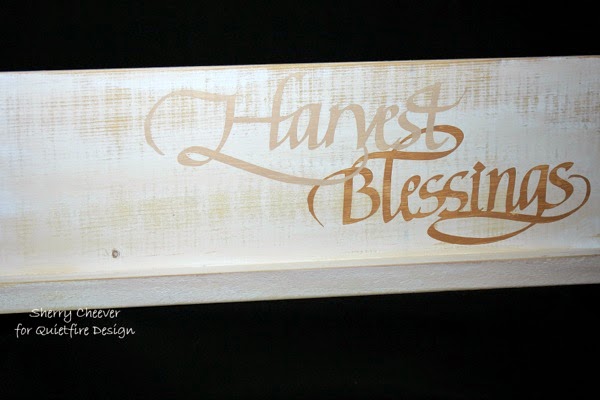
Using the same tan/brown paints used for the antiquing, the sentiment was painted onto the sign.  Blessings was painted first, allowed to dry and Harvest was painted last.  

HBStep4

While the paint was still wet, the vinyl was removed.

HBStep5

To finish the sign, I dug through my fall decoration boxes and found some loose flowers and pumpkins to glue to the sign.  

HarvestBlessingsSide1

Both sides of the sign were completed, so that it could sit on my dining room table as a centerpiece for the holidays.

HarvestBlessingsSide2

Now for the grand prize!  

Walnut hollow quietfire design prize

To be eligible for our grand prize, your work is simple:  Please leave a comment on each of our blog posts, nine here on the Quietfire Creations blog and five on the Walnut Hollow blog hop posts.   So that will be 14 comments in total on two different blogs from September 29, 2014 to October 3, 2014!  The winner must be a resident of North America.

We will draw the prize on Monday October 6th, 2014 and the winner will be announced shortly after in a separate blog post. We look forward to seeing your comments!  Tell your friends!


Make sure you visit the other post on the Quietfire Creations Blog by Kathy Jo today.  We are posting two a day, and we would hate for you miss anything!

SHERRY SIGNATURE


Related Posts Plugin for WordPress, Blogger...