Wednesday, October 31, 2012

Oct/12 - Owl - Boo & Who's Behind

click on card for larger view
Yogi here with the last Halloween card for the season...

I ran my white cardstock through my machine with the Spellbinder's "Bark" m-bossibilities folder, sponged Distress browns then sanded down lightly.

Measured my owl image (Local King Rubber) and cut an opening in the above piece, penciled in the opening on my card front, then stamped my owl using Versafine Black onyx & clear embossing. Adhered my bark layer to my cream toned card front.

Sponged and direct to paper several dark browns on a scrap piece of cardstock, ran through machine with the bark folder, sanded the high points, and cut the frame, then adhered it to card.

Stamped the sayings with the black, cut out and used a hole punch on the corners of "Boo" and just cut the points of the "Who..." piece.

Hope you were inspired by our Halloween projects this year.

Monday, October 29, 2012

FLOURISHED NOEL- CARDS

Hi Everyone! It's Holly here with a couple cards showing another way to use the beautiful tree stamp from the FLOURISH NOEL set.

On this card, the tree stamp provides a pretty shadow for the Create-A-Flake Four die cuts.
To keep the 'spokes' aligned, I placed a snowflake in the center of a large piece of scrap paper, then drew lines from the center of the snowflake, through the ends of the spokes, to the edge of the paper. I removed the snowflake, laid down the card and stamped the tree, lining up the top and trunk along the drawn lines.
The stars were simpler to do since I just stamped on the star die-cuts themselves. They were cut using
The edge of the card base was stamped with the tree as well and when matted, created a nice patterned border. The next layer was embossed using HOLIDAY MAGIC M-Bossibilities. Once stamped, and with the edges sponged using DISTRESS INKS, the stars were stacked and attached to the card front. Christmas Wonder from CHRISTMAS CUDDLERS  was stamped onto white card stock and trimmed down. The edges were sponged, a silver cord from my stash was tied to the end and it was attached to the card.

I hope you are inspired to try different ways of using stamps and see the versatility of this tree.
Thank you for stopping by!


Thursday, October 25, 2012

Every blade in the field Card

Hi Y'all, Monica here today.  The inspiration for this card came from my garden.  While picking fallen oak leaves out of a Laceleaf Japanese Maple I started really paying attention to its beautiful colors and the delicacy of the leaves.  Then I started thinking they'd make good masks.  Ah, ha!  Time to play with the Dylusion sprays I got a little while ago.

 
This was a very quick card.  Arrange the leaves on a piece of cardstock, spritz with water, spritz with Dylusion Ink Spray (Bubblegum Pink), spritz with water, lightly spritz around edges with Crushed Grape, spritz with water.  Remove leaves and dry papers.  I used an old iron instead of a heat gun.  Be sure to look at both sides of your paper as you'll get various looks on each sample.  The quote layer is actually the reverse side of one of my first attempts.

Stamp Every blade in the field quote on background using Archival Jet Black ink.  Cut and emboss with Spellbinders Respendent Rectangles.  Create a 6x6" base card.  Cut another layer of background and use corner rounder.  Use Brilliance Dew Drops inkpad, Pearlescent Purple, to edge all layers, paying particular attention to the border of the quote layer.  The small size and pointed tip of the Brilliance Dew Drops are perfect for jobs like this.  Assemble with Be Creative tape and Pop-Dots.

Ideally this card would have been yellow, orange, red and a hint of green but those colors are on my Wish List for now, lol.   

I hope y'all have the opportunity to get outside to enjoy the last colors of fall and sunny days.  Keep your eyes open for things to haul back to your studio to play with.  All kinds of treasures to be found in Nature's fall gifts.

Hugs,
Monica

A New Chance to Win Free Rubber Stamps!


Here is another opportunity for you to win Quietfire Stamps!  This is easy! - just become a Follower of our Quietfire Creations Blog right here.  You can do that by subscribing to our Blog Posts by email or by clicking Join this site. Everything is over >>>>>>>> in the righthand sidebar! 

Three lucky followers will win grab bags of Quietfire Design rubber stamps!

But wait! There's more.

Want to double your chances of winning?  All you have to do is subscribe by email AND Join this site. (If you're already subscribed and/or Following, you're already entered!)

On November 3rd, we'll randomly draw three lucky winners!

Thanks for following us and good luck!
flourish

Wednesday, October 24, 2012

Halloween Wicked Collection Party Ensemble


Hello everyone, Terre here to get you motivated to create some spooky treats for Halloween using the Quietfire Design Halloween Wicked Collection. I created some treats for the neighbor kids, my grandson and my little 4 year old Leahandra.

I used the Tombstone die template from Spellbinders and stamped the sentiments from the Halloween Wicked Collection to the front of the Tombstone.
                                         Here's a close up, just love those sentiments!
Next I created my own candy bar labels and stamped a few more Halloween Wicked Collection sentiments, you know like Toe of Frog and Eye of Newt...love it!
Here is some spooky brew (root beer) with a Spellbinders Spider Web die cut out of black glitter paper and added some Want2Scrap Swirls Finesse along with the spooky sentiment.
                                                           Don't they look cool!
These are tall mini M & M candy tubes stamped and airbrushed with some Want2Scrap Nestaboard and Nestabling.
These are clear card boxes turned into spooky treat boxes filled with candy...YUM!
Close up of the candy bar labels stamped with Quietfire Designs Halloween Wicked Collection. I have to say this stamp set was just perfect for each and every piece I created, I hope the kids enjoy these treats.
Thank you for stopping by my blog post and I hope you feel inspired to go create some unique Halloween treats for your little goblins, I know mine are going to just love them! Crafty Smiles, Terre

Monday, October 22, 2012

We Cannot Tell, You Are MY Friend, Some People Come, The True Harvest


 Robyn,here ,with another post on my theme of creating very different  designs with the same elements.

The foundation of these cards is a class I took in brush lettering.All of the backgrounds and faux layering are done with watercolor and brush. Use a good quality watercolor paper for best results.
Be sure to ink up your stamps well, as the paper is absorbent and textured.

I hand drew the center rectangle and stamped the quote with Versafine sepia and thermal embossed clear.
Added Distress Inks to highlight around the quote and watercolored the border.

Stamped You are my Friend, the companion stamp in this set, around the perimeter of the card base and glued on the panel with Ranger Glue Stick.

You are My Friend is also stamped inside. I think I mailed this before I got a photo!


This card at right has the same construction.
This quote's companion stamp says,
Thanks You For Coming into My Life, which I stamped inside.

I emphasized the words 'hearts' and 'Ever' using Versafine Crimson and Deep Lagoon and added the Flourished Hearts and thermal embossed everything in clear.


Same construction here, the quote with a bit of rainbow ink at the bottom.

Same quote, one extra layer-Spellbinders Frameabilities poinsettia, the inner panel.

I hope this gives you some idea's of how to get the most out of your Quietfire Stamps-Experiment and be sure to share back with us!
Comments and questions welcomed. I try to answer them all if you leave contact info.

Friday, October 19, 2012

Christmas Cuddlers!

Sherry here with you today.  I hope you’re enjoying the Christmas Blog Hop and you’ve kindled your creativity along the way!  It’s still not too late to follow along with the hop and get your name in the drawing for a grab bag of Quietfire Design rubber stamps.  In case you missed it, and want to go back and look things over, here’s our schedule for this week:
Since you are here today anyway, you need to hop over and check out what Suzanne has done for her project!

I have one more project this week for you using the new Christmas Cuddlers Word Set!  

ChristmasBlessingsTag

I used a manila shipping tag for the base, which was inked with the Wrinkle Free-Distress Technique using Iced Spruce and Shaded Lilac Distress Inks that were misted with water containing Gold Perfect Pearls.  Once the tag was dry, it was run through the Grand Calibur with Spellbinders Holiday Magic M-Bossabilities.  

The sentiment Christmas Blessings was embossed in Gold and then die cut/embossed with Spellbinders Labels One.  The same Wrinkle-Free Distress was used on another tag for the sentiment.

ChristmasBlessingsTagSENTIMENT

The embellishments for the tag were also made from manila tags that had been inked first and then die cut.  The evergreen branches were inked with Evergreen Bough Distress Ink and highlighted with Crystal Stickles.  The pine cones were inked with Gathered Twigs, stenciled with Forest Moss, then highlighted with Crystal Stickles.  Both the branches and pine cones were die cut/embossed with Spellbinders Fall Foliage.

ChristmasBlessingsTagCLOSEUP

The ornament was die cut/embossed with Spellbinders 2012 Holiday Tree, colored with Dusty Concord Distress Ink, then covered with Milled Lavender Distress Stickles.  The seam binding ribbon for the pine cones and the top of the tag were dyed with Shaded Lilac Distress Ink. 

That’s all for me today.  Thanks for stopping by and remember you have until midnight tonight to leave comments for the Designers during the Blog Hop.  Each Designer will be drawing a winner from the comments left on their blog.
SHERRY SIGNATURE

Project Supplies:


Wednesday, October 17, 2012

Hold On To the Spirit - Poinsettia


click on image to see larger view
Hi there, Yogi here with a very simple one layer card that uses a masking/stenciling technique.
click on image to see larger view

I side folded a white card and used the Crafts Too embossing folder "Holly", but since the design didn't reach the area I wanted, I cut the folder apart, and taped it at the other end, now my design landed where I wanted it...

Cut a mask (Spellbinders Labels 22) and sponged various colors of Distress (Old Paper, Antique Linen, Aged Mahogany) around the edges, moving the mask to make the larger design. Used a 4B pencil and a paper stump to blend the shadow line.

Stamped the saying with Distress Aged Mahogany and touched some areas with Walnut Stain, clear embossed.

The flower is red cardstock, scrunched and the high points embossed with gold and is die cut with Marianne Designs "Poinsettia" die set. The center of the flower is a quilled fringe using Quilled Creations "Mum's" die from gold paper.

Hope you enjoyed today's project.

Monday, October 15, 2012

IF I HAD A STAR- CARD

Hi Everyone! This is Holly with a card using a very easy technique. I made the card front full-size, did the technique, then attached it to the card base. Distress inks can bleed through to the back of the card stock, so I added a card front to keep the card interior clean. Here's what I did.
Using all the blue distress inks I used the texture tape technique which means taking a length of masking tape (about 6") and pressing the middle section onto the ink pad, then pressing the inked area to the cardstock. Lift and repeat, applying the ink in a random fashion, starting with the lighter colour and working to the darkest colour. I used new pieces of tape for colour changes and because it gets soggy. The inks blend nicely and you get a nice mottled night sky look.
I spritzed the inked piece with my sparkle spritz made by mixing water and super sparkle Lumiere paint in a mini mister and shaking it up. I set this aside to dry while I stamped up the focal piece.
 
I stamped the sentiment onto white card stock using jet black archival ink then cut out the circle using a standard circle die. I embossed the smallest star die beside the sentiment, then painted it in using the Lumiere super sparkle acrylic paint. The sentiment circle piece got a spritz of sparkle too.
Once dry, the card front and sentiment circle were sponged around the edges, then I attached the card front to the card base, then the sentiment circle to the card front using foam tape. Two corners got rounded off and re-sponged.
With a stylus, I added a dot of sparkle paint to the centers of the spritzed dots- lots of them. The ones that don't have a dot of paint added look farther away.
I added some paint  dots to the sentment circle too, then added bling to the star and two corners.
 
This was a totally addicting technique for me. I want to try other colours as well- I think it'd make beautiful accent pieces too.
Thank you for looking today and be sure to join the Christmas Blog Hop starting today withYogi! 


Friday, October 12, 2012

THE MOST I CAN DO- CARD

Hi Everyone! This is Holly with a card for you today. The technique is quite simple with striking results. To begin, the base card is masked off to reveal the center band. Distress inks are then sponged on once, then sponged on again to achieve some depth. This card uses scattered straw, sage bundle and vintage photo for the base strip and Jet Black Archival Ink to stamp the flourish and sentiment
The sentiment is then cut with the classic oval die, sponged around the edge and attached to the card base using foam tape.
I hope you like this card and technique enough to give it a try- I think you'll enjoy it.
Thank you for looking today!

Thursday, October 11, 2012

Our Christmas Blog Hop!


Please join us next week, October 15-19, 2012 as we share our creative ideas for using the new Quietfire Design Christmas stamps.

Each day designers will be posting brand new artwork they have created using the new rubber stamps.  Visit their blogs on the day of their featured project, post a comment on their Blog Hop post and you will be eligible to win a grab bag of Quietfire Design rubber stamps!  Each Designer will randomly choose a winner from the comments on their own Blog Hop post, so make sure you’ve commented by midnight Friday, October 19th.  Tell your friends!

Stay tuned for more details!  The new stamps are available for sale now, but will not be shipping until next week.

Happy creating! Suzanne

Wednesday, October 10, 2012

One of Our Own Needs a Helping Hand

Our hearts go out to Design Team Member Darsie Bruno.  Yesterday morning her home was destroyed by fire. I simply cannot imagine going through what Darsie is experiencing.  We know you will want to support Darsie with art supplies so she can begin making her special beautiful creations again, but right now she has no where to put them, so a fundraiser has been initiated to get her back on her feet.


You will find JustRite, Spellbinders, Splitcoast Stampers and probably a lot more groups and individuals who Darsie has touched with her inspiring artwork, trying to help out.  We hope you will, too! This is a PayPal fund that has been set up by Spellbinders, but there is a whole team at work!


Darsie's Facebook Page is here if you want to leave her a message personally.

You're not alone Darsie!  Sending you soothing good wishes.

Suzanne and the Quietfire Design Team

Hold Onto The Spirit of Christmas Wall Hanging

Hello Everyone, Terre here and Tis the Season to start thinking of all your holiday crafted projects just like this Hold Onto The Spirit of Christmas wall hanging. I used a piece of cardboard and die cut it from Spellbinders Grand Labels Eleven, using the Layered Poinsettia die template and the Edgeabilities I created a festive border at the bottom of my wall hanging.
I stamped the sentiment on a piece of Kraft cardstock and tore around it to make it look worn and distressed. Quietfire Design has some of the most beautiful sentiments for all occasions, this particular sentiment was perfect for this wall hanging.
I hope you are inspired to create a holiday wall hanging just like this one, they make perfect gifts for friends and family. Crafty Smiles, Terre

Monday, October 8, 2012

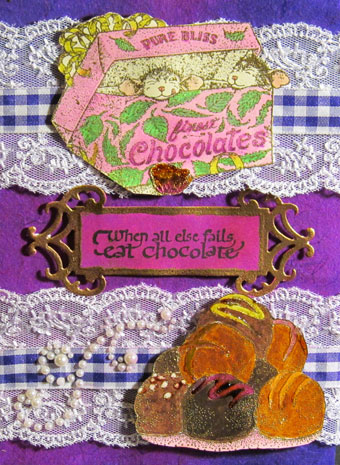
My dark side is chocolate card

Hi Y'all, Monica sharing with you today.  This project could either be a card or the beginning of an altered book tip-in.


Spritz cardstock with Dylusions Ink Spray, Bubblegum Pink and Crushed Grape to create 5x7" background. Stamp House Mouse image with Brilliance Graphite Black ink and Ranger Gold detail embossing powder. Color image with Sakura gel pens, Inkssentials white pen, and Tombow markers. Scribble on scrap paper with gel pen and use water brush to wash color on the chocolate box. Trim closely to remove background images around chocolate box portion of image. Stamp candy portion of stamp twice on scrap paper. Color and trim closely. Stack and glue pieces together to create a raised candy piece. Stamp truffles pile portion of another House Mouse image on scrap paper. Color with markers and trim closely. Use Crystal Lacquer on frosting on truffles and bitten chocolate on Mouse image. Stamp saying from Quietfire Design and cut out with Spellbinders Fancy Tags Two. Use VersaMark pen and Ranger Gold embossing powder on frame of tag. Spritz with Dylusions Bubblegum Pink. Wipe embossed frame with tissue. Attach lace and ribbon to background with Be Creative Double-Sided Tape. Attach chocolate box, tag and truffles with pop dots. Add pearl floursish.

Enabler's List:
My Dark Side is Chocolate (set of three cravings)
Dylusions Ink Spray, Bubblegum Pink, Crushed Grape
Spellbinders Shapeabilities, Fancy Tags Two
Be Creative Double-Sided Tape

It's a cold, wet morning here.  I hope everyone has a box of chocolates and a snuggly spot to get cozy.  Is it too early to start thinking about spring?

Hugs,
Monica
  

Saturday, October 6, 2012

Get a Free Rubber Stamp!

Never had a Quietfire Rubber Stamp?  Got a blog?  Want a free Quietfire Rubber Stamp?

For the next two weeks, we're asking you to take part in a swap! This time anyone with a blog is welcome to play, even if you have Quietfire stamps! We're asking you to add our blinkie to your blog sidebar and we'll send you a Quietfire Rubber Stamp (stamps will vary).

"What do I do, I'm so excited?!!!", you ask.

Here is our blinkie, with the code underneath.  Just copy that code (you need to do it this way because it has the link back to the Quietfire site) by highlighting the code and then clicking CTL and C at the same time.  Make sure you copied all the code. 


(These instructions are for Blogger)
Now go to your blog inner workings, then to the Layout page.
Click "Add a Gadget"
When the window pops up, scroll down to find and click HTML/JavaScript
When another window pops up, click under Content and paste (click CTL and P at the same time) our blinkie code you copied from here.
Click Save  and have a look at your blog.  Wow! Magic!  It might take a minute to warm up and change.

Once you've put our blinkie on your blog, tell us in a comment below and we'll all stampede over and have a look!

And the most important part....  Email us with your snailmail address and as a thank you, we'll send you a stamp!
Thanks so much for your support!  Suzanne
NOTE:  This Blinkie Swap is now restricted to North American destinations. Sorry!

Friday, October 5, 2012

Halloween Wicked/12 Days of Halloween

Robyn here, not a big Halloween person.

I double dare you to resist these Halloween and Fall themed Quietfire stamps.

I triple dare you and bet you a dark chocolate bar you will find a way to use the flourished bat.

Today I'm featuring the 12 Days of Halloween from the Halloween Wicked Collection.

 I  dry embossed with a Cuttlebug folder and brayered with Versamark and thermal embossed silver.
The quote is thermal embossed on vellum with holographic power!


The other event that put me over the edge was finding this mini spider punch at the Thrift shop for 50 cents!

I made dimentional glue dots with The Best Glue Ever to creep my spiders-accented with Stickles Glitter glue.


Right is a quick tag to show you the rest of the 12 Days.
The web on this tag is done by inking up the embossing folder and using it as a stamp.

I know y'all are singing along!

Enjoy the change in weather, however you celebrate and be sure to share your creations with us on Facebook.

Featured Products:

Wednesday, October 3, 2012

Old Bottles Get New Life!

Hey y’all!  Sherry here today with a quick Halloween decoration you can make to add a little something something to a neglected area of your home!  If you are like me, I love Halloween and have decorations in all the common rooms in our home.  As a matter of fact, my daughter mentioned on October 1st it was time to get the decorations out . . . it’s in our plans for any day now!

One thing I’ve been wanting to do since I first received the Halloween Wicked Collection last year, was to make some bottles to stick in the china cabinet.  I’ve had stashed back as bookends, a couple of old whiskey bottles that I retrieved from the trash when we were clearing out my grandfather’s home.  I’m pretty sure they were something my grandmother kept, but then again they could have been my grandfather’s.  I do remember that when I was a little thing, and sick with sore throat and/or head colds, my grandmother would make us hot toddies.  

Anyhoo, here’s what I came up with.

Halloween Bottles

The labels were made from manila shipping tags and the Wrinkle Free Distress Technique, using Antique Linen, Spiced Marmalade and Vintage Photo Distress Inks.  


Even though it’s hard to tell in the photo, the edges were outlined with a gold leafing pen, then distressed just lightly with a pair of scissors.  To finish off the bottles, some ribbon was tied around the top and held in place in some hemp twine.

That’s all for me except to say thanks for stopping by!
SHERRY SIGNATURE

Project Supplies:


Related Posts Plugin for WordPress, Blogger...