Hey Quietfire Fans! For today's project I'm excited to be sharing with you my Have Yourself a Merry Little Christmas Card. I combined a variety of dies, stamps and Modern Gilding Powder, which were all perfect for creating this Christmas card. You'll want to grab a cup of your favourite beverage and learn how to recreate my Have Yourself a Merry Little Christmas Card at home.
To start, apply Emboss It Ink to the Have Yourself a Merry, Flourished Tree stamp and stamp onto a piece of cream cardstock. Sprinkle Copper Scroll Modern Gilding Powder over the stamped image. Tap off the excess powder and emboss with a heat tool.
Using a Zig Emboss Brush Marker, colour in four of the dots. Sprinkle Dragon Berry Modern Gilding Powder over the inked dots. Tap off the excess powder and emboss with a heat tool. Colour in the remaining dots with the Zig Emboss Brush Marker. Sprinkle Acanthus Teal Modern Gilding Powder over the remaining inked dots. Tap off the excess powder and emboss with a heat tool.
Fussy cut around the saying. Ink the edges of the saying using Walnut Stain Distress Ink and a blending tool with foam.
Die cut the Flourished Oval Frame out of a piece of cream cardstock. Apply Emboss It Ink to the frame. Sprinkle Gothic Black Modern Gilding Powder over the entire surface of the frame. Tap off the excess powder and emboss with a heat tool.
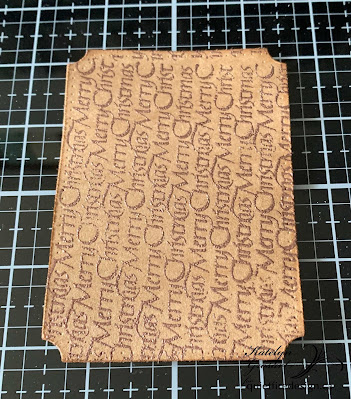
Die cut a 3" Stitched Indented Rectangle out of kraft cardstock. Apply Emboss It Ink to the Merry Christmas Background and stamp onto the rectangle. Reapply ink to the stamp and stamp as needed to cover the entire surface of the rectangle. Sprinkle Copper Scroll Modern Gilding Powder over the entire surface of the rectangle. Tap off the excess powder and emboss with a heat tool. Distress the edges of the rectangle. Ink the edges of the rectangle using Walnut Stain Distress Ink and a blending tool with foam.
Choose a piece of Christmas patterned paper. Die cut a 3 1/2" Stitched Indented Rectangle out of a piece of cream cardstock. Die cut a 3 1/4" Fitted Indented Rectangle out of the Christmas patterned paper. Distress the edges of both rectangles. Ink the edges of both rectangles using Walnut Stain Distress Ink and a blending tool with foam.
Die cut a 2 1/2" Stitched Oval out of the same piece of Christmas patterned paper. Die cut a 2" Stitched Oval out of a piece of kraft cardstock. Distress the edges of both ovals. Ink the edges of both ovals using Walnut Stain Distress Ink and a blending tool with foam.
Adhere the 3 1/4" rectangle to the 3 1/2" rectangle.
Foam square the 3" rectangle to the 3 1/4" rectangle. Adhere the 2" oval to the 2 1/2" oval. Foam square the 2 1/2" oval to the middle of the 3" rectangle.
Adhere the flourished oval frame to the 2 1/2" oval, making sure the flourish is in the top left corner.
Foam square the Have Yourself a Merry Little Christmas saying to the middle of the 2" oval.
To finish the card, cut a cardbase out of white cardstock that measures 3 1/2" x 9 1/2", score at 4 3/4". Adhere the cardfront to the cardbase.
Here are a few closeups of the finished card.
Here is the finished Have Yourself a Merry Little Christmas Card.
Quietfire Design Supplies Used:
Other Supplies Used:
- Elizabeth Craft Designs: Stitched Ovals, Stitched Indented Rectangle and Fitted Indented Rectangle
- Tim Holtz for Ranger Ink: Distress Ink - Walnut Stain and Blending Tool with Foam
- Ranger Ink: Emboss It Dabber
- Misc: Cream Cardstock, White Cardstock, Kraft Cardstock and Christmas Patterned Paper
Thanks so much for joining me today and I hope that I have inspired you to recreate my Have Yourself a Merry Little Christmas Card at home.
- Katelyn


No comments:
Post a Comment