Showing posts with label alcohol inks. Show all posts

Tuesday, September 4, 2018

Make a Wish with alcohol geode background

Have you seen those beautiful geode birthday cake?  That was my inspiration for the Make A Wish card.  I played around with my alcohol inks, using a brush to make the colors go in an arch.  I added some silver and gold mixative to the Yupo paper.  

Image result for geode birthday cake


After the background was finished, it was quite vibrant and the Make A Wish diecut got overshadowed by all the colors and lines, even after I added a black shadow to the die cut.  So I decided to add a layer of vellum - it softens the background but you can still see it and it make the sentiment easier to see.  


I only added glue behind the lettering and the frosted dots to keep the vellum in place.


Hope you like the card!  

Make a Wish - Metal Cutting Dies


Monday, August 27, 2018

Autumn - The Thankful Receiver


Hello!!!  It's Wanda here today to share an Autumn card.  I am ready for some cooler (not cold) weather but it's suppose to be in the 90s here in Southern Iowa today.  By Wednesday it's just the 70s.  70s will be nice but it won't stay and it'll be 80s the rest of the week.  

My background is created on translucent Yupo paper.  I used some bright alcohol inks in fallish colors.  Next I used wadded up plastic wrap to "stamp" Alcohol Lift-Ink.  As I lifted the alcohol ink I then stamped it onto regular white cardstock.  Once I was done stamping I blotted the lift-ink off the yupo and then buffed the paper.  


Next I flipped the yupo paper over and stamped the music image from the Crows Set multiple times with Archival Ink Jet Black until the paper was filled. 


I gently dried the black ink with a heat tool being sure not to get the yupo too hot.  You can see how the music comes through in this picture.


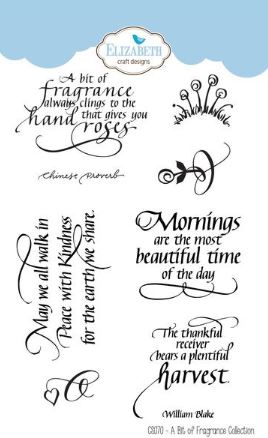
I stamped the harvest quote from the A Bit of Fragrance Collection on my stamped off paper and then die cut it with a Stitched Rectangle.  I also die cut my yupo with a larger Stitched Rectangle.  


The yupo paper was attached to white cardsock.  I stamped one image from the Where Flowers Bloom Collection on the center-bottom of the yupo paper.  I wrapped the quote panel with twine, tied a bow, and attached the panel to the yupo panel with thick foam mounting tape.  

You might notice that this card is not the card I showed at the top.  It was my original card and then after taking pictures I decided I should also use the Autumn die.  Everything was attached together so I created a panel by tearing around the main area using a metal ruler.  This would have been a very nice card also.


I die cut the word Autumn from white cardstock, inked it with Distress Ink Barn Door and Festive Berries, coated it with Embossing Ink and embossed it with Clear Embossing Powder.


I hope you've enjoyed today's card/cards.  Have a wonderful week!!!

Hugs, Wanda


Friday, July 27, 2018

Christmas in July - May Your Heart Be Warm, Merry Christmas


Hello!!!  I hope you've been enjoying Christmas in July this week!!!  Beautiful projects have been shared and I love Suzanne's video.  Don't miss it.

I'm sharing 3 cards, all with different looks, but all done with the same stamps (May Your Heart Be Warm and Merry Christmas Background) and die (Merry Christmas 2).  All the details are below.

To celebrate Christmas in July we’re having a giveaway!  One randomly chosen follower will win a $25 gift certificate for the Quietfire website.  All you have to do to be eligible is comment on the blog posts and follow us on YouTube!  https://www.youtube.com/user/QuietfireDesign.  Entries close Sunday July 29, 2018 at midnight.  


This first card came about when our daughter was here for a visit and I was showing her the Distress Resist Spray.  I built layers onto a piece of cardstock starting with Resist Spray, inking, spraying again with Resist, adding more ink, and then repeating a third time.  Each layer of Resist is a different tone from light to dark since I worked from light to dark with my colors.  Once I was done and I had this beautiful background of reds I thought, "Oh, this would be great for a Christmas card and I need one this month for QF", so it became one.

I stamped the quote in the center of the paper and then die cut two Stitched Ovals (Elizabeth Craft Designs).  I added gold embossing (Queen's Gold - Ranger Ink) around the main oval and a hint of gold paint around both the inside and outside of the other oval.


On my folded green card I stamped the Merry Christmas Background down the center using Versamark Ink for that watermark look and then added white paint splatters.


Merry Christmas was die cut from Gold Metallic Cardstock.  Red Stickles dots were added to the branches and on the dot above the letter "i" of the diecut.  Everything is attached flat except the main oval and that is attached with foam tape.


This next card has a much more vintage feel.  (and I think it's my favorite of the three cards)


The quote was stamped onto white cardstock.  I used a stamping platform so I could ink the quote with black and stamp, then ink the branches with green and stamp.  After stamping I covered the paper with embossing ink and embossed it with Baked Texture Vintage Beeswax (Emerald Creek - Seth Apter).  I added a second layer of embossing ink and powder and heated it again.  Isn't it gorgeous!!!  


My background was created on Transparent Yupo Paper.  I used alcohol inks and alcohol blending solution on felt to dab onto the Yupo adding layers until I liked it.


Once it was dry I stamped the Merry Christmas Background with the Alcohol Lift-Ink.  This pulls alcohol ink off the yupo paper.  (You can only remove alcohol ink with the Lift-Off ink if you have the alcohol ink on a non-porous surface such as Yupo).  So now you have alcohol ink mixed with the lift-ink on your stamp.  You can then stamp onto a porous surface, such as regular cardstock, to transfer the ink.  I did this twice to get all the way down the Yupo paper.  On my regular cardstock I left an open area when I stamped the second time.  I used this card of stamped transferred ink to create another Christmas card that I shared early this week on my blog HERE.

The Lift-Off ink on the Yupo will still be wet.  Now you dab over that ink with a paper towel until most of the ink is removed and then you can lightly rub to get the last of it making what you stamped really pop.  If you rub too soon, you will smear your stamping instead of it staying crisp and clear.


Merry Christmas was die cut from white cardstock and my folded base card is white cardstock.  I gave the die cuts and edges of the base card a creamy, shimmery look by brushing it with Nuvo Mousse (Mother of Pearl).  A perfect look for a vintage card.


Again I used Red Stickles for berries on the branches and over the letter "i".


My final card has a much brighter look.


I stamped and embossed the Merry Christmas Background in clear onto white cardstock.


Next I sprayed over the cardstock with Distress Spray Stains, blotted it, dried it, and, once I knew what size I needed, trimmed it down.


I attached double sided tape to the top of silver cardstock, die cut Merry Christmas, removed the liner from the top and added Silver Silk Microfine Glitter.  After dumping off the excess glitter and putting it back into the jar, you then use the pad of your finger to rub over the glitter to burnish it down well and really bring out the shine.  It's fun to watch it sparkle more as you rub over it!!


I stamped the quote onto white cardstock, embossed it with Carnation Red embossing Powder and die cut it with a Stitched Oval die.


I added Silver Glitter Paste around the edges of the oval.  If you don't have glitter paste but you do have glitter, you can make your own paste by mixing glitter with gloss gel medium.  Silver Stickles were used over the berries on the branches. 


White cardstock was folded for the base of the card.  


There ya go.  Three completely different looks using the same stamps and dies.  Isn't it great!!!  Which one is your favorite?

Thanks for following along!!

Hugs, Wanda

Tuesday, July 3, 2018

Thank you cards with Alcohol Ink backgrounds

Hello!  Today I'm sharing a set of notecards I made for my son to use as Thank You cards.  I'm running late so they needed to be really quick and easy.  But since I'm not big on mass producing, I needed a bit of variety to them.  Yay for Quietfire dies!  Did you know that there are 3 different "Thank you/Thanks" word dies available?  You would think you only need one but I find that having them in different sizes and arrangement really helps.

First, I finally jumped on the alcohol ink background so I had a bunch of them laying around.  Most were on the 5"x7" Yupo paper so I simply cut them in half and adhered them to a white card base.  And then I got a little more creative with cuts.

After deciding on the shape of the background layer, I die cut all of the different "thanks" type of die cuts to see which one would look best with the different layouts.  I came up with these 4 different cards:


For the first card, I simply die cut the new Thank you 3 metal die and placed in on the bottom of the triangle.  I did add a layer of Crystal Effects on the die to add just a bit of depth to the die cut.


For the second card, an older Thanks die went perfectly in the angled background.


For the third card, I embossed in silver and split the background along the diagonal.  


The last one is simply an oval with a bit of washi tape along the bottom. I'm really glad I had all these different dies that said essentially the same thing because it made the different layouts I had come together easily.  Which was your favorite? 


Thank You 2 - Metal Cutting Die

Thanks - Metal Cutting Die


thank you - Metal Cutting Dies


Related Posts Plugin for WordPress, Blogger...