Sunday, July 31, 2016

Keeping it Straight - In Summer!

Ever have trouble getting your A Way With Words diecuts straight? It's Suzanne here with a little weekend project sharing a technique to help you out!  It could save you a lot of aggravation!
 
 
Here is a little video so you can see it in action.  The tutorial is only a minute long because that's the longest that Instagram will allow!  The video below is full width and can be viewed here or on YouTube.


I love using Glue Dots.  It gives me the flexibility to remove the diecut if I don't quite get it right!
The soapstone pencil which was not necessary for this project can be found on the Quietfire site HERE.
Have any questions?  Just ask in the comments!
 
Here is the supply list for making this card (the links go to the Quietfire site):
 
In Summer Quietfire rubber stamp 
Elizabeth Craft Designs Stitched Rectangles
Kaisercraft Fairy Dust 6 1/2" Paper Pad
Core'dinations Valiant Violet Cardstock
 
Instructions:
  1. Form a 6.5 x 5 inch tent-fold card base from purple cardstock.  Die cut Summer from the same cardstock.
  2. Cut three nesting panels of patterned paper from the Stitched Rectangles as shown.
  3. Stamp the sentiment at the bottom of the smallest panel.
  4. Follow the demonstration in the video for placing your Summer diecut using Glue Dots to adhere the diecut.
  5. Assemble the card using foam tape as shown.
Thanks for dropping by!  Happy creating, Suzanne


Thursday, July 28, 2016

You are my Sunshine


Hello!!  It's Wanda here today and I'm so glad you've stopped by!!!  

My project today uses one of the stamps from the Always Be My Friend set of 3, You are my Sunshine.   


Going from the bottom up, I have a layer of orange cardstock, then a layer of pink with the edges distressed, a white layer and then a layer of Shimmer Sheetz.  I used a little bit of alcohol ink on the shimmer sheetz, embossed it and then sanded the high spots lightly.  You are my Sunshine is stamped with Archival Ink jet black and then die cut with a stitched oval die.  The flowers are created using the Susan's Garden Notes Cosmos die set.  I die cut 2 stands from white cardstock, glued them together, embossed it doing half at a time as it is wider then the folder, inked the edges and folded.  


Supply List -

Cardstock - White, Pink, Orange, Yellow
Distress Inks - Picked Raspberry, Mustard Seed (Ranger)
Alcohol Inks - Shell Pink, Pink Sherbet, Lemonade (Ranger)
Archival Ink - Jet Black (Ranger)
Shimmer Sheetz - White Iridescent (Elizabeth Craft Designs)
Stitched Ovals die set (Elizabeth Craft Designs)
Susan's Garden Notes Cosmos die set (Elizabeth Craft Designs)
Susan's Garden Tools and Mats (Elizabeth Craft Designs)
Sea Glass Embossing Folder (Elizabeth Craft Designs)
Card Stand/Easel die (Elizabeth Craft Designs)

Wednesday, July 27, 2016

Merci to you...

Hi everyone, it's Teresa here and thanks so much for stopping over today to see what's new on the Quietfire blog.  I have an easy card to share today that i did with the "Merci" die and the new "I don't tell you often enough stamp set".  There are so many fun ways that you can mix and match the Way with Word dies and stamps these days and these two went perfect together for this card for my friend.


For my card i used the "Merci Die" and cut it out and layered it with brown printed paper. Then I  paired it with a fancy die that i had in my stash to make a medallion for it to lay on.  I used dark brown paper to shawdow the die and it made it pop out really nice even though it's more vintage looking.  The flowers and papers are from Prima Marketing and it's called Tales of you and Me.


Here is the stamp set that i used for the inside.  I cut a small piece of ivory paper and then stamped the "I am thankful for all you do" in the dark cocoa that i used for the front of the card.  These are such great multi purpose stamps and you can use them for so many cards and things.


And here is a quick closeup of the die and the shadow.  I love to do this because it makes the die thicker and more bolder and it really stands out more.  

Thanks again for stopping by and have a wonderful day!!

Tuesday, July 26, 2016

Season's Greetings!

 
Check out how Judi Kauffman used the 'Season's Greetings' die and an unusual color palette for her 6" square card! You'll find it on page 78 of the newly-released issue of Just Christmas Cards & Ornaments! Magazine from Scott Publications
From Quietfire  ||  From Elizabeth Craft Designs
Thanks for stopping by!

Monday, July 25, 2016

"Dream" mixed media card

Hello Crafty Friends!  Kathy Jo here today sharing a mixed media card using the beautiful "Dream" die:
Dream - Metal Cutting Die
This lovely die has been used on many of my projects and it is definitely one of my favorites.  (Yes, I love all of Suzanne's dies and there are some that I seem to go to frequently: Believe, Memories, Remember, Merry Christmas and happy.)  I pulled out this favorite die and played with mixed media products to create the Dream card.
Instructions:


  1.  Create a top fold card 5.25" x 5.25" from Kraft card stock.
  2.  Cut pinstripe patterned paper (from My Mind's Eye) to 5" x 5" and distress edges.  Apply white gesso to the center of the paper and lightly along the edges.  Dry.
  3.  Place Tim Holtz' "Tracks" stencil vertically on paper and apply Archival Ink in Coffee.
  4.  Place Tim Holtz' "Bubble" stencil on paper and apply Coffee archival ink.
  5.  Place Tim Holtz' "Flourish" stencil on paper and apply Ranger Texture paste using palette knife.
  6. Adhere scrap cheese cloth and tissue tape as shown.  Dye ribbon using Distress Stain in Tumble Glass.  Adhere lace ribbon.  Create bow and adhere bow/ribbon to card front.
  7. Die cut Dream using white card stock.  Apply Stickles in Peacock.  Sprinkle Tim Holtz Glitter dust on still wet Stickles.  Air dry.  Adhere to card front.  Glue white rose to ribbon.
The card was so fun to make and the Dream pops on the card as it is sparkly and pretty.
Thank you for stopping by!  I do hope you enjoyed the card.  Also- Don't forget to check out the deals right now at Quietfire Design:

Buy two items from our Paper category and get 30% off each!  For in stock items only.
Buy two Spellbinders products (in stock) and get 50% off each
  Sale price will appear when the item is in your shopping cart.
Christmas Stamps are 20% off regular price!

Have a happy crafty day!
Hugs,
Kathy Jo

Wednesday, July 20, 2016

The love we give away....


Hello everyone,
Yvonne here with a card using the Quietfire Design stamp "The Love We Give Away".
Since it's hot and sunny here in Holland this week I matched  the colours of the card to the weather...bright, sunny and...well simply happy :-)


Used materials:

Wishing you all a great day!

Hugs from Holland,

Remember I love you

The Remember die is wonderful for scrapbooking but also for highlighting your sentiment.  On this card, all my pinks frame my sentiment "I love you" from the I Don't Tell You Often Enough stamp set by Quietfire Design.  

Diana Nguyen, Quietfire Design, Remember, Elizabeth Craft Designs, hydrangea, I don't tell you enough

After I stamped the "I love you" on white card stock, I die cut it out with the large frame from Spellbinders Filigree Delight die.  The Remember and hydrangeas (from Elizabeth Craft Designs) were cut from pink card stock paper. A darker pink was cut for the shadow effect on the Remember.  The hydrangea flowers were made by curling each petal with a stylus.  To add more dimension to the flowers, I colored the center a darker pink and then brushed Wink of Stella over the flowers.  I also added drops of Crystal Effects as water drops.


Diana Nguyen, Quietfire Design, Remember, Elizabeth Craft Designs, hydrangea, I don't tell you enough


Remember - Metal Cutting Die


I Don't Tell You Often Enough, Set of 5 - Mounted


Tuesday, July 19, 2016

Let It Snow Snowman - Season's Greetings die

Yogi here today with another Xmas card under my belt... Love the snowman from the "Let It Snow, Snowman" stamp set.

Click on any image to enlarge. Enjoy

I'm using an "A Way With Words" die from Elizabeth Craft Designs "Season's Greetings" also available on Quietfire Design HERE.
I'm also using a design element/sentiment stamp set from Quietfire Design "Let It Snow, Snowman" 5pce set


Scored and folded my white card. Stamped the winter scene (Deep Red "Winter Stream") using Distress "Iced Spruce" and clear embossed.

Embossed a border around the scene using Cuttlebug "Winter Borders" set, moving the folder as needed.

Adhered a piece of grey/silver Sari ribbon.

Created an electronic cut file of the snowman and design word (or fussy cut around the stamped images... you know how lazy I am BIG GRIN)  and cut from white cardstock. Stamped the words using "Stormy Sky" and embossed with Emerald Creek Hot Stuff "Blue Sparkle" embossing powder. Stamped the snowman using "Tumbled Glass and embossing with Emerald Creek Hot Stuff "Turquoise Shimmer". Adhered both to the card front.

Inside: Stamped the snowflakes using the stormy sky and embossing with the pearlescent embossing powder

Die cut the "Season's Greetings" from white cardstock, inked with the stormy sky and embossed with the turquoise shimmer .

Sponged some blue around the edges.


Monday, July 18, 2016

Every Good & Perfect Gift


Good Morning.  Selma here today with a card designed using Suzanne's newly released Every Good & Perfect Gift rubber stamp.  This verse could be used for so many different types of cards to cheer someone up.

Every Good & Perfect Gift - Mounted

This beautiful verse was stamped, using VersaFine black ink onto a piece of yellow polka dot design paper.  To create frames, Stitched Square dies were used to die cut three different frames. 

To me, flowers are always a perfect gift from above.  I created a barrel of cute pansies and daisies using Susan's Garden Notes Pansy and Garden Patch Mini Daisy die sets. The barrel is from Karen Burniston's Barrel Basket with Pop Up die set.   Curvy Leaves and Leafy Branch dies were used for fillers.  The butterfly was die cut using yellow card stock for the base and brown card stock for the silhouette.  Orange ink was sponged on the yellow base of the butterfly before gluing the die cut pieces together.  Yellow die cut corners were added to complete the card.  All dies are from Elizabeth Craft Designs.


Thursday, July 14, 2016

Love Card with Flourished Heart Cutting Files

Hello, Connie Nichol here today with a card featuring the Quietfire Love die manfactured by Elizabeth Craft Designs and components from two of Suzanne Cannon's digital cutting files for the Silhouette.  I was invited to a wedding this past weekend and needed to put together a quick card for the bride and groom.


I started with wanting to use the Love die and then thinking about what I could add to make it more special.  What better than adding a calligraphic heart?  Suzanne Cannon has several beautiful heart cutting files available in the Silhouette Store.  I ended up using this Flourished Heart Motif cutting file for my heart embellishment.  The inside of the heart cuts out as a separate piece, so I covered it in ultra-fine glitter and popped it up with dimensional adhesive to make it extra special.
I also used a portion of the Flourished Scalloped Heart Card cutting file.  Isn't that white scalloped frame beautiful?  I love how you can take your favourite elements from several cutting files and put them together to make something different.  

And of course, here's the Love die designed by Suzanne Cannon and manufactured by Elizabeth Craft Designs.  It's available here in the Quietfire Design Store or from Elizabeth Craft Design and cuts beautifully.  Perfect for a wedding card.  I love the simple elegance of it.  I think sometimes simple is better.  


Wednesday, July 13, 2016

The Earth Laughs Rose - Crackle Background


Hi There!!  It's Wanda here today!! 

I just love how the flower turned out on this card!!  Of course, it helps that Suzanne penned such a beautiful rose to begin with!!  A little color and you've got a beauty!!  The rose and the quote are the two stamps in The Earth Laughs Rose Set.  I've also used the new Crackle Background (yep, love this stamp also!!)


Let's get started -

  • With a #8 Manila Tag oriented horizontal, 'ink' Crackle Background with Distress Paint (Picked Raspberry, Cracked Pistachio, Squeezed Lemonade) and stamp on right side of tag covering about 2/3 of the tag. Dry. 
  • Rub Distress Stain (Twisted Citron) over entire tag, blot and dry.
  • With a Blending Tool, add Distress Ink (Picked Raspberry, Cracked Pistachio, Squeezed Lemonade) randomly on tag.  Dry.
  • Use a damp towel to remove excess ink from paint-stamped crackle. 
  • Stamp quote with Archival Ink (Jet Black). 
  • Stamp flower onto tag with Archival Ink (Leaf Green).  Left side of flower will run off tag.  Add color to stem with a marker.
  • Stamp flower onto watercolor paper with Archival Ink (Jet Black).  Color flower using Distress Ink (Picked Raspberry, Squeezed Lemonade) and a Water Brush.  Cut out flower only (not the stem) and attach over flower on tag gluing just the bottom-center area of flower leaving the top and sides to slightly lift.  
  • Stamp around edges of tag with Crackle Background using Distress Ink (Picked Raspberry). 
  • Ink some areas of tag with Distress Ink (Mustard Seed) to brighten it up a bit and help some of the detail pop. 
  • Mask off quote and splatter watery, white paint over tag.  Dry.  
  • Layer tag to white cardstock, then pink dotted cardstock, and then to folded white card.  Finished size of card is approximately 4" x 7". 
I hope you've enjoyed today's card!!  I had a lot of fun making it!!!  


Tuesday, July 12, 2016

The New All Seasons stamps...

Hi and thank you so much for stopping over to the Quietfire Design blog today.  I am sharing 2 stamps from the new collection with my projects, one with a card and the other with the new jewelry stamps.


I haven't done a fancy card in a while and so i got out some of my favorite dies and had fun.  This card is made with the new Autumn is a second spring stamp from the brand new "All Seasons Set".  There is a spring, summer, fall and winter one and i had lots of pretty papers from Bo Bunny and flowers in my stash that would match up perfect for a fall theme.  I stamped the card in black over the dotted paper and then cut it out.  This way i could be sure that it all lined up perfectly.  It's just a simple layered card and would be easy to do as a gift set for someone for Christmas or a birthday with each of the new stamps.  How pretty would that be....


And for these little bookmarks there is a new set of stamps that are "Jewelry Words" and will fit inside of jewelry findings.  These are some little metal bookmark pieces that i got from Prima and they fit perfectly.  All i did was stamp some pretty papers and emboss them and then glue them under the resin tops.  


And here is the set of the new "All Season stamps".   The sentiments are really beautiful and masterfully done by Suzanne Cannon.  I hope that you try a few yourself and maybe post what you did on our facebook page so we can see what magic you create with them. 

Have a really wonderful day!!  

Teresa

Thursday, July 7, 2016

Hello Summer


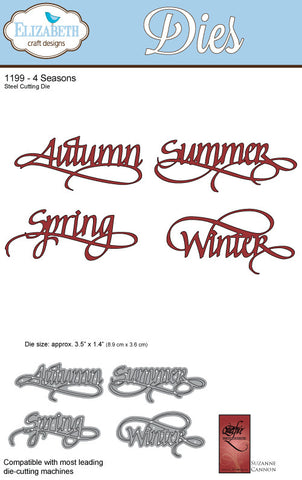
Good Morning.  This is Selma today with a bright, sunny Summer card for you.  It is easy to cheer someone up with a beautiful card by using the A Way With Words die cuts.  Today I have used Suzanne's Hello and 4-Seasons die sets.

A Way With Words, Hello


4 Seasons


In order to create a colorful card, I used Susan's Garden Coreopsis dies to create the flowers.  The butterfly was die cut using white card stock and colored with PanPastels.

The white frame was created by using one of the Dottted Scallop Rectangle dies, and two Fitted Frames 3 - Curvy Rectangles die cuts.  A piece of white card stock was die cut using the Fitted Squares die set and embossed with the Dancing Leaves Embossing Folder.  This rectangles was glued to the back of the Fitted Frames then all rectangles glued together.

Two Corners, using the Corners 1 die set, were die cut and glued to the top of the card.  A white Chain was die cut using  the Chains 1 die set, cut in half and glued to each side.  All the dies used can be purchased from Elizabeth Craft Designs.

The Hello die cut was glued to the top of the white frame and the Summer die cut glued below the flowers.


A Way With Words - Hello
A Way With Words - 4 Seasons

Tuesday, July 5, 2016

I am Thankful for all You do....


Hello everyone,
Yvonne here with a card which is about saying "thank you".
Sometimes the littlest things in life can mean the world to me and thus are Big things to be thankful for :-)
This card is made with such a special person in mind....

For my card I used a stamp from the the Quietfire Design set "I don't tell you enough" (a set of 5 stamps).

Used materials:

I hope you like the card and hope to have inspired you to make a card for a special person in your life.

Thanks so much for stopping by
and with hugs from Holland,
Yvonne


Related Posts Plugin for WordPress, Blogger...