Tuesday, July 31, 2018

Merry Christmas - May Your Longest List - Step Back Technique

Yogi here today with a Step Back technique I discovered recently and thought I'd give it a whorl...

I'm using an A Way With Words dies  "Merry Christmas 2" 2pce set from Elizabeth Craft Designs, also available on Quietfire Design HERE

I'm also using a quote stamp from Quietfire Design ("May Your Longest List...")  


Scored and folded my red textured cardstock to create my easel structure. Cut another piece in white the same size as card and adhered to front.

The technique calls fro a rubber stamp and die set. Since I don't own the die for this holly branch I cut my top layer with my electronic cutter...

Stamped the holly (Sheena Douglas "Holly" set) on white cardstock using Versafine Black Onyx and clear embossed. Painted with watercolors.


Electronically cut the upper layer in the same orientation as the bottom layer. Cut a piece of fun foam and adhered to the top layer then onto the bottom layer, then onto the card front.

Doodled some faux stitching using a black Zig marker.

Die cut the "Merry Christmas" from an Oriental Menu that was mailed to me. I was about to throw it out, but said to myself, it's a nice glossy heavy weight cardstock with really nice food images... I love the way the die cuts turned out. It was a 6page menu so have lots of die cuts BIG GRIN.

Added some white dots to the berries with a gel pen ad then Glossy Accents.

On the floor: Stamped the quote using the black and clear embossed. Die cut with Elizabeth Craft Designs "Stitched Rectangles", sponged edges with Distress "Candied Apple". Adhered to some mat board and then to the floor to act as my stopper.

Die cut the holly sprig (Tim's thinlits "Holiday Greens"). Colored with Distress pads.

Tied a multi loop bow and adhered with hot glue. Added the large white pearl.


Monday, July 30, 2018

Christmas in July - Winner

Drum roll, please!

The winner of the $25 gift certificate is Charmaine Stack! 
Congrats Charmaine!

Email me to claim your prize! :-)

Thanks to everyone who followed our Christmas in July and to the Quietfire Design Team who shared so many wonderful projects!
And of course, a big thanks to everyone who placed orders.  Enjoy your new toys, er, TOOLS! I should be able to get them all out in the mail by tomorrow!

Suzanne

I need coffee ....


Today i have another new coffee card from the cutest set of new cling stamps.  I found a few pieces of a beautiful water color looking paper in my stash and it already looked like it had spills on it. So cute!   So i added the tea stain ring from the tea stamp set on the bottom in a light taupe and then stamped my image on the top in black.  I really love this quote and i think it speaks for alot of us in the mornings.... 


Here is a quick closeup, the sentiment is perfect on this papers don't you think?  And like my card last time that was made with the same 49th and Market papers it really works well with the stamps and not much other fussiness.  Summertime is a great time to get out your stamps and create a bunch of cards to have ready for everyone just in case.... and this set is a must have!

Thank you again for stopping over for a little coffee time inspiration! And i guess i need to say that 
this is actually my last post for Quietfire Design for awhile.  It was a very hard decision to do but i have been researching my family tree since my parents passed away and it's time for me to do some traveling and make up a few books for the family to keep about them.  

Thank you to all of you for the many sweet and kind comments you have left through the years.  Yes i can't believe it's been years on this amazing team but always check back because you never know
what beautiful and amazing products that the talented Suzanne Cannon has up her sleeve or what amazing inspiration you will get from the Design Team!

Enjoy your day.. I will miss you all.... Teresa

Supplies:

Quietfire Design Cling Stamps:


Sunday, July 29, 2018

Christmas in July- All hearts come home for Christmas

Hello Crafty Friends.

Welcome to the final day of Christmas in July!  I do hope that you have enjoyed the week and that we have given you ideas for your Quietfire Christmas projects.

Today's project is unbelievably sweet and it makes my heart smile whenever I look at it.  The focal point is the heartwarming stamp, All hearts come home for Christmas:
All Hearts Come Home - Mounted
Card Instructions:

  1. Create 5x5 top fold card using white card stock.
  2. Cut and mat patterned paper to card front.  (I used Prima Marketing's Santa Baby papers throughout.)
  3. Adhere pink doily to center of card front.
  4. Cut image to size and apply silver marker along edges.  Adhere wee double bow.  Apply glitter to snowflake centers.
  5. Stamp quote to white card stock and die cut using circle die.  Apply silver marker along edges.  Mount to card front using double faced foam tape.
  6. Decorate inside of card as desired.

 Isn't it darling?
Alas, today is the last day of the Christmas in July here at Quietfire Creations...but it has been a fun week!  


Don't forget to enter in the draw for the $25 gift certificate!
To celebrate Christmas in July we’re having a giveaway!  One randomly chosen follower will win a $25 gift certificate for the Quietfire website.  All you have to do to be eligible is comment on the Quietfire Creation blog posts and follow us on YouTube!  https://www.youtube.com/user/QuietfireDesign   Entries close Sunday July 29, 2018 at midnight.  Good luck!!

Thanks for stopping by!
Have a happy, crafty day.
Big Hugs,
Kathy Jo

Saturday, July 28, 2018

Christmas in July- Periodic Table "Ho Ho Ho"

Hello Crafty Friends!

Have you enjoyed the Christmas projects this week?   It has definitely been a jam packed week of holiday inspiration!

Today's card was inspired by all of Suzanne's awesome digital cutting files.  She is such a busy gal creating weekly digital files for us crafters.  The digital cutting file Ho Ho Ho periodic table is right up my alley being a nerdy mechanical engineer.  (That's right, I admit to being a nerd.  And I am loving all of her Periodic Table files!)  

Card Instructions:

  1. Die cut Ho Ho Ho using red card stock.  Apply brown ink along edges to create an aged appearance.
  2. Create top fold card using Kraft card stock.
  3. Cut and mat wood grain paper to card front.  Apply brown ink along edges.
  4. Mount Ho Ho Ho to card front using double faced foam tape.
  5. Apply Nuvo Crystals or similar to inside of each H o.
  6. Decorate inside as desired.

Isn't it fun?  Perfect for your "nerd" this holiday!

Have you entered into the draw for the $25 gift certificate?  It is easy peasy: 
To celebrate Christmas in July we’re having a giveaway!  One randomly chosen follower will win a $25 gift certificate for the Quietfire website.  All you have to do to be eligible is comment on the Quietfire Creation blog posts and follow us on YouTube!  https://www.youtube.com/user/QuietfireDesign   Entries close Sunday July 29, 2018 at midnight.  Good luck!!

Thanks for stopping by!
Have a happy, crafty day.
Big hugs,
Kathy Jo

Friday, July 27, 2018

Christmas in July - May Your Heart Be Warm, Merry Christmas


Hello!!!  I hope you've been enjoying Christmas in July this week!!!  Beautiful projects have been shared and I love Suzanne's video.  Don't miss it.

I'm sharing 3 cards, all with different looks, but all done with the same stamps (May Your Heart Be Warm and Merry Christmas Background) and die (Merry Christmas 2).  All the details are below.

To celebrate Christmas in July we’re having a giveaway!  One randomly chosen follower will win a $25 gift certificate for the Quietfire website.  All you have to do to be eligible is comment on the blog posts and follow us on YouTube!  https://www.youtube.com/user/QuietfireDesign.  Entries close Sunday July 29, 2018 at midnight.  


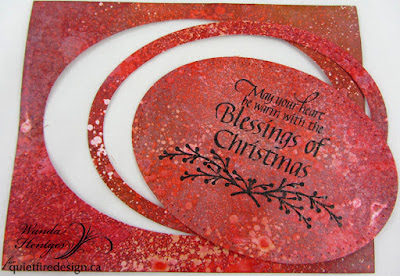
This first card came about when our daughter was here for a visit and I was showing her the Distress Resist Spray.  I built layers onto a piece of cardstock starting with Resist Spray, inking, spraying again with Resist, adding more ink, and then repeating a third time.  Each layer of Resist is a different tone from light to dark since I worked from light to dark with my colors.  Once I was done and I had this beautiful background of reds I thought, "Oh, this would be great for a Christmas card and I need one this month for QF", so it became one.

I stamped the quote in the center of the paper and then die cut two Stitched Ovals (Elizabeth Craft Designs).  I added gold embossing (Queen's Gold - Ranger Ink) around the main oval and a hint of gold paint around both the inside and outside of the other oval.


On my folded green card I stamped the Merry Christmas Background down the center using Versamark Ink for that watermark look and then added white paint splatters.


Merry Christmas was die cut from Gold Metallic Cardstock.  Red Stickles dots were added to the branches and on the dot above the letter "i" of the diecut.  Everything is attached flat except the main oval and that is attached with foam tape.


This next card has a much more vintage feel.  (and I think it's my favorite of the three cards)


The quote was stamped onto white cardstock.  I used a stamping platform so I could ink the quote with black and stamp, then ink the branches with green and stamp.  After stamping I covered the paper with embossing ink and embossed it with Baked Texture Vintage Beeswax (Emerald Creek - Seth Apter).  I added a second layer of embossing ink and powder and heated it again.  Isn't it gorgeous!!!  


My background was created on Transparent Yupo Paper.  I used alcohol inks and alcohol blending solution on felt to dab onto the Yupo adding layers until I liked it.


Once it was dry I stamped the Merry Christmas Background with the Alcohol Lift-Ink.  This pulls alcohol ink off the yupo paper.  (You can only remove alcohol ink with the Lift-Off ink if you have the alcohol ink on a non-porous surface such as Yupo).  So now you have alcohol ink mixed with the lift-ink on your stamp.  You can then stamp onto a porous surface, such as regular cardstock, to transfer the ink.  I did this twice to get all the way down the Yupo paper.  On my regular cardstock I left an open area when I stamped the second time.  I used this card of stamped transferred ink to create another Christmas card that I shared early this week on my blog HERE.

The Lift-Off ink on the Yupo will still be wet.  Now you dab over that ink with a paper towel until most of the ink is removed and then you can lightly rub to get the last of it making what you stamped really pop.  If you rub too soon, you will smear your stamping instead of it staying crisp and clear.


Merry Christmas was die cut from white cardstock and my folded base card is white cardstock.  I gave the die cuts and edges of the base card a creamy, shimmery look by brushing it with Nuvo Mousse (Mother of Pearl).  A perfect look for a vintage card.


Again I used Red Stickles for berries on the branches and over the letter "i".


My final card has a much brighter look.


I stamped and embossed the Merry Christmas Background in clear onto white cardstock.


Next I sprayed over the cardstock with Distress Spray Stains, blotted it, dried it, and, once I knew what size I needed, trimmed it down.


I attached double sided tape to the top of silver cardstock, die cut Merry Christmas, removed the liner from the top and added Silver Silk Microfine Glitter.  After dumping off the excess glitter and putting it back into the jar, you then use the pad of your finger to rub over the glitter to burnish it down well and really bring out the shine.  It's fun to watch it sparkle more as you rub over it!!


I stamped the quote onto white cardstock, embossed it with Carnation Red embossing Powder and die cut it with a Stitched Oval die.


I added Silver Glitter Paste around the edges of the oval.  If you don't have glitter paste but you do have glitter, you can make your own paste by mixing glitter with gloss gel medium.  Silver Stickles were used over the berries on the branches. 


White cardstock was folded for the base of the card.  


There ya go.  Three completely different looks using the same stamps and dies.  Isn't it great!!!  Which one is your favorite?

Thanks for following along!!

Hugs, Wanda

Thursday, July 26, 2018

Twinkle & Sparkle


Hey Quietfire Fans! It's all about Christmas in July this week on the blog and I'm excited to share my Twinkle & Sparkle Tag. 


My tag features a variety of Quietfire Stamps and A Way With Words Dies. Grab a cup of your favourite Christmas beverage and learn how to recreate my Twinkle & Sparkle tag at home. 


To start, die cut the Flourished Oval Frame die out of the middle of a tag. 


Set the Flourished Oval Frame aside. You'll need the tag with the frame outline. Apply Emboss It Ink to the Merry Christmas Background stamp and stamp onto the tag. Reapply the ink to the stamp and stamp again on the remainder of the tag. Sprinkle Glacier White Embossing Powder over top of the tag. Tap off the excess powder and emboss with a heat tool. Using a blending tool with foam, blend Candied Apple and Fired Brick Distress Oxide Ink over the entire surface of the tag. Use a baby wipe to wipe the ink off the embossed words. Spritz the ink with water.


Grab the Flourished Oval Frame. Apply Emboss It Ink to the frame. Sprinkle Charred Gold Embossing Powder over the entire surface of the frame. Tap off the excess powder and emboss with a heat tool.


Next you'll need a plain tag. 


Using a blending tool with foam and blend Candied Apple Distress Oxide Ink in the middle of the tag. Spritz the ink with water. Dry the tag with a heat tool. Apply Emboss It Ink to the Twinkle & Sparkle stamp from the Bright Holidays Word and stamp onto the middle of the tag. Sprinkle Doubloon Emboss Powder over the word. Tap off the excess powder and emboss with a heat tool.


Apply Emboss It Ink to the dot stamp from the Have Yourself a Merry Little Christmas Stamp set and stamp randomly around the Twinkle & Sparkle sentiment. Sprinkle Iridescent Shimmer Embossing Powder over the dots. Tap off the excess powder and emboss with a heat tool.


Adhere the Flourished Oval Frame inside the tag that has the Flourished Oval Frame cut out. 


Distress the edges of both tags. Ink the edges of both tags using Black Soot Distress Ink and a blending tool with foam. Foam square the tag with the frame overtop of the tag that has the sentiment on it.


Die cut three snowflakes from the Brr word die out of white cardstock. Add a glitter dot to the middle of each snowflake.


Use a paint brush and Black Soot Distress Spray Stain to splat the ink randomly on the tag. Adhere one snowflake in the top right corner of the frame. Adhere the other two snowflakes on the bottom left side of the frame. 


Tie a white ribbon at the top of the tag. To finish off the tag, choose a couple of metal snowflakes and tie them to the middle of the bow with a piece of twine. 

Here are a couple of close up's of the Tag.


Thanks so much for joining me today and taking a look at my project! I hope that I've inspired you to want to recreate my Twinkle & Sparkle Tag at home. 


Quietfire Supplies Used:


Other Supplies Used:

- Emerald Creek Craft Supplies: Mini Victorian Snowflake Charms, Victorian Snowflake Charms, Doubloon Embossing Powder, Glacier White Embossing Powder, Charred Gold Embossing Powder and Iridescent Shimmer Embossing Powder
- Tim Holtz for Ranger Ink: Distress Oxide Ink - Candied Apple & Fired Brick, Distress Ink - Black Soot, Distress Spray Stain - Black Soot, Blending Tool with Foam, Distress Tags and Distress Sprayer
- Ranger Ink: Emboss It Dabber
- Elizabeth Craft Designs: Transp. Glitter/Gold Dots
- Misc: White Cardstock, Heat Tool, Baby Wipes, White Ribbon and Twine

To celebrate Christmas in July we’re having a giveaway!  One randomly chosen follower will win a $25 gift certificate for the Quietfire website.  All you have to do to be eligible is comment on the blog posts and follow us on YouTube!  https://www.youtube.com/user/QuietfireDesign   Entries close Sunday July 29, 2018 at midnight.  Good luck!!

- Katelyn


Related Posts Plugin for WordPress, Blogger...