Thursday, January 30, 2020

Together Card with Calligraphic Heart on Sequin Fabric

Hello, Connie Nichol here today with a rather romantic card that you could use for Valentine's Day or for a wedding or anniversary.  I had purchased some reversible sequin fabric, and was experimenting using it for card making.  This is one of the results.  The sequins certainly make a statement!

connie nichol

I started by cutting a rectangle out of watercolour paper and then cutting a circle out of the rectangle near the top with a moderately large circle die.  I added some colour to the paper using Nuance powders.  These are water soluble powdered dies that have very vivid rich colours.  Sprinkle them on very sparingly and then spray lightly with water. 


Let dry, and then with a fine tip applicator, drizzle a bit of glue here and there onto the watercolour paper.  Sprinkle with burnished silver gilding powder and heat emboss.  I also gilded the card edges using embossing ink and the silver powder.


Die cut the word 'together' and a calligraphic heart from the Calligraphic Elements 2 set, dab with embossing ink and coat with burnished silver gilding powder.  Heat to melt.  

Layer sequin fabric under the die cut circle and back with a piece of cardstock before adhering everything to a card base.  I found that that gave the fabric some good stability.  Thanks for stopping by and happy card making!

Quietfire Design Products Used:  Burnished Silver Gilding Powder, Together metal cutting die, Calligraphic Elements 2 metal cutting die


Other products used:  Magenta Nuance powders, Inky Antics reversible sequin fabric, Beacon adhesives, watercolour paper, Versamark ink


Tuesday, January 28, 2020

CAS Kites fly highest

Hi, Diana here today with a super simple card featuring the Kites Rise Highest stamp.  I just didn't feel like it needed much besides a couple of kites high off in the corner.


I stamped the quote in the bottom right corner.  At first I masked off the kite before inking but then (SSHHH!!!) I cut off the kite with one clean cut.  I was too nervous some inking would mess up that clean white card when I stamped the two kites.


Do sponge a couple of clouds before stamping though! 


Kites Rise Highest - Mounted


Monday, January 27, 2020

Rosemary & Sage Notecard


Hey Quietfire Fans! For today's project, I'm sharing with you my Rosemary & Sage Notecard. By combining a variety of stamps, dies and the Modern Gilding Powders, they were all perfect for creating my card. You'll want to grab a cup of your favourite winter time beverage and learn how to recreate my card at home.

To start, you'll need the medium Flourished Corner. Apply Potting Soil Archival Ink to the corner and stamp onto a piece of cream patterned paper. Reapply ink to the same corner and stamp onto the same piece of paper. Fussy cut the corners out. Ink the edges of the corner using Walnut Stain Distress Ink and a blending tool with foam.

Die cut the Flourished Frame out of white cardstock. Apply VersaMark Ink to the entire surface of the frame and sprinkle Copper Scroll Modern Gilding Powder over the entire surface of the frame. Tap off the excess powder and emboss with a heat tool. Apply VersaMark Ink to the entire surface of the frame again and sprinkle Copper Scroll Modern Gilding Powder over the entire surface of the frame. Tap off the excess powder and emboss with a heat tool. 


Die cut a 3" Stitched Rectangle out of the same cream patterned paper you stamped the corners on. From the Parsley, Sage, Rosemary and Thyme stamp set, you'll need the Rosemary and Sage stamps. Apply Forest Moss Distress Ink to the Rosemary image stamp and stamp 1" from the left of the 3" stitched rectangle. Apply Forest Moss Distress Ink to the Sage image stamp and stamp 3/4" from the right of the 3" stitched rectangle. Apply Shabby Shutters Distress Ink to the Rosemary word stamp below the Rosemary image. Apply Shabby Shutters Distress Ink to the Sage word stamp and stamp below the Sage image. Apply Potting Soil Archival Ink to the Grid Background and stamp randomly on the edges of the 3" stitched rectangle. Apply ink to the stamp as needed. Distress the edges of the rectangle. Ink the edges of the rectangle using Walnut Stain Distress Ink and a blending tool with foam.


Die cut a 4" Stitched Rectangle out of kraft cardstock. Die cut a 3 1/2" Stitched Rectangle out of a green floral piece of patterned paper. Distress the edges of both rectangles. Ink the edges of both rectangles using Walnut Stain Distress Ink and a blending tool with foam.


Adhere the 3 1/2" stitched rectangle to the 4" stitched rectangle. Adhere the flourished frame to the 4" stitched rectangle.


Wrap twine four times along the bottom of the 3" rectangle. Foam square the 3" rectangle to the middle of the 3 1/2" rectangle.


Adhere one of the corners to the top left corner of the 3" rectangle. Adhere the other corner to the bottom right corner of the 3" rectangle. To finish the card, cut a cardbase out of kraft cardstock that measures 5 1/4" x 8", score at 4". Adhere the cardfront to the cardbase.


Here are a few closeup photos of the finished card.


Here is the finished Rosemary & Sage Notecard.


Quietfire Design Supplies Used:


Other Supplies Used:

- Elizabeth Craft Designs: Stitched Rectangles
- Ranger Ink: Potting Soil Archival Ink
- Tim Holtz for Ranger Ink: Distress Ink - Walnut Stain, Forest Moss & Shabby Shutters and Blending Tool with Foam
- Imagine Crafts: VersaMark Ink
- Graphic 45: Patterns & Solids - Penny's Paper Doll Family 
- Misc: Twine, White Cardstock and Kraft Cardstock

Thanks so much for joining me today and I hope that I have inspired you to recreate your own version of my Rosemary & Sage Notecard. 

- Katelyn


Tuesday, January 21, 2020

I Don't Need an Inspirational Quote...


Hello Quietfire fans!  Betsy on the blog today with this cute coffee card!  You'll see as we go along
that I changed my mind twice as I was making this!  Products I used:


I love the quote from this stamp set!  The first step was to cut my papers to the correct size.  My
card base is an A2 size top folding Neenah Desert Storm card.  My next layer is dark brown
and measures 4" x 5 1/4".  My patterned paper is 3 3/4" x 5".  I adhered those together in
that order.  My smaller panel starting with the dark brown card stock measures
2 3/4" x 3 1/2".  The patterned paper is 2 1/4" x 3 1/4".  I did not not adhere these
together at this point.

I heat embossed the coffee cup and steam on striped paper with the Acanthus Teal Modern
Gilding Powder.  I also heat embossed the sentiment with the same embossing powder
directly onto the smaller patterned paper panel.


I fussy cut the coffee cup and steam.  And then decided that I didn't like the quote stamped
directly onto the patterned paper.  So I decided to stamp it onto a scrap of patterned
vellum.


I really didn't like that either, so I heat embossed it onto some teal colored vellum.  It was very
easy to keep lining these up.  But I was finally happy with the teal vellum.  I used a Zyron Sticker
maker to adhered the vellum panel.  You really can't tell that I heat embossed this 3 times
and layered them one over the other LOL! I adhered the coffee cup and steam above the sentiment at an angle.  I then added some dark brown peel-offs to give the piece of vellum some definition and adhered this patterned panel to the dark brown one. Then I glued the whole small panel to the lower right corner of my card.  I added a small white & gold twine bow at the top left corner of
the sentiment and 3 gems in the lower right corner.  And my card was done!


I was really pleased with the final card and was glad I had made the changes
to the sentiment.


Quietfire Design Products Used:


Other Products Used:

Unity Stamp Company - Coffee Lovers Paper Pad
Paper Wishes - Teal Vellum
Gina K. Designs - Dark Chocolate
Love From Lizi - Dark Brown Metallic Peel-offs
Brown Gemstones
White & gold twine
Neenah Desert Storm card base
Heat Tool
Glue
Anti-static Powder bag

Thank you for stopping by today!

For a more detailed tutorial for this card visit my blog:


Monday, January 20, 2020

Sleeping Under a Quilt, a Scrapbook Layout

Sleeping Under a Quilt stamped and embossed with Acanthus Teal Modern Gilding Powder/ scrapbooking layout

Happy January 20, 2020! Kim here today, sharing a scrapbooking layout using a new favourite stamp from Quietfire Design; ‘Sleeping Under a Quilt’ [item #6245]

My Mom is an exceptional quilter! This past Christmas, she gifted us beautiful quilts. My son was over the moon to receive a full size quilt, he has been sleeping under my Mom’s quilts all his life, and was wanting one to fit his bed! This stamp was perfect to tell this story.

Creative Scrapbooker Magazine January Sketchy Challenge


My layout started with the January Sketchy Challenge from Creative Scrapbooker Magazine. I love adapting them, to make them my own. Sketches are such a great place to start the creative process!

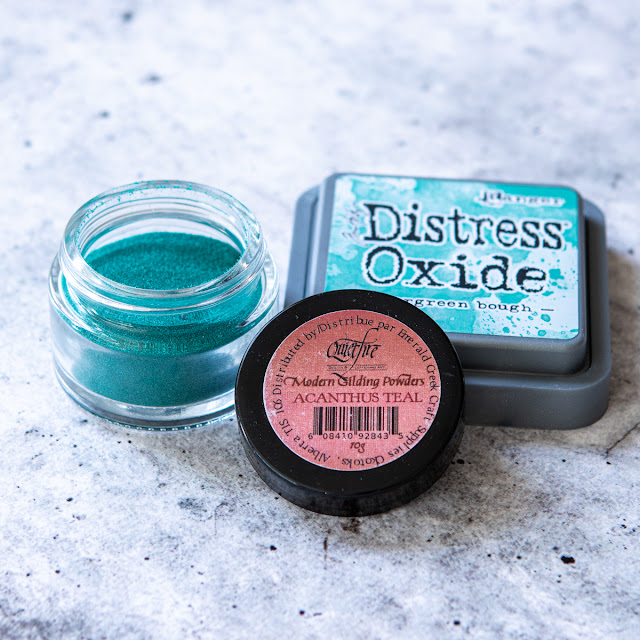
I used the quilt quote in the lower right corner of the grid design. I stamped it onto a piece of sturdy white cardstock using Distress Oxide ink and then embossed with Acanthus Teal Modern Gilding PowderThe Distress Oxide leaves a beautiful, crisp yet ‘juicy’ image for embossing. I like to choose a similar colour to the Modern Gilding Powder I use. Not necessary, just something I have been doing for so long, it’s just instinctual. 

Acanthus Teal Modern Gilding Powder / Distress Oxide Ink

Note that I also added stitching to the border.

Sleeping Under a Quilt stamp / embossed with Acanthus Teal Modern Gilding powder

I sewed on two fabric hearts, it seemed to be a perfect embellishment for my ‘quilted’ layout. 

scrapbook layout using Sleeping Under a Quilt stamp

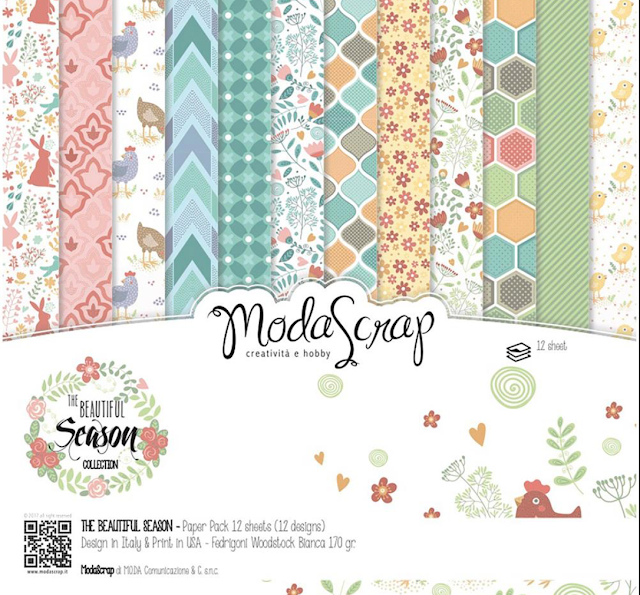
I found the perfect background paper for the layout from a Moda Scrap collection I had in my stash called ‘The Beautiful Season Collection’. The colour was great and it looks like a border one might find on a quilt...I was really trying to keep with that theme!

Scrapbook layout using Sleeping Under a Quilt stamp and acanthus Teal Modern Gilding Powder

I am really happy to have this story told and tucked into a scrapbook album. Often we think of stamps as a card making elements, but some of them are so lovely to add to scrapbooking layouts. This particular quote couldn’t be any more perfect for the job I needed it to do!


Happy creating in 2020!

Supplies:


Creative Scrapbooker Superstock 
Moda Scraps: The Beautiful Season Collection
Ranger Distress Oxide Ink: Evergreen Bough
Scrapbook Adhesives by 3L
Ali Edwards: cork heart & speech bubble chipboard

Bernina sewing machine

Saturday, January 18, 2020

Thursday, January 16, 2020

I will write peace on your wings

Hi, Diana here today to share with you a card I made with the "I will write Peace" stamp and how I changed it up just a bit for a second card with the same layout to show you how different materials can be swapped in and out.


After I stamped the quote on a sheet of white card stock, I used the slope die from Elizabeth Craft Designs Adventure Edges.  Now you can simply sketch and cut out a wavy line but the dies makes it a bit easier and cleaner as I wanted to do this twice.


The second time I did it I had the bottom point touch and the top about an inch and a half apart to make a small V shape cutout.


I then used green and blue Copic markers to color the inside.  I popped the white layer up on foam tape on a blue card base but not the colored swatch to add depth to the card.  I also added a butterfly from the Butterfly Flourish die set covered in Elizabeth Craft Design Microfine Glitter Silver Sands.


After I did, I thought about how I could have made it using different mediums.  This time I stamped and embossed with Gothic Black Modern Gilding powders.  It made the quote defined and just more striking. 


The other change I made was to use a gradient of Silk Microfine Glitter for my swatch of color instead of Copics.  Since I used the glitter for the background, I switched to Burnished Silver Modern Gilding powders for my butterfly.


I love both of these cards - they each have their own beauty to them.  Hope that inspires you to play around - because that's what it's all about!  Have some fun.


Supplies:

I Will Write Peace - Mounted


 Butterfly Flourish - Metal Cutting Dies


Modern Gilding Powders:  Gothic Black and Burnished Silver


Tuesday, January 14, 2020

Happy Anniversary Card


Hey Quietfire Fans, Happy New Year! For today's project, I'm sharing with you a Happy Anniversary Card. By combining a variety of stamps and the Modern Gilding Powders, they were all perfect for creating my card. You'll want to grab a cup of your favourite winter time beverage and learn how to recreate my card at home.

Start, you'll need to die cut a 3 1/2" Stitched Rectangle out of white cardstock. Apply Emboss It Ink to the Dotted Harlequin stamp and stamp onto the rectangle. Sprinkle Dragon Berry Modern Gilding Powder over the entire surface of the rectangle. Tap off the excess powder and emboss with a heat tool. Distress the edges of the rectangle. Ink the edges of the rectangle using Black Soot Distress Ink and a blending tool with foam.


Apply Emboss It Ink to the wreath from the Twiggy Wreath stamp set and stamp onto a piece of white cardstock. Sprinkle Copper Scroll Modern Gilding Powder over the stamp heart. Tap off the excess powder and emboss with a heat tool. Apply Emboss It Ink to the Happy Anniversary sentiment from the Twiggy Wreath stamp set and stamp in the middle of the twiggy wreath. Sprinkle Dragon Berry Modern Gilding Powder over the sentiment. Tap off the excess powder and emboss with a heat tool. Fussy cut the heart out. Ink the edges of the heart using Black Soot Distress Ink and a blending tool with foam.


Die cut a 4" Stitched Rectangle out of a piece of black cardstock. Distress the edges of the rectangle.


Die cut two 1 1/8" Stitched Fishtail Banner out of black cardstock. Cut each banner down to 2 1/4". Adhere the two banners together. Distress the edges of the banners.


Foam square the fishtail banner to the middle of the 3 1/2" rectangle. Wrap twine around the middle of the 3 1/2" rectangle five times and then tie a bow on the right hand side.


Adhere the 3 1/2" stitched rectangle to the 4" stitched rectangle.


Use adhesive and 3D foam square to adhere the Happy Anniversary heart to the middle of the stitched fishtail banner.


To finish the card, cut a cardbase out of white cardstock that measures 5 1/4" x 8", score at 4". Adhere the cardfront to the cardbase.


Here are a few closeup photos of the finished card.


Here is the finished Happy Anniversary Card.


Quietfire Design Supplies Used:


Other Supplies Used:

- Elizabeth Craft Designs: Stitched Rectangles and Stitched Fishtail Banners
- Ranger Ink: Emboss It Ink
- Tim Holtz for Ranger Ink: Distress Ink - Black Soot and Blending Tool with Foam
- Misc: Twine, White Cardstock and Black Cardstock

Thanks so much for joining me today and I hope that I have inspired you to recreate your own version of my Happy Anniversary Card. 

- Katelyn


Related Posts Plugin for WordPress, Blogger...