Thursday, February 27, 2020

Where Words Fail...


Hello Quietfire fans!  Betsy here today sharing with you a beautiful music
inspired card.
I have used the "Where Words Fail" stamp set.  I have also used


To start with I chose my papers which came from Stamperia - Music.  I distressed the
 edges of the 2 panels I wanted to use.  Then I inked the edges with chalk ink
 in a mocha color.  


Next I heat embossed my sentiment.  I stamped it onto the smaller blue panel
with VersaFine Clair Nocturne ink.  Since this is a pigment ink, it stays
wet long enough for me to then sprinkle on the Modern Gilding Powder in
Gothic Black.  Having pre-treated my panel with an anti-static powder
bag, none of the embossing powder stuck where I didn't want it to.
Using the pigment ink to stamp with gives me a very clean stamped
image to then heat emboss.


I layered my papers onto an A2 size side folding card base with the edges inked.  
I used a sheer gold ribbon across the top and a few musical metal
embellishments.  And my card was complete.


I hope you enjoyed learning how to make this elegant musical card with
this gorgeous quote stamp from Quietfire Design.  

Quietfire Design Products Used:


Other Products Used:

Stamperia - Music Paper Collection
Chalk ink - Mocha
Sheer Gold Ribbon - 3/8" wide
Metal Embellishments
VersaFine Clair Nocturne Ink
A2 Size white side folding card base

Thank you so much for stopping by today!
Betsy

In my capacity as a design team member for Quietfire Design, I do receive the products I use from them. All opinions and creative decisions remain my own, and I only work with companies/use products that I love.


Tuesday, February 25, 2020

Stenciled Caulking Background Card

Hello, Connie Nichol here today with a card that is published in the spring issue of Creative Scrapbooker Magazine.  It features the Spring has returned stamp from Quietfire Design.


It's super simple and quite unique because it uses caulking from the hardware store to create some texture.  Simply pick up a tube of caulking (costs less than $3 a tube), use an old hotel key as an applicator and smear the caulking through a stencil to create a card background.  The caulking dries quickly and can be coloured with a few drops of spray ink or reinker before application.


Add a stamped Quietfire quote, a couple of paper flowers and you're done!  

Thanks for stopping by and I hope spring finds you soon, wherever you are!


Supplies Used:  Quietfire Design stamp, acrylic caulking, Prima flowers and feathers, Ranger ink

Monday, February 24, 2020

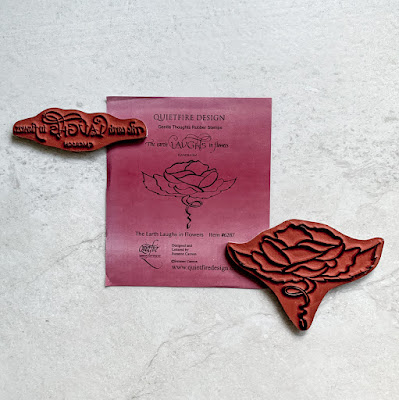
The Earth Laughs in Flowers - Watercoloured Card Technique

Quietfire Design-cardmaking-The EarthLaughs in Flowers-©kdgowdy-Kim Gowdy

Hello and Happy Monday! Kim here on the Quietfire Creations blog again. I am just returning from a week in Las Vegas and must say...I am so ready to be done with winter! Funny how we adapt so quickly and fully to warmer temperatures! With that being said, let’s create with lovely stamp set, The Earth Laughs in Flowers!

Quietfire Design-cardmaking-The EarthLaughs in Flowers-©kdgowdy-Kim Gowdy


This simple technique is one of my favourites and can be quite relaxing to do. Just what I needed after a very ‘people-y’ and busy week away!

I stamped my flower image onto a piece of water colour paper with Ranger Archival Black Ink. Using a stamp positioner, I layered my ink about 4 times. I find that water colour paper requires multiple impressions to achieve a crisp, inked image. It’s important to use an archival ink so the next steps do not cause the image to bleed.

Quietfire Design-cardmaking-The EarthLaughs in Flowers-©kdgowdy-Kim Gowdy

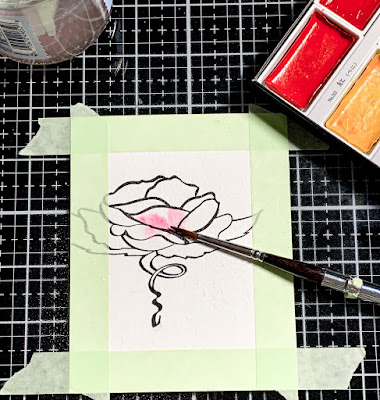
Once the image was stamped I used a narrow strip of painter’s tape to my edges, creating an even border around my image. Be sure the tape is pressed down on the inside edges.

Quietfire Design-cardmaking-The EarthLaughs in Flowers-©kdgowdy-Kim Gowdy

Spritz the paper with water.

Quietfire Design-cardmaking-The EarthLaughs in Flowers-©kdgowdy-Kim Gowdy

You’ll want a nice amount of water on your working area, but not pooling.

Quietfire Design-cardmaking-The EarthLaughs in Flowers-©kdgowdy-Kim Gowdy


I colour my image with water colours. The spritz of water to the page allows your paint to flow onto the image, add more as required or pick up excess water/colour with a small piece of paper towel and a light touch.  

Quietfire Design-cardmaking-The EarthLaughs in Flowers-©kdgowdy-Kim Gowdy


Once your image is dry, your paper will flatten. Sometimes it needs a bit of help, I use an dry iron with paper towel or parchment paper placed over painted image.

Lastly, I stamped my sentiment, again using multiple layers of ink to get a crisp image. I love the look of the image and sentiment extending past the edges. It creates an interesting contrast to the water coloured focal point.

Quietfire Design-cardmaking-The EarthLaughs in Flowers-©kdgowdy-Kim Gowdy

Thanks for checking into the blog. Hoping this card inspires you to pull out some water colour and play. Don’t overthink the process, water colours are very forgiving and are perfectly imperfect!

Supplies:


Tim Holtz Stamp Platform
Ranger Archival Black Ink
Koi Watercolours
Scrapbook Adhesives by 3L - ultra strong
Bazzil cardstock

Strathmore Watercolour Paper

Wednesday, February 19, 2020

Stamp Focus: "Look for the dream"

Hello Crafty Friends!

Are you looking for an inspirational card for a friend considering a new career?  Or a loved one working hard on a goal?  Perhaps a family member is graduating soon?  The card I am sharing today has a wonderful and inspiring quote that is perfect for so many occasions.  The gorgeous calligraphy stamp is called "Look for the dream":
Look For The Dream - Mounted
The stamp is a beautiful focus for an inspirational card front.  For my card I created a simple inky background (spritzed with water) and cut to 3.75 wide x 5 high.  Versamark was applied along the edges and Modern Gilding Powder in Kells Gold was applied along the edges.
Next, the quote was stamped onto vellum paper using Staz On ink in black.  It was cut to 3.75 wide and the long edges torn.  Versamark was applied along the edges and Kells Gold was heat embossed.  The vellum was mounted onto the inky paper, mounted onto 4 x 5.25 lilac cardstock, and then mounted on a 4.25 x 5.5 card base.
A sweet little double bow was adhered as shown and the card was complete!

Quietfire Design product used:
Look for the dream stamp
Kells Gold Modern Gilding Powder

Thanks for stopping by!
Have a happy, crafty day.
Big Hugs,
Kathy Jo

Tuesday, February 18, 2020

Butterfly Birthday

 Today I'm sharing a very quick birthday card using the Happy Birthday clear stamp collection.  The butterfly from the Butterfly Flourish metal die set.


I started with a white card base and a beautiful background paper.  I actually purchased this from a blank card set and used the pretty paper as a background - but you can do the something similar using alcohol inks.  I stamped the birthday sentiment on white card stock and the butterfly twice from the same paper.  Trim the white to a rectangle and adhere.  You can't make this any easier - but it's still gorgeous with that lettering and butterfly.


Butterfly Flourish - Metal Cutting Dies

Butterfly Flourish metal die (Quietfire Design | Elizabeth Craft Designs)


Happy Birthday Collection - Clear Stamps

Happy Birthday clear stamp collection (Quietfire Design | Elizabeth Craft Designs)

Monday, February 17, 2020

Dream Tag


Hey Quietfire Fans! I'm ready for spring to arrive here on the west coast of Canada. So for today's project, I'm sharing with you my Dream Tag. By combining a variety of stamps, dies and the Modern Gilding Powders, they were all perfect for creating my tag. You'll want to grab a cup of your favourite beverage and learn how to recreate my Dream Tag at home.

Die cut a 2 1/2" Stitched Oval out of white cardstock. Sprinkle Wisteria and Spring Green Magenta Nuance over the tag. Spritz the powder with water. Dry the oval using a heat tool. Apply Jet Black Archival Ink to the Dream with your eyes wide open quote and stamp to the middle of the oval. Distress the edges of the oval. Ink the edges of the oval using Black Soot Distress Ink and a blending tool with foam.


Die cut the Flourished Oval Frame out of white cardstock. Apply a coat of Emboss It Ink to the frame. Sprinkle Kells Gold Modern Gilding Powder over the entire surface of the frame. Tap off the excess powder and emboss with a heat tool.


Apply Emboss It Ink to the medium Flourished Corner and stamp onto a piece of white cardstock. Reapply ink to the flourished corner and stamp onto the same piece of white cardstock. Sprinkle Gothic Black Modern Gilding Powder over the corners. Tap off the excess powder and emboss with a heat tool. Fussy cut the corners out. Ink the edges of the corners using Black Soot Distress Ink and a blending tool with foam.


From the Butterfly Flourish die, die cut the medium and small butterfly out of white cardstock.


Die cut a 3" x 6" tag out of white cardstock. Cut the tag down to 5 1/2". Sprinkle Wisteria, Turquoise and Spring Green Magenta Nuance Powder. Spritz the powder with water. Dry the tag with a heat tool.


Apply Emboss It Ink to the Grid Background stamp and stamp randomly onto the tag. Reapply ink to the background stamp as needed and stamp another five times. Sprinkle Gothic Black Modern Gilding Powder over the entire surface of the tag. Tap off the excess powder and emboss with a heat tool. Distress the edges of the tag. Ink the edges of the tag using Black Soot Distress Ink and a blending tool with foam.


Foam square one of the flourished corners 1/2" from the bottom and 1" from the left of the tag. Foam square the other flourished corner 1" from the left and 1 1/4" from the top of the tag.


Adhere the flourished frame to the stitched oval. Use adhesive and foam square to adhere the oval 1" from the left and 1/2" from the bottom of the tag.


Adhere the medium butterfly to the bottom left side of the flourished frame. Adhere the small butterfly to the top right side of the flourished frame. To finish the tag, tie a piece of twine through the top of the tag.


Here are a few closeup photos of the finished tag.


Here is the finished Dream Tag.


Quietfire Design Supplies Used:


Other Supplies Used:

- Elizabeth Craft Designs: Stitched Ovals and Planner Essentials - 26 - Planner Pockets 3 - Tag & Toppers
- Ranger Ink: Jet Black Archival Ink and Emboss It Ink
- Tim Holtz for Ranger Ink: Distress Ink - Black Soot and Blending Tool with Foam
- Magenta Nuance: Spring Green, Wisteria and Turquoise
- Misc: White Cardstock and Twine

Thanks so much for joining me today and I hope that I have inspired you to recreate your own version of my Dream Tag.

- Katelyn


Thursday, February 13, 2020

Shoot for the moon

Hi, there!  I'm here to share a card for the dreamers and the go-getters in your life... or maybe you need to give them a little nudge in that direction.  Haha!  It's the mom in me coming out.


I was in a bit of a rush to make this so I don't have any pics of the steps to make the card but it's pretty straightforward.  I started with a piece of vellum and embossed in black the sentiment from the Soar Collection. I usually emboss on vellum because I have the hardest time not having my ink smear. 

To make my starry night background, I started with blue cardstock and used Black Soot Distress Oxide to darken it.  I then splattered gold Finetec paint on it.  I turned the Star Spray die so that the smaller stars would be at the top.  I then covered a sheet of cardstock with Silver Sands Silk Microfine Glitter and cut the same stars out of that.  Set those aside for now.  Make a moon by using a circle die or punch and then use the same punch/die to turn it into a crescent moon.

The reason for those glittery stars (besides being very pretty) is so that I could have places to add adhesive to the vellum to adhere to the background.  As you know, you can see wherever you put adhesive on the vellum so I did select places and then covered them the with the glittery stars.


Hope you like it and got some ideas and tips from this card.  Thanks so much for looking!


Soar Collection - Clear Stamps

Soar Collection - clear stamp (Quietfire Design | Elizabeth Craft Designs)


Tuesday, February 11, 2020

There are always flowers...

Hello, friends! It's Nancy back on the blog today!

This month I'm sharing a fun card that features a number of wonderful Quietfire Design products!

Here's the card I made:


I found a piece of watercolour paper on my desk, so I began with that.
I stenciled the Dotty design onto the paper using some pink ink. 


I then stamped the wonderful sentiment, on to the stenciled background, using VersaMark ink.
I sprinkled it with the beautiful Dragon Berry Modern Gilding Powder, tapped it off,
and set it with my heat tool.
Isn't that a beautiful shine?


I mounted the watercolour piece onto a slightly larger card base, using foam tape.
Then I die-cut the pretty rose and added it in place on the card front.
I curled up the leaves for some extra dimension, and put a little piece of foam tape under the rose.


This card was lots of fun to put together using these fabulous products!
It would be a lovely card to send for so many different occasions!


Quietfire Products Used:


Other Materials Used:
DCWV Textured Cardstock;
Watercolour Paper;
VersaMark Embossing Ink;
Hampton Art Pink Ink;
Foam Tape.

* * * * *
Thanks so much for stopping by today!
I'll be back soon to share another fun project!

* * * * *
Related Posts Plugin for WordPress, Blogger...