Showing posts with label Calligraphic Elements 2. Show all posts

Tuesday, July 16, 2019

Fill Your Paper Tag Book - Nancy Nickel, Guest Designer


It’s Nancy back with you today. I’m here to share my second Guest Designer post.
When I saw this gorgeous “Fill Your Paper” sentiment stamp in the store, a project immediately came to mind. It was just a matter of finding a cut file in the shop that would work with the image I had in my head. Then I saw the Library Pocket Tag Book cut file, and knew that it was just the right one. Every once in a while, I come across a cut file that becomes a fast favorite. This file is one of those for me. In fact, I have already cut out a couple more, in different themes and colours, that are all ready to put together. The one I’m sharing with you today is done in a vintage style, and made to actually fill with writings and favorite quotes.


 I cut out the album, adding a second cut of the front and back cover, of black cardstock. I also added a second cut of the reinforcements because I liked them so much, and I wanted to add them everywhere! I assembled the pockets. I then inked all the edges of all the pieces with Black Soot Distress Ink, including the inside of the pockets. I adhered all the reinforcements in place.


I stamped the tags with the Grid Background Stamp, using a light ink. That way it won’t interfere with any writing that will be added. The grid adds interest while offering some straight lines to write on. I used a black pen to frame the stamping, then I inked around the tag with Black Soot Distress ink. I added the reinforcements. Finally, I looped a piece of cream coloured seam binding through the hole at the top of the tag.

For the front cover, I adhered the piece of black cardstock to the back. I inked around the edges with Black Soot Distress ink. I stamped the Fill Your Page sentiment in place with Memento Tuxedo Black ink. I cut the Flourished Oval Frame out of black cardstock, and fit it in place around the sentiment.


Finally, I cut the hanging heart from the Calligraphic Elements 3 set out of black cardstock. I didn’t want a black heart, so I cut a second one out of red cardstock. I trimmed out just the heart, and adhered it in place on the black cut. I added that to the cover.


Then all that was left to do was decorate the pages. I did this using more of the die-cut elements. 


The Library Pocket Tag Book included several butterflies. I have added these to the tags and the pockets. I also added some more of the Oval Frames, cut from the designer paper, to the inside covers. 


This offers a place to write something with a white marker or gel pen. Please refer to the photos to see how I decorated it all.


This was a really fun project to put together, and I’m really looking forward to filling it up with the “…breathings of my heart.”
Thanks very much for stopping by today! I’ve enjoyed sharing my project with you!
Nancy :o)
Library Pocket Tag Book


Quietfire Designs Products Used:


Other Products Used:
Prima Finnabair Vintage Vanity Collection;
Cardstock: Black, Manila, Scrap of Red;
  Distress Inks: Black Soot, Antique Linen,
Memento Ink: Tuxedo Black;
Tim Holtz Mini Book Rings – 2;
Black Micron Pigma Pen;
Seam Binding - Cream


Thursday, July 11, 2019

Rosebud Wreath - Miss You - Love Collection - The Human Heart

Yogi here today ad I was in a mood to create a simpler card than I normally do... Love the way this one turned out.

I'm using several dies "Rosebud Wreath" 8pce set and "Miss You" from Elizabeth Craft Designs, also available on Quietfire Design HERE and HERE    

I'm using rubber  stamp quote from Quietfire Design. ("The Human Heart...")

And I'm using a couple hearts from a clear stamp set "Love  & Hearts Collection" 10pce set by Quietfire Design also available on Elizabeth Craft Designs HERE
 

Cut, scored and folded my white cardstock to create the 7"w x 5"h top fold structure. Cut a piece of Co-Ordinations pink toned cardstock slightly smaller than card, rounded the corners with a corner rounder punch than adhered it to card front.

Die cut the leafy wreath from a tissue box cardstock (the whole box had beautiful leaves all over it - BIG GRIN). Spliced and adhered to the contour of a large heart shape. Adhered to card front. Die cut the rose buds from white cardstock, inked the sold layer with Distress "Spun Sugar" and the overlay with "Picked Raspberry" clear embossed. Adhered both layers together and then onto the wreath.

Die cut the "Miss You from another Co-ordinations cardstock, inked with Versamark and embossed with Pearlescent embossing powder. Adhered to front. I then used the fine tip of a black Zig Writer to create a shadow on the right and bottom side of each stroke.
 

On the inside: Stamped the hearts using Tim's Stampin Platform and Distress Spun Sugar and clear embossed. Stamped the heart outline using Versafine Clair "Charming Pink" and clear embossed.

Stamped the quote using Versafine Black Onyx and clear embossed on a pink cardstock. Trimmed down to fit the contour of the hearts.


Saturday, July 6, 2019

Simply Mr and Mrs


I'm over the the Elizabeth Craft Designs blog today with this simple, but elegant card.  It can be quickly made or it can be a loving quest for the perfect ribbon!

See the details on the blog: https://blog.elizabethcraftdesigns.com/


Tuesday, February 12, 2019

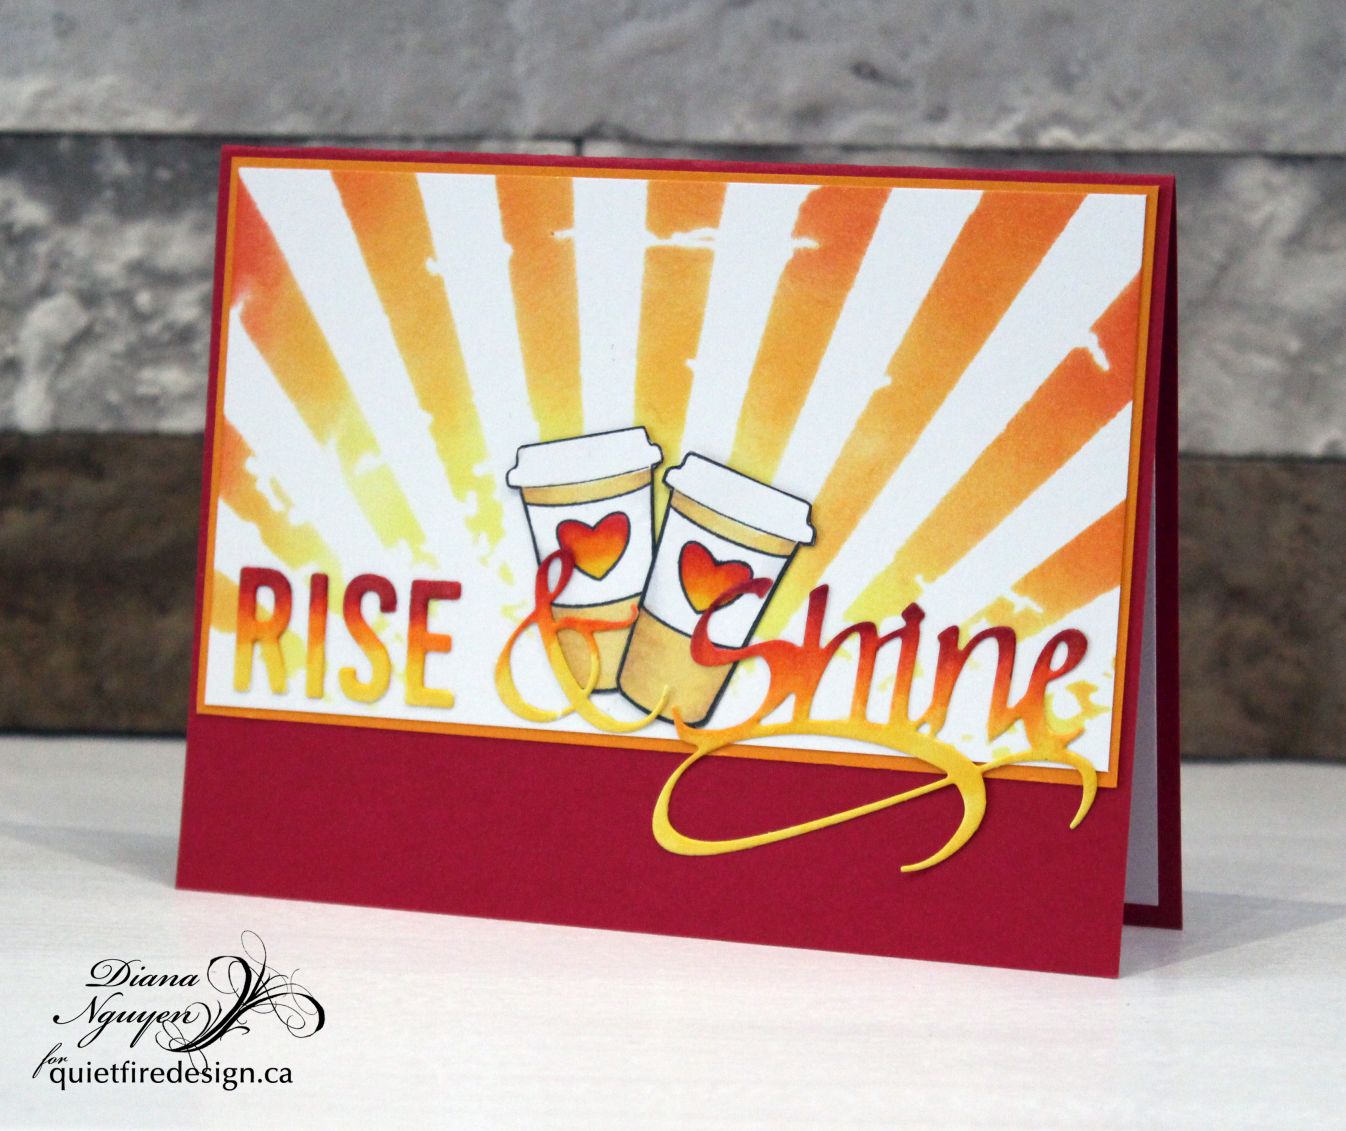
Rise and Shine with some coffee

Who's a morning person?  I am actually.  But I do have a need for caffeine - I thought I drank coffee for the warmth and taste but found out I get a headache in the afternoon when I don't drink my coffee.  When did that little addiction happen?!

I do have a couple of friends who do not function without coffee at all - like don't speak to me until I've had my first cup of coffee kind of people.  

So maybe give them a cup of coffee before you give them this card for them to actually appreciate it.  Haha!


For this card, I did a lot of sponging and blending.  I first made a background using a Sun Ray Stencil by Tim Holtz with Distress Inks.  I started with the yellow, went to orange then red.  I went back with the lighter colors to blend the inks.


For the letters (Alphabet Caps by Elizabeth Craft Designs) and words (Shine and & from QF, also available from Elizabeth Craft Designs), I used Copic markers to color the letters the same shades as the sunrise.  I kept the same color scheme with the coffee cups I fussy cut out.


Enjoy your morning coffee (or tea)!
Shine - Metal Cutting Die
Shine Metal Die Cut (Quietfire Design | Elizabeth Craft Designs)

Calligraphic Elements 2 - Metal Cutting Dies

Calligraphic Elements 2 (Quietfire Design | Elizabeth Craft Designs)

But First, Coffee, Set of 8 Stamps - Mounted


Thursday, January 3, 2019

A Focus on "Love": elegant handmade card


Hello Crafty Friends!

Over the holidays I spent a lot of my free time in the craft room.  It felt so good to relax and let the crafty mojo flow.  One of the projects created used one of the newly released stamps (the twiggy wreath...so cute!) and two dies: Love and Heart.  Love how the heart dies look in each corner- so ornate and beautiful!


Card Instructions:

  1. Create 5.75" x 5.75" top fold card base from white card stock.
  2. Cut patterned paper to 5.5" x 5.5".  Apply gold marker along edges.  Mount to card base.
  3. Apply pink ink along edges of a 5" doily.  Mount to card front.
  4. Stamp twiggy heart to white card stock using pink ink. Die cut using ornate circle die.  Apply pink ink and then gold marker along edges as shown.  Mount to card front using double sided foam tape.
  5. Die cut Love from gold card stock.  Mount to card front using liquid adhesive.
  6. Die cut four hearts from gold card stock.  Mount to corners using liquid adhesive.
  7. Add wee gems as desired.


The calligraphy is gorgeous in gold!  Such pretty flourishes in both dies.

Quietfire Design product used:
Love die
Calligraphic Elements 2 die set
Twiggy Wreath and Sentiments stamp set

Thank you for stopping by!
Have a happy, crafty day.
Big Hugs,
Kathy Jo

Thursday, March 1, 2018

"You are sunlight to my heart"

Hello Crafty Friends!

Kathy Jo here sharing a card using a classic Quietfire Design stamp, You are Sunlight:
You are Sunlight - Mounted
Isn't it the sweetest sentiment?  I remember the first time I used the stamp- it was on a card I made for a wonderful friend of mine.  That card was shared here on Quietfire Design on December 31, 2014!
Wow- time has flown!   Even though it was released a few years ago- like all Quietfire Design stamps- it is a timeless stamp to be used again and again.  This time I paired it up with the lovely heart die from the Calligraphic Elements 2 set:
Calligraphic Elements 2 - Metal Cutting Dies
I think the stamp and die were made for each other as they look so happy together.  :)
The flower ribbon is a beauty, too. The ribbon tucked under the heart is from the Prima ribbon set, Nature Garden Trimmings:
Nature Garden Trimmings
Oh!  And I had to add some bling that shimmers in the light.  The bling looks quite content on the heart:
The shaped card has several soft layers that allow the beautiful stamp and heart to be the focus of the card front.
I do hope you enjoyed the card...I know I enjoyed making it!  It felt great to pull out one of the Quietfire classics and create another project.

What are your favorite older Quietfire Design stamp sets?  Do you have a favorite one that you use often?  Or that makes your heart smile whenever you use it?

Thank you for stopping by!  Have a happy, crafty day!
Big Hugs,
Kathy Jo

Saturday, February 10, 2018

Always & Forever


Hi there, Artlings!  It’s Suzanne here today with a simple, elegant version of Always & Forever.  You can see this card with instructions over on the Elizabeth Craft Designs blog today.
 This is perfect for a guy for Valentine’s Day, but by changing the colour of the gently sponged ink, you can pink it right up!  By adding dimension to each layer, the result is a super special card for a super special person. Wouldn’t this make a stunning wedding or anniversary card?
This card is so simple to make. It took me longer to photograph it than to make it.  And the photo really doesn’t do it justice!
Elizabeth Craft Designs Supplies:
Always   Quietfire Site | ECD Site
Butterfly Flourish   Quietfire Site | ECD Site
Calligraphic Elements 2   Quietfire Site | ECD Site
Fitted oval
Scalloped oval
Fitted rectangle
Scalloped rectangle

Others:
Kool Tac clear foam adhesive Scrapbook Adhesives by 3L 3D Foam Squares


Tuesday, January 30, 2018

January Designer Challenge - Elizabeth Craft Designs


The Elizabeth Craft Designs Designer Challenge for January is "You Fill My Heart", just in time for Valentine's Day!  

I wanted to use this simple thought which says it all....  You're never getting rid of me!  ;-)   I chose delicate colours, I even used the same paper to cut Forever that I used on the background.  A black diecut used as a dropshadow made all the difference!

For today's challenge, Elizabeth Craft Designs will be giving away Gift Card to use on their website to 3 lucky winners.  To enter, simply leave a comment on the Elizabeth Craft Designs Challenge Blog Post!  Good luck! 

Here is how you can make this card.  It's so simple. Choosing the paper is fun!

Instructions:
1.       Form a 6 x 7” side fold card base from pink cardstock.  Cut a green panel measuring 4.75 x 5.5” and a white mat that is about 1/8” larger.  Adhere panels together with Clear Double Sided Adhesive.  Adhere the panels to the card base with foam squares to give some dimension.
2.       Die cut Believe from white cardstock, Forever from green cardstock and the flourished heart from pink cardstock.  Die cut all three dies from black cardstock as well. 
3.       Layer the words together so the black diecut is slightly offset.  Designer tip: make sure each of the black diecuts is offset the same way (distance offset and direction of offset) in each pair of diecuts!  You don’t have to use lots of Glue Dots, just a few placed in the widest parts of the letters.
4.       Use Glue Dots to adhere Believe and Forever to the green panel as shown.  Cut small pieces of the Kool Tak Clear Foam to raise up the heart as shown so it appears to float above.  Voila! You’re done!
5.       Give the card to someone you love!
        
This would make an wonderful wedding card when done in white!


Thanks for dropping by for a peak.  Don’t forget to hop over to the Elizabeth Craft Designs blog to be eligible for their giveaway!


Supplies from Elizabeth Craft Designs:
Believe  QFD | ECD
Forever   QFD | ECD
Calligraphic Elements 2   QFD | ECD
Beacon Kids Only Glue  ECD
Clear Double Sided Adhesive  ECD

Others:
Micro Glue Dots
Maja Designs Papers – Sofiera collection and other pink
White cardstock
Black cardstock
Ranger Distress Ink – Mahogany
Ranger Ink Blending Tool

Scrapbook Adhesives by 3L 3D Foam Squares
Kool Tak Clear Foam Tape


Thursday, July 20, 2017

Tutorial: "Warm Thoughts" accordion mini-album

Hello Crafty Friends!  Kathy Jo here joining the Quietfire Design "Christmas in July" celebration.  Many of you are thinking about summer projects but it is always good to get a head start on the holiday gifts...and what a perfect excuse to retreat to the craft room.  Humming your favorite holiday tunes is fun, too.  To play on the Christmas song:  "Oh what fun it is to hide and use my Quietfire Design...hey!"  :)

For my project, I created a festive accordion mini-album using several Quietfire Design dies.  This mini-album can hold photos and heartwarming wishes to loved ones and friends.  A lovely and thoughtful handmade gift!

Let's start the tutorial...

First, several goodies are needed for this project.  The photo below shows most of the goodies.

  • Quietfire Design dies: "Warm Thoughts""Cozy""Brrrr" and Calligraphic Elements 2 
  • Four 4 1/4" x 4 1/4" white card stock
  • Two 4 1/8" x 4 1/8" dry embossed Kraft card stock
  • Two pieces of 14" wrinkled, white 1/2" ribbon
  • Scrap patterned paper.  Enough to make ten 3 3/4" x 3 3/4" squares
  • Red gems
  • Good double sided adhesive tape
  • Liquid adhesive (with a fine tip would be best)
  • Red card stock
  • White card stock
  • 12" x 12" Kraft card stock
  • Holiday spirit  :)
Instructions:
  1. Die cut word dies and heart die in both red and white card stock.  Die cut several snowflakes.
  2. Cut red card stock to 4 1/2 x 9 1/2.  Score at 4 3/4 and at 5.
  3. Cut two pieces of Kraft card stock to 4 x 12. Score at 4.  Flip card stock and score at 8.
  4. Adhere white card stock (cut to 4 1/4 x 4 1/4) to inside of album.
  5. Adhere Kraft accordions to inside.  The accordions should be mounted as shown below to ensure the accordions unfold properly.

  6. Adhere the patterned papers (ten required at 3 3/4 x 3 3/4).  Adhere the snowflakes, Cozy and hearts as desired. Below are several photos.  I made sure to also use a couple of patterned papers that were not "busy" so that I could write in the open areas.


  7. Now we move to the outside of the album.  Use good double sided tape across the middle of the album front and back.  Do not go to the edges as the stacked card stock (in step 8) leaves an open border around the album front and back.
  8. Assemble white card stock (4 1/4 x 4 1/4) and embossed Kraft card stock (4 1/8 x 4 1/8) to album front and back.
  9. Adhere (using liquid adhesive) the red and white "Warm Thoughts" die cuts to the front.  Add snowflakes.  Add gems.  Tie bow.
The mini-album would be a wee, wonderful gift for the "nice" people on your Christmas list!  :)

Thank you for stopping by!  I do hope you enjoyed the tutorial and don't forget to check out the Christmas Specials at Quietfire Design!

Have a happy, crafty day.
Big Hugs,
Related Posts Plugin for WordPress, Blogger...