Showing posts with label wishing you whimsy. Show all posts

Tuesday, March 3, 2020

Wishing you Rainbows & Unicorns Card


Hey Quietfire Fans! For today's project I'm sharing with you my fun Wishing you Rainbows & Unicorns Card. By combining a variety of stamps, dies and the Modern Gilding Powders, they were all perfect for creating my card. You'll want to grab a cup of your favourite beverage and learn how to recreate my Wising you Rainbows & Unicorns Card at home.

To start, die cut a 3" Stitched Rectangle out of a piece of white cardstock. Apply Emboss It Ink to the Grid Background stamp and stamp onto the rectangle. Reapply ink to the stamp and stamp as needed to make sure the entire rectangle is covered with the grid pattern. Sprinkle Gothic Black Modern Gilding Powder over the entire surface of the rectangle. Tap off the excess powder and emboss with a heat tool. 


Using a blending tool with foam, blend Wilted Violet, Worn Lipstick and Cracked Pistachio Distress Oxide Ink over the entire surface of the embossed rectangle. Spritz the rectangle with water. Dry the rectangle with a heat tool. Distress the edges of the rectangle. Ink the edges of the rectangle using Black Soot Distress Ink and a blending tool with foam. 


Die cut a 5/8" Fitted Rectangle out of white cardstock. Cut the fishtail down to 2 3/8". Using a blending tool with foam, blend Wilted Violet and Worn Lipstick Distress Oxide Ink over the entire surface of the fishtail. Spritz the fishtail. Dry the fishtail. Apply Emboss It Ink to the Wishing You words from the Wishing You Whimsy stamp set and stamp onto the fishtail. Sprinkle Gothic Black Modern Gilding Powder over the stamped words. Tap off the excess powder and emboss with a heat tool. Distress the edges of the fishtail. Ink the edges of the fishtail using Black Soot Distress Ink and a blending tool with foam.


From the Love, Joy, Peace Ornament, die cut the Ornament out of black cardstock.


Die cut a 2 1/2" Fitted Circle out of white cardstock. Apply Worn Lipstick Distress Oxide Ink to the Rainbows & Unicorns sentiment from the Wishing You Whimsy stamp set and stamp in the middle of the circle. Dry the ink with a heat tool. Apply Wilted Violet Distress Oxide Ink to the Grid Background stamp and stamp off onto a piece of paper and then stamp overtop of the circle. Dry the circle with a heat tool. Distress the edges of the circle. Ink the edges of the circle using Black Soot Distress Ink and a blending tool with foam.


Die cut the Peace on Earth from a piece of black cardstock. Cut the die cut piece in half. You will only need the left hand side of the piece. 


Die cut a 3 1/2" Stitched Rectangle out of white cardstock. Apply Worn Lipstick Distress Oxide Ink to the Grid Background stamp and stamp on all four edges of the rectangle. Dry the rectangle with a heat tool. Distress the edges of the rectangle. Ink the edges of the rectangle using Black Soot Distress Ink and a blending tool with foam.


Adhere the ornament to the circle. Adhere the Peace on Earth die cut piece to the back left hand side of the rainbows & unicorns circle.


Foam square the rainbows & unicorns circle 3/4" from the bottom and 1/2" from the left of the 3" rectangle.


Staple the Wishing You fishtail 1" from the top and all the way to the left hand side of the 3" rectangle. You will need to adhere the left side of the fishtail to the circle.


Adhere the 3" rectangle to the 3 1/2" rectangle. Cut a cardbase that measures 3 1/2" x 9 1/2", score at 4 3/4". Adhere the cardfront to the cardbase.


Here are a few closeup photos of the finished card.


Here is the finished Wishing you Rainbows & Unicorns Card.


Quietfire Design Supplies Used:


Other Supplies Used:

- Elizabeth Craft Designs: Stitched Rectangles, Fitted Fishtails and Fitted Circles
- Ranger Ink: Emboss It Ink
- Tim Holtz for Ranger Ink: Distress Ink - Black Soot, Distress Oxide Ink - Worn Lipstick, Wilted Violet & Cracked Pistachio and Blending Tool with Foam
- Misc: White Cardstock, Black Cardstock and Mini Stapler

Thanks so much for joining me today and I hope that I have inspired you to recreate your own version of my Wishing you Rainbows & Unicorns Card.

- Katelyn


Tuesday, November 7, 2017

Shaker Card with glitter background and extra sparkles

I'm getting better at playing with glitter!  I wanted to just make a pretty shiny background and ended up with this shaker card.  Sometimes you just play and let it go where it goes.


I covered a sheet of white card stock with ECD double sided adhesive and then added glitter to the top side and let it fall down in a diagonal manner.


I then burnished in the glitter with my finger to complete the background.


I cut out the "Sending" and little flowers out of white cardstock.  A rhinestone in the middle made the flowers match my sentiment perfectly.  The shaped glitter inside the shaker element added an extra dimension of fun.


Hope you like it and have a wonderful day of sparkles and fun!


Sending Hugs Kisses - Metal Cutting Dies

Sending Hugs and Kisses Die (Quietfire Design | ECD )

Wishing You Whimsy, set of 4 - Mounted


Monday, July 31, 2017

Sunshine, Freedom & a Little Flower - Karen Hasheck, Guest Designer


Karen Hasheck here today and once again, I am honored to be sharing a card with you as a guest design team member. Quietfire Design’s “Just Living is Not Enough” stamp is the focus of this card and one of my favorites from Suzanne Cannon. I am also sharing a new to me fun fold and here are the directions for this card:

Just Living
1.     Cut an A2 sized (8 ½” x 5 ½”) card base out of yellow cardstock and fold in half.
2.     Using temporary tape, attach the folded card to a craft mat and tape down the sunshine stencil from The Crafter’s Workshop over the card. Sponge Mustard Seed Distress Ink through the stencil holes, then remove the stencil.
3.     Die cut a stitched square with a Lil’ Inker die out of the middle left of the card front and stamp the “Just Living” sentiment in the center of the cut out stitched square.

Wishing you Whimsy
4.     Cut a piece of floral designer paper (mine was from The Paper Studio) 5 inches by 7 ½ inches and score at 2 ½” and 5” on the long side.

5.     Stamp “Wishing You” from the WishingYou Whimsy stamp set on the left third towards the top. Die cut and attach “Love” below it. I had to trim just a bit of the swirls on the Quietfire Designs “Love” so it fit on the folded piece.
6.     Attach the floral piece with adhesive only on the far left side of the folded designer paper to the inside of the card.
A Way With Words Love

7.     Fold the floral dp in thirds and from the front, attach the square sentiment piece so it fits perfectly in the square hole in the front.
8.     Die cut Tim Holtz’s Wildflower out of green and pink cardstock, and attach the flower to the front of the card.


I had so much fun playing with Quietfire Design’s gorgeous stamps and dies and hope you have enjoyed the cards I shared as a guest design team member here.
 
[Thanks so much for joining us Karen and sharing your awesome projects!
Karen can be found on her blog Karen's Kreative Kards.]


Wednesday, July 5, 2017

Wishing You Glitter & Sparkles - Guest Designer Karen Hasheck


My name is Karen Hasheck and I am thrilled to be a guest designer here today. I have been a fan of Suzanne Cannon’s gorgeous stamps and dies for a long time and was so happy to meet her at the 2017 Creativation in Phoenix last January. So of course, when she asked me to play with her beautiful stamps and dies as a guest dt, I jumped at the chance.
Wishing You Whimsy
Don’t we all love glitter and sparkles? I like all the choices of wishes in the Wishing You Whimsy stamp set, but my favorite for the special crafty females in my life is this wish for “glitter and sparkles.” I stamped “wishing you” in black ink on a piece of vellum. Then I stamped the “glitter and sparkles” with Versamark, applied Nuvo’s Gold Enchantment Glitter Embossing Powder and heat set it with my heat gun. I cut out the circle with a stitched circle die from Lil’ Inker.
The glitter and sparkles are all over the background I created for this card too. I cut a piece of watercolor paper 5 ½ inches by 4 ¼ inches and wet it with the Nuvo Light Mist Spray Bottle. I sprinkled on Cobalt Blue, Orange, Purple and Ostwalt Blue Brusho Coloured Crystals, then spritzed them again with water. Brushos are watercolor powder crystals and release gorgeous colors when wet. I sprayed until the colors were mixed, then sprinkled on Nuvo Silver Embossing Powder while still wet. Then I dried the piece with my heat gun. This part does take some time to first dry the Brushos and then dry the embossing powder completely.
After the piece was dry, I decided the card front needed a little more glitter to frame the circle sentiment. I applied ¼” scor-tape going up, then down and then up again. I removed the top layer of the scor-tape and sprinkled on Nuvo Gold Shine Sparkle Dust (a very fine glitter), and burnished it in. I created a thin purple line of glitter below the gold one using 1/8” scor-tape and Nuvo Cosmo Berry Sparkle Dust. I attached the vellum circle wish with sparkly silver brads and then adhered the completed card front to a white A2 card base.
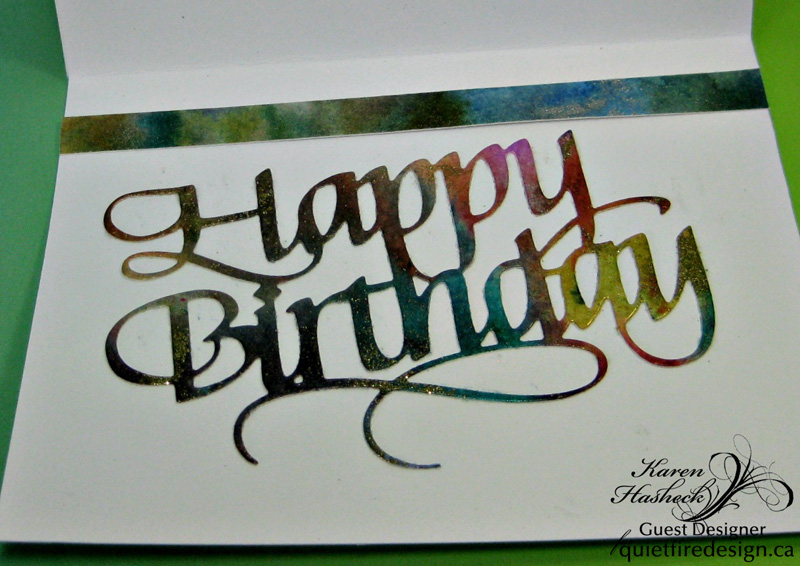
When I was playing with my Brushos and embossing powders, I made a piece with 
Happy Birthday
gold embossing powder and different colors of Brusho Crystal Colors. I die cut the beautiful Quietfire Design Happy Birthday die out of that piece and attached it to the inside of the card. I also attached a strip of the Brushos and silver piece to the top of the inside of the card because it would be shame to waste any of those glitter and sparkles. I think any of my crafty friends would love this sparkly birthday card and I had great fun making it for this guest dt blog post here at Quietfire Creations.
 
[You can find more of Karen's fun creations on her blog Karen's Kreative Kards ]


Thursday, June 8, 2017

Wishing you Glitter and Sparkles....


Hello everyone,
Yvonne here wih a card that is all about glitter!
For my card I used the brandnew Quietfire Design stampset Wishing You Whimsy (set of 4 stamps).
The die-cuts as well as the usd inkpad all have a little sparkle.
A card that for sure will brighten up someone's day!


Materials used:
  • Quiefire Design: Wishing You Whimsy (set of 4 stamps)
  • Geo die template
  • Delicata gold inkpad
  • acryllic stamp block
  • cardstock: white, purple. gold, glitter
  • 3D foam tape, glue

I hope you like the card and wish you a sparkly day!
Thanks for stopping by!

Hugs from Holland,

Wednesday, May 31, 2017

Tuesday, May 23, 2017

May 2017 New Stamps!


Welcome to the May 2017 Quietfire rubber stamp release. There are eight new stamp sets to play with! (Wow, 8!!)
Where to start….? 
I absolutely love sayings with double meanings.  I guess that’s why the two music stamps are my favourite!  The Music in my Heart sentiment was sent to me by Karen S (I’ll be sending you a complimentary stamp Karen!)  and is such a beautiful sentiment.  It’s perfect for a sympathy card.  Let me know what you'd use it for!


The Music in my Heart
 

The other music stamp saying is from Design Team member Connie Nichol.  Whether you’re talking about music or comfortable companionship with a friend, Moments of Silence applies.
 
 
Moments of Silence

The Leafy Acanthus Background is from an illustration I did years ago in the William Morris style.  Use it with a light coloured stamp ink for a subtle effect.  I think the quiet floral background combines beautifully with the “stillness” of the The Greatest Revelation.  Makes you pause and think.


The Greatest Revelation
 
Leafy Acanthus Background
 
 Thanks to a big nudge from Cheryl A., the Queen of Everything, which was sold out, has been resurrected. It’s a bit different, but the sentiment is still as strong as ever!  Cheryl, I’ll be sending you a complimentary set.


Queen of Everything
 
This new Modern Calligraphy style works well with whimsical sayings, so here is a really fun set of stamps.  If you have the Wishing You A die set, then you can combine it with Wishing You Whimsy perfectly!


Wishing You Whimsy

And last but not least, for those who like to doodle and colour there are two new sets of Fill 'er Up Caps:  DAD and MUM
Both these sets only have two letters, as one is repeated.  If you already have our JOY or LOVE set, then it's easy to make MOM
This brings our total of Fill 'er Up Letters to 11....  ADEJLMOUVY and T is part of the Thanks - Fill 'er Up set.  If you're feeling adventurous, flip the M upside-down for W and the U upside-down for N!  That takes us to 13 letters - half way there! Give it some time and we'll have the whole alphabet!

DAD


MUM

And that's it for now! Have fun and happy creating!
Suzanne

Card display base is
Walnut Hollow Basswood Country Round, Small
Related Posts Plugin for WordPress, Blogger...