Thursday, August 13, 2015

A Way With Words - Friends


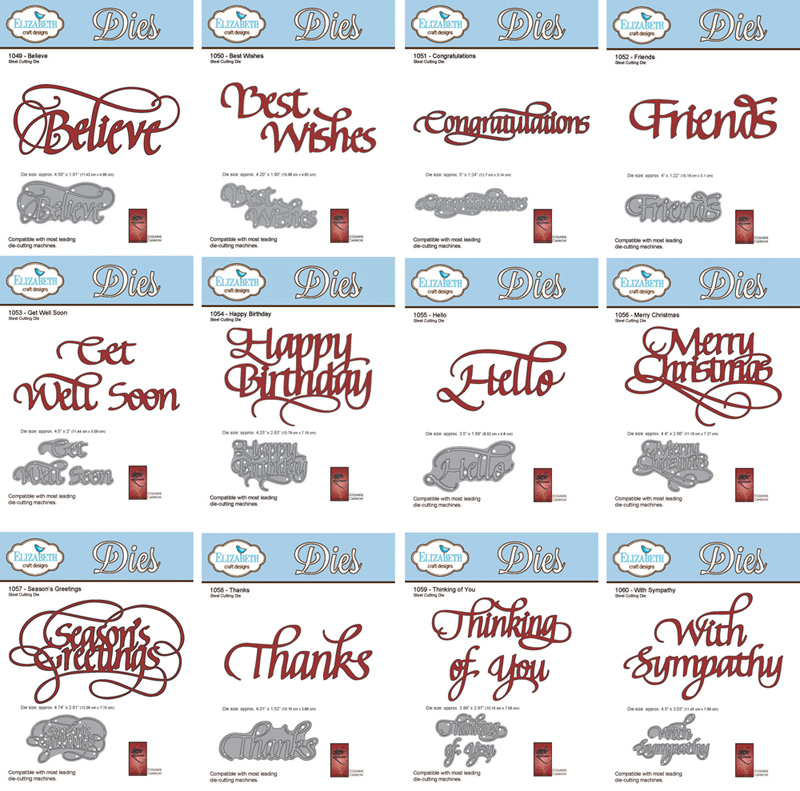
Welcome to A Way With Words!  Each day during this event we’re sharing projects made with the brand new Elizabeth Craft Designs word dies.  All these designs are from original hand lettering by Suzanne Cannon and can be found on the Quietfire site, and on the Elizabeth Craft Designs site.

Yogi here today and it's my turn to use one of the newest dies - Loving all of them BIG GRIN

The die I'm using today is "FRIENDS" my favorite word... (at Elizabeth Craft Designs and at Quietfire Design) All the other dies, shimmer sheetz, glitter, sticky tape are Elizabeth Craft Designs products.

I die cut my word from a piece of decorated 140# Arches watercolor paper I had in my scrap drawer. It has streaks of blue's and yellow's with some nice hard edges in it... Cut the word again from a dark blue heavy textured cardstock. Layered the two together off set to create a shadow.

Die cut the "Berry Branch" from Distress inked cardstock in green's.

Die cut the flowers "Bunch of Flowers 1" from the watercolor decorated paper. Tooled them to get some shape. Layered two together and added an iridescent blue pearl to their centers.

Die cut the butterfly in black for the filigree piece and from blue Iris Shimmer Sheetz. Adhered the filigree to the under body with double sided tape. Added the  little body colored with a yellow colored pencil.

Stamped the quote (minus the words
 "Friend's are") using Distress "Broken China" on the decorated watercolor paper and clear embossed. Used a 3" circle punch to cut it out. Used an x-acto knife to cut some slits for my Sari ribbon to pass through.

Side folded my white card (5"w x 7"h). Cut a piece of yellowish beige textured cardstock a bit smaller than my card front and started assembling my elements. The ribbon circle with the ribbons adhered to the back. Then the word "Friends", then the berry branch and the flowers, and lastly the butterfly.

Click on any image to enlarge. Enjoy

Thanks for visiting! 

Wednesday, August 12, 2015

A Way with Words- With Sympathy


Welcome to a Way with Words.  Each day during the event we're sharing projects made with the brand new Elizabeth Craft Designs word dies.  All these designs are from original hand lettering by Suzanne Cannon and can be found on the Quietfire site and on the Elizabeth Craft Designs site.


My die today is called "With Sympathy" and i really love all the delicate loops and curves on the sentiment.  I decided to use some of the "Shimmer sheets" in both the blues and the reds to make it look like the sky and clouds and the red of a loving heart.  The cloud i just cut freehand around the sentiment so you don't even need to have a die.  Just draw your own.  And i finished it with a pretty matching black satin bow and a rhinestone.  It was really easy and the dies cut like butter, you will love them.


We have lots of inspiration for you each and every day using the new dies so be sure and check out our Facebook page and the Elizabeth Craft Designs for inspiration from their designers too.  Have a fun and crafty day and thanks so much for stopping by.  

A Way With Words - Best Wishes!

Welcome to A Way With Words!  Each day during this event we’re sharing projects made with the brand new Elizabeth Craft Designs word dies.  All these designs are from original hand lettering by Suzanne Cannon and can be found at both Quietfire Design and Elizabeth Craft Designs.


Sherry here today and I have a card to share using the new metal cutting die, Best Wishes.


Using some Prima paper from my stash, Something Blue, the edges of coordinating paper were distressed, sponged with Antique Linen, and then sewn to a base of cream cardstock.  The words, Best Wishes, were die cut from a coordinating brown, and affixed to a layer of rectangles.


The decorative flowers are some from my stash (Prima Seashore) and the ribbon was dyed with Peacock Feathers Distress Ink to match the flowers.


Thanks for stopping by and joining me today!

SHERRY SIGNATURE

Tuesday, August 11, 2015

A Way with Words - Thinking of You, Friends

Welcome to A Way With Words!  Each day during this event we’re sharing projects made with the brand new Elizabeth Craft Designs word dies.  All these designs are from original hand lettering by Suzanne Cannon and can be found on the Quietfire site and on the Elizabeth Craft Designs site.  

Quietfire Design, Thinking of You, dies, Diana Nguyen, card
Diana here and I'm so excited to share the cards I made with the new word dies that I have two cards to show today.  The first one fits in a business envelope perfectly and was done with just a few items.  I first sponged a leafy sprig using a Heidi Swapp bird stencil with some Distress Ink Black Soot.  I then die cut the Thinking of You (at Elizabeth Craft Designs and at Quietfire Design) dies 7 times with different card stocks:  white, red, orange, yellow, green, blue, and violet. 

I carefully glued each die together in ROYGBV order.  It gave my dies dimension and the side view is pretty neat too!  To pull in the colors a bit more, I added some tiny rhinestones.


For my second card, I took a simple A2 card base and cut an inch strip off.  I then glued the very top edge and bottom edge of the Friends die (at Elizabeth Craft Designs and at Quietfire Design) to adhere the pieces together.  It left a gap to see the inside of the card where I glued a strip of Shimmer Sheetz.  A bit more rhinestones to go with the sparkle and mirror effect and the card is done. 

Quietfire Design,Friends, Diana Nguyen, card, Shimmer sheetz

Hope you liked the cards and that it gave you some new ways to use these fabulous word dies!


Monday, August 10, 2015

A Way With Words - Merry Christmas and Season's Greetings Mini Album!


Welcome to A Way With Words!  Each day during this event we’re sharing projects made with the brand new Elizabeth Craft Designs word dies.  All these designs are from original hand lettering by Suzanne Cannon and can be found on the Quietfire site and on the Elizabeth Craft Designs site.  

It’s Kathy Jo here today and I am beyond excited to share my project using two of the new dies, Merry Christmas and Season's Greetings.  


Merry Christmas - Metal Cutting DieSeason's Greetings - Metal Cutting Die 


I used both dies on a festive 5x7 Christmas album.  Full disclosure: this is the first time I have made an album.  I always thought that an album would be overwhelming or difficult but it was the opposite - it was easy to do using the new dies and stamps from Quietfire.  (I plan on making more!)
The Merry Christmas die was the focal point on the album cover. 
The first two album pages...
...have a sweet Santa scene on one page...
...and the next page has Quietfire's stamped sentiment, May your longest list this Christmas.  What a sweet sentiment!
Next we have a cute indoor stocking scene.
On the left is Santa filling the stockings with the wee ones looking on...
...on the right is Quietfire's stamped sentiment, Christmas is a piece of home.
The last two pages remind me of my hubby and I.  
The first sheet has a cover scene from The Saturday Evening Post and the heartwarming sentiment, My idea of a perfect Christmas.
The right side is an old postcard with snowflake tags:
The back of the album is a mirror of the front's layout.  The die used is the new Season's Greetings die.  Gorgeous die!
Thanks for visiting!  I really hope you enjoyed the new dies and stamps!  Don’t forget to stop by the Quietfire site and the Elizabeth Craft Designs site to see all of the lovely new dies!  

Big Crafty Hugs,
Kathy Jo

Sunday, August 9, 2015

A Way With Words

We're celebrating the release of our brand new collection of craft dies from Elizabeth Craft Designs called A Way With Words!  We are simply delighted so many designs are available to you all at once.  As I write this, the dies are on their way to me and shipping to customers from Elizabeth Craft Designs.


For the next two weeks the Quietfire Design Team will be sharing lots of different ways you can use these dies. It's very exciting and simply wonderful to see the amazing variety emerging from design studios around the world! Make sure you're signed up for the Elizabeth Craft Designs Blog Posts because their designers have a whole different and very rich style of using the Quietfire dies.


We already have a well-stocked Pinterest Board to spark your creativity. You can see our gallery of Techniques and Tutorials on the Quietfire site here.


 Make sure you follow our blog - or sign up for email update so you don't forget to check back.  The email sign-up for blogposts is >>>>>>>>>> in the sidebar.

If you're not already receiving it, please sign up for the newsletter as well.

I created this little video as an introduction to the new dies.  Excuse my voice, I've been fighting the plague since I got home from holidays!


Welcome to the new Quietfire-Elizabeth Craft Designs dies!


Friday, August 7, 2015

Believe - Guest Designer Chana Malkah


Hello, Crafty Peeps!
I am so excited to present this project as a Guest Designer for Quietfire Creations!


I was honored to be invited, and trust me, I agonized over what to create!  Eventually I created two projects using the Quietfire Believe Die.

Believe Craft Die


Project #1   An Upcyled Ping Pong Paddle


I was inspired by a project from Asmah Abidin.  She had the fabulous idea of upcycling a ping pong paddle.  I thought this would be the perfect showcase for the Quietfire Believe Die!

I sent my hubby off to the Goodwill. He returned with 2 paddles, and a Racketball Racket.  
He says he purchased the racket in self defense in case my inspiration took me in a different direction! (Translation no more sudden trips to the Goodwill. )


The elegance of this Quietfire "Believe Die"  really draws the eye into this design, I think!   
Quietfire offers a Believe Stamp Set that could be use to complement the die. 

I used exterior house paint as my base color and the just pulled items from my "stash" to complete the embellishments!


 The handle and rim were stained using Tattered Angels' Plain Jane Baseboard "Clay" and "Bittersweet" Semi Opaque Matte Mists. To brighten the palette a little, I added the orange-red flowers and a smattering of TH Abandoned Coral DI on the flourishes.


Project #2 - Journal


 Since both items will be given to the same person, I tried to mimic the color palette.  
This journal was ordered to be used in a place of worship, so the Believe die is perfect!


I resisted the temptation to make the spine and back more elaborate!  Very pleased with the decision to leave both black and add only random swipes of gold! 
 I covered the entire project with three coats of  Liquitex Professional Gloss Varnish...the effect is quiet lovely!


Chana was one of our prize winners not so long ago and shared a project she created using the prize and we were so taken with it, we asked her to be our guest designer!
Chana calls Decatur, Georgia home and is the queen of more than one blog.  You can find her at
and her Challenge Blog: 613 Avenue Create - Owner
She designs for 

  • Canvas Corp Brand (7 Gypsies, Tattered Angels, Canvas Home Basics)
  •  Earth Safe Finishes
  • 613 Avenue Create
  • Shopping Our Stash


Wednesday, August 5, 2015

In a Perfect World

Hello!  It's my pleasure today to show you my new favorite stamped saying from Quietfire:  In a perfect world you would live next door.  Don't you just love it when you see something like that and immediately think of several people you want to send it off to?  And then when it is perfectly written too - ahh, crafty bliss.  :)  


Quietfire Design, In a perfect world, Diana Nguyen, die-namites, birdhouse, card

I kept it very simple (no surprise there!) with a watercolored die from Die-namites Hello Birdhouse and a softly sponged background.  There were 4 houses on this die so I trimmed a couple off and moved one around so that I would have room for my sentiment.  


Quietfire Design, In a perfect world, Diana Nguyen, die-namites, birdhouse, card

In A Perfect World, Set of 4 Stamps - Mounted

Off to make a few more and send them off!  Have a wonderful day!


Monday, August 3, 2015

Easel - Holly & Ivy - May Your Longest List


It's Yogi here today on the Quietfire Creations blog and I wanted to use my Copic attachment for my air brush machine and the new Copic Sketch markers I got... BIG GRIN

I'm also using a couple dies from Elizabeth Craft Designs (ECD)

I'm using the newest "May Your Longest List..." from Quietfire Design as well as an eCut available on the Silhouette onLine store

("May Your longest List..."); eCut ("Holly & Ivy")

 I scored and folded my red textured cardstock to create the easel (7"w x 5"h closed). Cut another red piece for the front.

As I mentioned above I used my Copic attachment for my airbrush machine spraying basic colors (YG03, G17, R08) through one of Tim's stencils (Holly Bough) on white cardstock.

Cut a piece of dark green textured cardstock as a frame with 1/2" borders. Adhered the two together and then tied a piece of red Sari ribbon/bow on the left side, then adhered it to the easel front.

eCut the "Holly & Ivy" from white cardstock. Applied Versafine Toffee all over and then embossed with Queen's Gold embossing powder. Adhered it to front.

card closed

Die cut the holly branch (ECD) from white cardstock and hit with Distress pads "Shabby Shutters" & "Pine Needles". Then applied Stickles "Holly" with my finger on the leaves. Adhered to card and added red pearls.
On the floor: Dry Embossed it partially with Sheena Douglas "Holly " embossing folder - hit the high points with a dirty green sponge lightly. Stamped the quote ("May Your longest List...") with Versafine Black Onyx and clear embossed.

Die cut the holly leaves (ECD) hit direct to paper with the shabby shutters & "Mowed Lawn". Adhered to a small piece of cardstock to create my stopper. Colored the berries with "Fired Brick" and clear embossed then adhered to leaves then to the floor.

Click on any image to enlarge. Enjoy
Related Posts Plugin for WordPress, Blogger...