
We'd like to welcome back Guest Designer for June: Holly Craft


A friend recently posted a tutorial for a
lever card on the newsletter of a popular stamping website (Split Coast
Stampers - click here to go to the tutorial). I took her instructions and made them my own by enlarging the size
of the card to 5 by 7 inches and using die to cut the openings in the front of
the card. I combined the Quietfire images with Spellbinders die and
M-Bossibilities to create this "Congratulations" card.

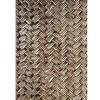
I cut the outside portion of the 5 by 7 card, diecut an opening with the larger of the three Labels 22 die that I used and then embossed with the 3D Basket Weave (SKU 7586-E3D-004) on the front portion of the card. I think of baskets as a texture you would find in a home so I thought that was appropriate. The inside card is the same size, but scored in quarters rather than just in half. The scores are made into valley, mountain, valley.

The opening cut in the front with the second largest
Labels 22 die is cut so that only half of it cuts, thus creating the lever.
There are two ways to accomplish cutting a portion of a die, that I can think
of doing.
- First, position the die in the desired position and then hang the portion off the base plate that you do not want to be cut. Only the portion that is between the cutting mats will cut. Tape it in place before running it through your diecutting machine.
- The other way to do it is to place the tan polymer mat up to the score line that you are cutting to. Slowly feed the portion into the diecutting machine that you want cut until you feel the resistance caused by the tan polymer mat. That portion will be too thick and you will be able to feel that and back out the plates.
Either way works great
so it is a matter of preference. Once I have the front and inside diecut, I
stamped my greetings inside and secured the very front and very back portions
of the card pieces to each other. You can see in the photo that the middle
portion separates in the folding process.

I embellished the front with the
verse on the smallest of the Labels 2 die I used and a band stamped with the
house image. This lever card design works so well with the beautiful sayings
from Quietfire and Spellbinders die. Choose a die that the desired saying fits
on and get started!

I also used the house image on the inside of the
"new home" note, leaving a space in my computer generated message to
add this touch of gold. As well, I used it on the back of the envelope above
the gold stripe on the envelope.
This use of a stamped images allows me to add that touch
of sparkle that the metallic gold adds which would not be possible with just
the computer generated text.


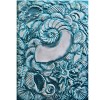
As often is the case, Quietfire stamp sets include a
stamp that is so versatile that it has many uses. On this shell card for a
beach wedding, I simply stamped "Congratulations" inside the card in
that elegant Quietfire look. I thought the outside (created with Spellbinders
3D Shell Beauty M-Bossibilites) complexity needed simplicity inside and
that beautiful Congratulations image provides that.
These are all projects and cards from my real life that
show I use Quietfire and Spellbinders products together so very often. You
might not do watercolor paintings, but I am sure you can use this stamp set! I
was so excited to see this set as there are few home stamps available. Hope you
have enjoyed my postings!
4 comments:
I would love to see a tutorial for the lever card. Really awesome. I am a little squeemish about tackling something like that without a tutorial. TFS
Mstgane
Ann
Lots of inspiration here!
thanks for joining us Holly!
very nice. nice job on the lever card. that sea beauty is a beauty.
have a great day
Ann, Split Coast Stampers has recently posted a lever card tutorial written by my friend, Laura Lipe. I changed up her design a little by using die from Spellbinders. Hope this helps! Go to the SCS website (www.splitcoaststampers.com) and look under the header tutorials. Hope this helps!
Post a Comment