Thursday, June 30, 2016

"Some People Come Into Our Lives" Graphic 45 card

Hello Crafty Friends!  Kathy Jo here sharing a card using the sweet "Some People Come Into Our Lives" stamped sentiment from Quietfire Design:
Some People Come Into Our Lives - Companion Stamp Set - Mounted
The lovely sentiment was stamped onto white card stock using Jet Black Archival Ink and die cut using Spellbinders' Victorian Bow Etched die.  Next black card stock was die cut with Spellbinders' Cascading Grace Etched Die.
The die cuts were layered on Graphic 45 Enchanted Forest paper.  All papers were mounted on a tent fold card and flowers were assembled as shown. 
Such a beautiful stamp- the sentiment and the calligraphy!

Thanks so much for stopping by!  I do hope you enjoyed the card.  :)
Have a happy crafty day,
Kathy Jo

Tuesday, June 28, 2016

Happy Family Days - Happy Anniversary


Hello!!  It's Wanda here with you today to share this anniversary tag using the Happy Anniversary sentiment from the Happy Family Days set of 4 stamps.  


I started with a #8 Ranger manila tag and first did the wrinkle free distress technique using Distress Inks Tea Dye, Antique Linen, and Pumice Stone.  After drying this, I placed the heart stencil (Tim Holtz) over the tag and inked through it with Versamark, removed the stencil and applied PanPastel Permanent Red buffing off any extra with a paper towel.  The chalk sticks heavily to the ink and lighter to the other areas.  The edges of the tag were then distressed.  Happy Anniversary is stamped on white cardstock with Archival Ink Jet Black, trimmed, edges distressed and colored with the PanPastel.  The flower pieces (Geranium - Elizabeth Craft Designs) were cut from white cardstock and color added to the center with the PanPastel.  The geranium leaves were cut from green cardstock and highlights added with PanPastel Bright Yellow Green.  The other leaves (Tim Holtz) were cut from watercolor paper and inked lightly with Distress Ink.  All the pieces were shaped and glued to the tag.  To finish it up 3D lady bugs were glued on, ribbon and twine tied to the top and white gel pen dots added some of the hearts.  


Monday, June 27, 2016

The Earth Laughs in flowers...

Happy Monday to all of you!!  I hope you all had a fabulous weekend and did something really fun and crafty.  I got out lots of things from my stash and a brand new stamp called "The earth laughs rose" and set to work to make something pretty.


To start my project I found a small wooden box in my stash that was bare wood.  It had a glass top on it but i decided to take it off and just create a pretty lattice design for the base and then color a pretty rose to put on top of it.  I stamped the flower and the sentiment first on white paper in a dark green ink and then embossed it in clear powder.  Then i colored it with 3 shades of Copic pens and 2 shades of green that matched really well.  When i finished i cut it all out and adhered it to the top of the box with 3D Foam dots by Scrapbook Adhesives.  It's really simple but i like how it came out.


For the box i painted it all white first and then after i added all the top pieces i went back and added some light pink paint and a bit of darker pink to shade it and match the flower.  And then i got a little crafty and added a stenciled design on the sides with white gesso.  I think i am going to sand it down a bit and paint a thin layer of white over it later but it was fun to try something new and think outside the box for decorating things.  Below is a photo of the things that i used for my project.  It's always good to see what new things others try so that you feel confident investing and trying it too.


Thanks so much for stopping by today on the Quietfire Blog to see what new from all of us to share and be sure and stop back for more summer projects!!  

                                                                              Teresa

Thursday, June 23, 2016

‘Invincible Summer’ Cards: By the Batch Method - Judi Kauffman, Guest Designer

 
Thank you for inviting me back as today’s Guest Designer! I want to share a card project that was sparked by my friend Toni’s request for cards to send out through her church’s Card Ministry.


I wanted to be able to send her at least two dozen and I thought it would be a good idea to design something that could be made with my favorite method: By the Batch. Once upon a time I wrote a book with that title. It’s been discontinued but copies are still floating around on eBay and Amazon. {Amazon.ca | Amazon.com}
 
The gist of it is this – Make lots of one-of-a-kind cards in a series using the same supplies for all of them. I don’t enjoy producing assembly-line duplicates and I find that with this method the more cards I make the more I want to make because I keep getting new ideas as I go along. I love lining them up while the inks dry – ‘show and tell’ with only me as the audience! And it’s kind of like doubling or tripling the recipe when baking cookies: There’s a bountiful outcome and only one mess to clean up!
I selected the beautiful and inspiring quote from Albert Camus that Suzanne Cannon turned into an equally beautiful calligraphic stamp. The stamp is called ‘In the Midst of Winter’ but I have dubbed these cards ‘Invincible Summer’ because that’s the part of the quote that warms my heart most. Suzanne’s new Crackle Background stamp fit nicely with the direction I wanted to take.
 
   
Crackle Background
In the Midst of Winter
 
 
I mixed in two of her new 4 Seasons dies for one of the cards to show what can be done with some Shimmer Sheetz and a few extra minutes of your time!
 
 
Do you have some corner edger scissors or corner punches tucked away in your tool box? If so, put them to use for the triple-layer background cards. Just a few seconds more and an extra half-sheet of cardstock for this option.


INSTRUCTIONS
If you are an experienced card maker, look through the photo gallery (scroll below), head straight to the supply list and skip the instructions. Create your own versions of the card, customize as you choose.
If you are a beginner, follow the steps below. And remember, even if you are new to card making you can still customize the project to suit your needs! Choose different inks, different quotes and background stamps. Change to tent-fold cards or card bases made from purchased patterned cardstock. It’s all in your hands. Trust your eye. The worst thing that can happen is you waste a piece of cardstock now and then.  
(The instructions are long, but I didn’t want to miss a single detail that a beginner might need!)
1. Lightly sponge several pieces of white cardstock with teal ink. With the same ink, stamp the Camus quote many times. Be sure to leave about an inch and a half between the impressions! 

 
2. Make a batch of A2 size (4.5” x 5.5”) side-fold card bases from the same white cardstock. Leave some of these white. Smudge the others with teal and yellow inks, using a different sponge for each color. Refer to the photos. Allow the colors to overlap here and there. Use circular motions as well as long strokes. Create rays that radiate like the sun. Also, use teal ink to randomly and imprecisely over-stamp with Crackle Background. TIP: Apply uneven hand pressure and do not re-ink every time you use the crackle pattern stamp. Second and third ‘ghost’ impressions add a terrific element of surprise and a softer layer of color.
 
3. For triple-layer background cards: Smudge a few extra pieces of white cardstock, stamp some with crackle pattern. Trim rectangles so they will fit on card front when layered, cut corners with decorative scissors or use corner punches. Center two contrasting rectangles onto card base.
 
4. Back pieces of Turquoise Gemstone and Yellow Iridescent Shimmer Sheetz with Clear Double Sided Adhesive Sheet and die cut the word Winter from Turquoise and the word Summer from Yellow. Reminder: You MUST use a metal adaptor plate or the Sizzix Big Shot with Precision Base Plate to die cut Shimmer Sheetz. Review Els van de Burgt’s video tutorial HERE if you are new to this technique. Go straight to step 7 to complete the card that uses Shimmer Sheetz words.
 
5. Tear the stamped quotes around all four edges, or leave a 90-degree angle corner at the top as shown on two of the samples. Smudge a bit of yellow ink over the words Invincible Summer to give the feel of sunshine. Attach a quote to each of the card fronts. TIP: To create a white edge, tear the cardstock toward you. To create a blue edge, tear the cardstock away from you.
 
6. Accent with simple embellishments: Glitter Dots in Gold or Turquoise, or a mix of the two; or add dimensional dots or brads. Refer to the photos for ideas on where to place them.
 
7. To complete Card 1 with die cut Shimmer Sheetz ‘Winter’ and ‘Summer’: Choose a card base that has teal ink toward the top, yellow ink toward the bottom, and yellow ink around the outside edges. Cut apart the lines within the quote and glue them in place as follows – ‘In the midst of’ above the word Winter, followed by the three lines that say ‘I found there was,’ and ‘within me, an’ and ‘invincible’ (allowing the flourish at the end of the word Winter to overlap right after the comma on the first of these three lines. Then add the word Summer and the ‘Camus’ attribution (allowing the flourish below Summer to overlap the cardstock with Camus’ name).
 
 
Card 1 Design Strategies to Notice:
The first strip and the last strip are both ½” high, while the three strips at the center are much thinner. The top strip is taller by necessity because of the flourish above the ‘d’ but the final strip with only the word ‘Camus’ on it is taller so that the card has some visual ‘weight’ toward the bottom! This is intentional, not something random. My goal was to keep the eye moving through the words. And the line spacing is uneven by intention. That also helps the eye keep moving.


CARD GALLERY (click on the image to see it enlarged)


SUPPLY LIST
 
Quietfire Design –
A Way With Words 4 Seasons die set  Quietfire Site | Elizabeth Craft Designs Site
 
Shimmer Sheetz in Turquoise Gemstone
Shimmer Sheetz in Yellow Iridescent
Clear Double Sided Adhesive Sheet
Glitter Dots Peel-offs in Turquoise/Silver and Gold/Silver


Wednesday, June 22, 2016

The Earth Laughs In Flowers


Good Morning.  This is Selma today with a post using Suzanne's beautiful "The Earth Laughs In Flowers" rubber stamp.  A card created with this stamp could be used for a variety of card giving occasions.

The Earth Laughs Rose, Set of 2 - Mounted

This stamp set also comes with a beautiful Rose stamp.  I chose to create dimensional roses and lilacs, created with Susan's Garden Notes Rose 1 and Garden Notes Lilac dies, for dimension, on the front of this card.  The flowers created duplicate the flowers in the design paper which is from the Craft & You - Rose Garden Paper Pad.  The Rose stamp was used on the inside of the card.


The Earth Laughs Rose - Set of 2

Monday, June 20, 2016

I don´t tell you enough...


Hello everyone,
Yvonne here with a card using one of the very latest Quietfire Design stamps sets "I don´t tell you enough": a set of 5 stamps.

I love this set for it expresses that feeling we often have that we don't tell enough how much we appreciate someone special in our lives....
And that makes this set one of my personal favourites....


Used materials:

Thanks for stopping by and wishing you a great day!

Hugs from Holland,

With Sympathy die - Perhaps They Are Not Stars - Paper Bow


Yogi here today with a sympathy card and a envelope punch board paper bow tutorial.

Scored and folded my white card.

Created a stencil using Spellbinders "Stars Five" set, die cutting with the largest die in the center of a larger piece of scrap cardstock. Placed the stencil where I wanted it on my card front. Inked the crackle stamp using Distress pads ("Broken China" all over, "Faded Jeans" & "Wilted Violet" here and there), misted with water and stamped. Used some of the unused portions of the stamp to stamp the unstamped sections. Sponged some of the faded jeans around the edges of the stencil to define the star shape. Dried thoroughly.

Stamped the quote ("Perhaps They Are Not Stars...") using Versafine Black Onyx and clear embossed.

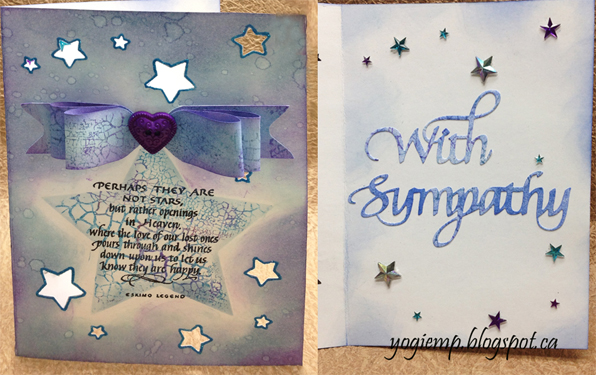
Punched and die cut the various stars (McGill star punch for the medium stars and Fiskars star punch for the smallest stars), and the smallest of the Spellbinders stars. Used a Quickie glue pen to outline each of the stars and sprinkled with Ritz micro fine glitter "Royal Blue".

Created a background paper for the bow using the crackle background stamp and the same ink pads as above (see pic below). After cutting the bow pieces, sponged them with the blues and violet to get deeper tonal values. Also sponged the backs of the pieces since they are partially visible. (The larger the bow, the more visible is the underside...)

When the front of the card was completed, kept it closed to adhere various sized rhinestone stars through each opening to the inside of the card using Glossy Accents. (See pic at the top)


Inside: Sponged some blue around the edges with a dirty sponge.

Die cut the "With Sympathy" (also available on Quietfire Design HERE) from a scrap piece of the background, then sponged more "Faded Jeans" to bring out the color. Adhered to inside.

See instructions for "Paper Bow" below. When completed, adhered to card front adding a purple heart button to the center. 


To see the step by step pics, check out the post I did in Feb 2014 (PS I used slightly different sizes for this bow)
http://quietfirecreations.blogspot.ca/2014/02/a-smile-that-you-send-out-paper-bow.html

Step 1: ink stamp with various colors, mist with water and stamp. Repeat as necessary to create a large enough background. I stamped twice to create a piece 8.5"w x 3.5"h

Step 2: Sponge with same colors to create depth.

Step 3: Cut background paper 1"h x the various sizes (1 pce 6.5"w; 1pce 5.5"w & 1 pce 4.5"w)


Use your envelope punch to punch the notch in the middle of each piece. Turn each piece 180º and repeat. On the shortest piece also notch both ends to create the picot.

Use the corner round of the envelope punch to round the edges of the 2 longest strips to create what the image looks like.

PS if you don't have an envelope punch, using a square or rectangle punch to create your  notches and a basic corner rounder punch for the ends will work as well, although it probably won't give you the same roundness to those center notches, but that gets hidden anyways with the center embellishment if large enough....

After punching the notches and corners etc, use a pencil or other round shape to massage your paper so it rolls nicely (similar to curling curling ribbon), to both longest pieces. Adhere the ends matching the notch shape of the longest strip, then do the same for the medium sized strip. Adhere both of these together at the center, then adhere these to the smallest strip. Voila, your bow is made. Adhere to your card and add a center embellishment.


Related Posts Plugin for WordPress, Blogger...