Monday, April 29, 2013

Congratulations on Your New Home! Card

Hi there!  It's Suzanne today, wondering what has happened to April!!
Here is a little card for you with a whole bunch of elements that I've been wanting to use.
First, I should introduce you to the new rubber stamps!  They were designed for someone with a new home, but they can all be used for other occasions.

Here is the whole set of five stamps. And here is the link to the set! Just click on the image below to see them larger.  Be Not Forgetful is a smaller version of a stamp we released quite a few years ago.  The technical problems have been remedied in this version.  Ahem, by mistake I left out the attribution...  It's the Bible, from Hebrews.  We hope you like our new collection!
 

Here is a close-up of the card:

 
I used VersaFine Crimson for stamping the images and blending around the edges.  I adore the little wood houses from Prima and the Memory Box star on a string. I'm finally getting to use the new Graphic 45 French Country papers.  They always makes me smile.  At CHA they were always playing Edith Piaf in their booth!! I think I would have gone insane after 4 days... either that, or I wouldn't have been able to speak English anymore.  My husband would have been impressed. Non, Je ne Regrette Rien!
 
I think I've created thumbnail links to everything below.  Just ask if you have any questions!
Thanks for stopping by! Suzanne


Friday, April 26, 2013

Mother's Hold Their Children's Hands Card

Hello everyone, Terre here with a quick and easy card, but the question is does it look like it was quick and easy? For this card I chose one of Quietfire Designs perfect sentiments "Mother's Hold Their Children's Hands". I embossed the entire front of the card using Spellbinders 5 x 7  Elegant Labels Four Card Creator die templates. The nice thing is you can find that die template right here at Quietfire Designs.

I used Core'dinations color core cardstock and sanded it once I had embossed it, I also cut the Spellbinders Labels Four die template out of white cardstock, stamped my sentiment in the center and adhered it to the card front with Beacon Adhesives Zip dry, my favorite liquid glue. I added some Want2Scrap Border Bling from Nina Bracket, tied a bow out of May Arts ribbon and there you have it, fast and simple but elegant! Thank you for stopping by my Friday blog post and have a wonderful weekend! Crafty Smiles, Terre

Wednesday, April 24, 2013

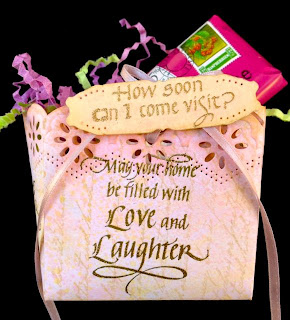
Home-Congratulations


Robyn here, excited to be the first to welcome you to the newest Quietfire Design Rubber Stamp Set

When you come to visit me, please bring flowers and
if you come bearing chocolate the answer is soon!

This house warming basket began as a 9x9" piece of white card stock. I used the ink blending tool to colorize with Distress Spun Sugar, Squeezed Lemonade and Tumbled Glass.
I used a background script stamp, and then sprayed some PerfectPearls Mist Forever Red and Sunflower gold.

Decorate both sides of the paper, or you could use double sided patterned paper.

Next score both sides at 3" and 6" to make 3" squares. I drew lines so you could see the marks, you, just score. 
Fold all the scores, making sure the mountain fold is on the side you want to see.
The next folds are collapse folds on all four corners. 

Pinch points  A and B  and bring them together to create the center fold.


I cut and embossed the border edge with Spellbinders Edgeabilites Classic Edges and Classic Insert C.
I think this will have to be a video tutorial as it involved some tricky placement and cutting.

Thanks for visiting,we love having you here at Quietfire Creations! You are a gift!
Comments and Questions welcomed.
Please hop over to Rainbowweaves for a bit of tag backstory.


Monday, April 22, 2013

Live in the Moment - Butterfly Card


Our friend and frequent guest designer Judi Kauffman shared a card she made with Live in the Moment stamp from Quietfire Design, silver butterfly peel-offs on altered Shimmer Sheetz from Elizabeth Craft Designs, papers from Karen Foster Design.


In case you want to make it precisely as shown, here are the details:
Stamp #6142, Butterflies #2539, papers Colorful Butterflies 64949 and Love My Mom 64947, White Iris Shimmer Sheetz altered with Jacquard Products' Pinata Color inks in Havana Brown and Senorita Magenta.

Stamping and smudging: Adirondacks inks from Ranger in Espresso, Stream and Raspberry. Card base is white, with the card front completely covered by Love My Mom paper. Butterfly wings have a double layer held with foam squares for dimension (extra pieces are part of the sticker sheet).


We Cannot Tell - Napkin cards

It's my turn (Yogi!) again on the Quietfire Creations blog. Well with these two cards - you can't get any simpler than this...

Our quilling group had a napkin exchange this past week. Now I have two huge drawers filled with napkins, so I really don't need anymore... BIG GRIN But then again some fresh designs might change my mind set and it sure did. Can't believe that with all the ladies that were exchanging napkins and the amount we all brought with us, there weren't any duplicates. AMAZING!!

Ok, then one of the ladies said, what do you do with them... Normally I use a gel medium to adhere my napkin to my cardstock, applying the gel to the cardstock and then laying my napkin on top. Works well, but does have a tendency to warp. I also use a glue stick in the same manner and like that as well. And I've done it with bee's wax, which I really loved, but is messy.

Now I know, adhering napkins with plastic wrap and a hot iron was supposed to work, but hadn't tried it, so that's what I used this time. What a breeze. I first tried the cheaper plastic wrap that you get in those jumbo rolls for the big dispensers, and even though it worked, I was a bit leery about it coming apart at some point. Then I tried it with Saran Cling Wrap and what a difference. Who woulda' thought... It adhered immediately and when cooled down, was stuck real good.

You got to admit, these napkins have beautiful images... So I lay a piece of cardstock (white 110#) on my work surface, a piece of plastic wrap and then my napkin face up. NOTE: If you've got any plastic wrap showing around your edges, you will need to put a protective layer on top so you don't ruin your iron. Using a dry hot iron (almost cotton setting), iron over your napkin. Allow the napkin to cool completely before seeing if it adhered properly. PS You'll see a difference in the look of the napkin where it adhered.

For the orchid card, I used Spellbinders A2 Matting Basics dies "A" & "B", cutting first the napkin piece, then I adhered it to my white cardstock, and placed the next die over the layers, centering it and then die cut that. Tied the ribbon around the two layers. PS the ribbon is just tied in a knot, and before pulling taught, slipped a small piece of ribbon into the knot, then pulled taught. Easy... Adhered everything to my light apple green card front (4.25"w x 5.5"h).

Inked up my stamp (Quietfire Design companion Stamp set "We Cannot Tell") with versafine Black Onyx, masking off the rest of the stamp with a piece of Magic Tape, then removed the tape after inking, then stamped onto card. Did the reverse masking of the stamp for the inside of the card, inked it up with the black and clear embossed.

For the roses card, I used the saran wrap. I die cut with Spellbinders Classic Ovals large and used an out of the box technique to have the rose bud outside the oval. I die cut the Floral Oval from some cream cardstock and adhered my rose oval. Scored and folded Kraft cardstock to make my easel card (5.5"w x 4.25"h) and adhered my elements to the center front.

When I die cut the rose, I cut into another part of the design, which I trimmed down and used for my easel floor, splicing some edge pieces to it.

Stamped the quote (Nature Quotemarks) with the black and die cut with the same oval die set. Folded it after the 2nd sentence and used it as a stopper for my easel. Adhered to card floor. When it was all done, I really wanted some bling... so added the rhinestone flourishes. I'm totally content and they both took less the 15 minutes to make, and that includes some of the thinking...

Hope you give it a try, it's addictive. Have a great day
Click on any image to enlarge.


Friday, April 19, 2013

Live in the Moment, You are Amazing, Serenity


Charmaine Stack here again as guest designer for April. Thanks for all the lovely comments regarding my Mother’s Day cards. This time I have a couple of uncomplicated cards to share using the beautiful new stamps from Quietfire Design. The joy of these stamps is that they can easily take center stage and do all the “heavy lifting” in a card design.


First up, we have this card with an embossed navy front created with Spellbinders M-Bossabilities 3D Framed Labels 18. Using this type of embossing folder makes a card come together in a snap! I tapped Ranger’s Perfect Medium Stamp Pad across the raised cardstock and dusted Perfect Pearls Pewter powder (from the Aged Patina Kit) over top with a soft paintbrush. I cut out an aperture to strategically frame the“Live in the Moment” quote using a Spellbinders Labels 18 die. The quote was stamped with Versafine Deep Lagoon ink and clear embossed.


The Serenity Prayer is stamped on white cardstock using the Royal Satin Kaleidacolor Stamp Pad. I then cut it out with a Spellbinders Nestabilities Classic Oval die. I mounted it on purple cardstock cut with the Spellbinders Floral Ovals die. Four red gemstones and a striped bow coordinate with the red cardstock card base. For photos showing how to do this small, neat bow, please visit this post on my blog.


And lastly, here is a card featuring “You are Amazing” from an earlier Quietfire stamp release. I stamped the sentiment in Brilliance Galaxy Gold on brown cardstock. The tree is created with a Dreamweaver Tree of Life stencil using Glossy Black Embossing Paste. After the paste had dried, I placed the stencil back over the tree and pounced Ranger’s Perfect Medium Stamp Pad over all and dusted on an assortment of Perfect Pearls from the Aged Patina Kit to colour the tree. I spritzed some gold shimmery mist across the panel. I rounded the top corners on a sage green base card, then did the same with the brown panel and drew around the edges and across the torn bottom with a gold leafing pen. Simple, but elegant – just like the sentiment! Thanks for visiting today and making my time as guest designer for April so enjoyable.

Wednesday, April 17, 2013

Live in the Moment!

Good morning!  Sherry here today and I have an altered frame using one of the new March releases, Live in the Moment, to share.  I don’t know about you, but for me I always look at what altered items I can make with Quietfire Gentle Thoughts.  Without fail I can always find the perfect sentiment to use in a frame or another gift item.

LiveInTheMomentFrame

I started with one of the Michael’s dollar frames that I always have on hand, painted it black and then applied a layer of black embossing paste with a mini harlequin stencil.  Once the embossing paste had dried, I replaced the stencil and misted with gold perfect pearls and water mixture.

LiveInTheMomentFrame CloseUpSentiment

The sentiment was embossed in black, mounted on chipboard, and then trimmed down to fit the inside of the frame.    Black cardstock spritzed with gold leafing was used as the background for the sentiment.

LiveInTheMomentFrame RedFlower

The flowers and foliage (Spellbinders Blossom Five and Foliage) were die cut from watercolor paper and then inked with Ranger Distress Stains.  

LiveInTheMomentFrame PurpleFlower

The flourishes (Spellbinders Venetian Motifs) were also die cut from watercolor paper and then colored with a gold leafing pen.  

Corsage pins used as embellishments were also covered with the gold leafing pen and all the splatters with made with the gold leafing pen using either a color spritzing tool and/or canned air. 

That’s all for me today . . . thanks for joining me!

SHERRY SIGNATURE

Project Supplies:


Related Posts Plugin for WordPress, Blogger...