Tuesday, May 19, 2020

In Summer


Hello Quitefire fans!  Betsy here today sharing a beautiful nature-inspired card using:


Such a wonderful quote!  So to begin I chose the paper I wanted to use and 
gathered my materials.


I wanted my card to have a natural organic and summery feel to it.  So I started by
ripping my main panel and inking the sides.  I also made a horizontal rip in from the
right side to peel back to reveal the sentiment.  I inked those edges as well.


Next I took a small piece of what would be my background paper and stamped
my sentiment on it with dark brown ink.  I love the clean crisp
image that stamping with rubber makes!


I ripped the right edge of this small panel and inked it up.  Then I adhered
it behind the patterned panel after curling back the torn edges.


Next I made an A2 size panel from white card stock measuring 5 1/2" x 8 1/2" 
and adhered my background paper.  I inked those edges as well.  Then I adhered
my patterned stamped panel on top.  Just one little tweak to the eggs in the nest,
they were white...I colored them pale blue.  And my card was finished!


Quietfire Design Products used:


Other Products used:

Patterned Paper
Background Paper
Chalk Ink
Copic Markers
Dark Brown Ink

For a more in depth tutorial please visit my blog:

Thanks for stopping by today!

Betsy

In my capacity as a design team member for Quietfire Design, I do receive the products I use from them. 
All opinions and creative decisions remain my own, and I only work with companies/use products that I love.


Thursday, May 14, 2020

I need coffee

Now that my husband is working from home, we are going through our coffee three times as fast because he drinks twice as much as I do.  Fortunately, there has been no shortages of coffee.  It made me think of the different containers we drink our coffee in.  I have a floral butterfly cup, he drinks out of a heavy mug, and we rarely if ever go out and buy coffee from a coffee shop unless it is from a Vietnamese store.  If your first coffee is the Vietnamese drip coffee with condensed milk, all other coffee tastes like weak tea.  I digress - here's my card with the different ways to drink your coffee.


I embossed the cups from the two sets in black and used color pencils for the first two and Copic markers to draw the tiny flowers and leaves on the last cup.


Since I had the stamp sets out, I made another card using just the heart coffee container and embossed it in white on kraft card stock.  


I used color pencils and masking to create the background.


A ribbons and a postage style die cut highlighted my quote.  I glued together several layers of the frame in white and then used a red layer on top to tie it together with the colored hearts.


Get these stamps while they last!

But First, Coffee, Set of 8 Stamps - Mounted


Tea & Thee, Set of 7 Stamps - Mounted


Tuesday, May 12, 2020

Be With Those ~ Tag


Happy Tuesday! It’s Kim here today with a fun project I worked on this week for the Quietfire Creations blog, using the Be With Those stamp. It’s a quote I am quite drawn to during these days of physical distancing!

I started my project with a large Ranger tag, about 8.5” x 4” and a background I had previously made during some gel plate play! I used some matte gel medium to adhere my background to the tag.


Once dry, I grabbed a big handful of Tim Holtz Idea-ology Dolls. I LOVE these vintage die cut images! I played with them for a bit to figure out how I wanted to layer and place them on my tag. Once I had that figured out, I took a quick photo with my camera to act as my memory when I stuck them back on using a Ranger glue stick.


Initially I wanted to emboss my quote with Tyrian Purple Modern Gilding Powder, but my background had a few bumps and I knew it would be tough to get a nice crisp image and this tag is ALL ABOUT the quote! I also tried to stamp onto some Duralar, but despite using powder to reduce the static, it was not working. That might be a technique to finesse another day!


I opted to use StazOn ink in black, on the Duralar, and stapled my clear tag onto the top left corner. I think it worked just great! So happy with how this tag turned out! 


I previously mentioned that this tag is ALL ABOUT the quote and I seriously mean that. My husband and I had fun thinking of other quotes that one could use and the whole vibe of the tag changes!


Have a great week! Get in lots of paper play before the long, summer days entice you to be outside!

~kim

Supplies:

Ranger tag & glue stick
Gel Medium
StazOn black ink

Monday, May 11, 2020

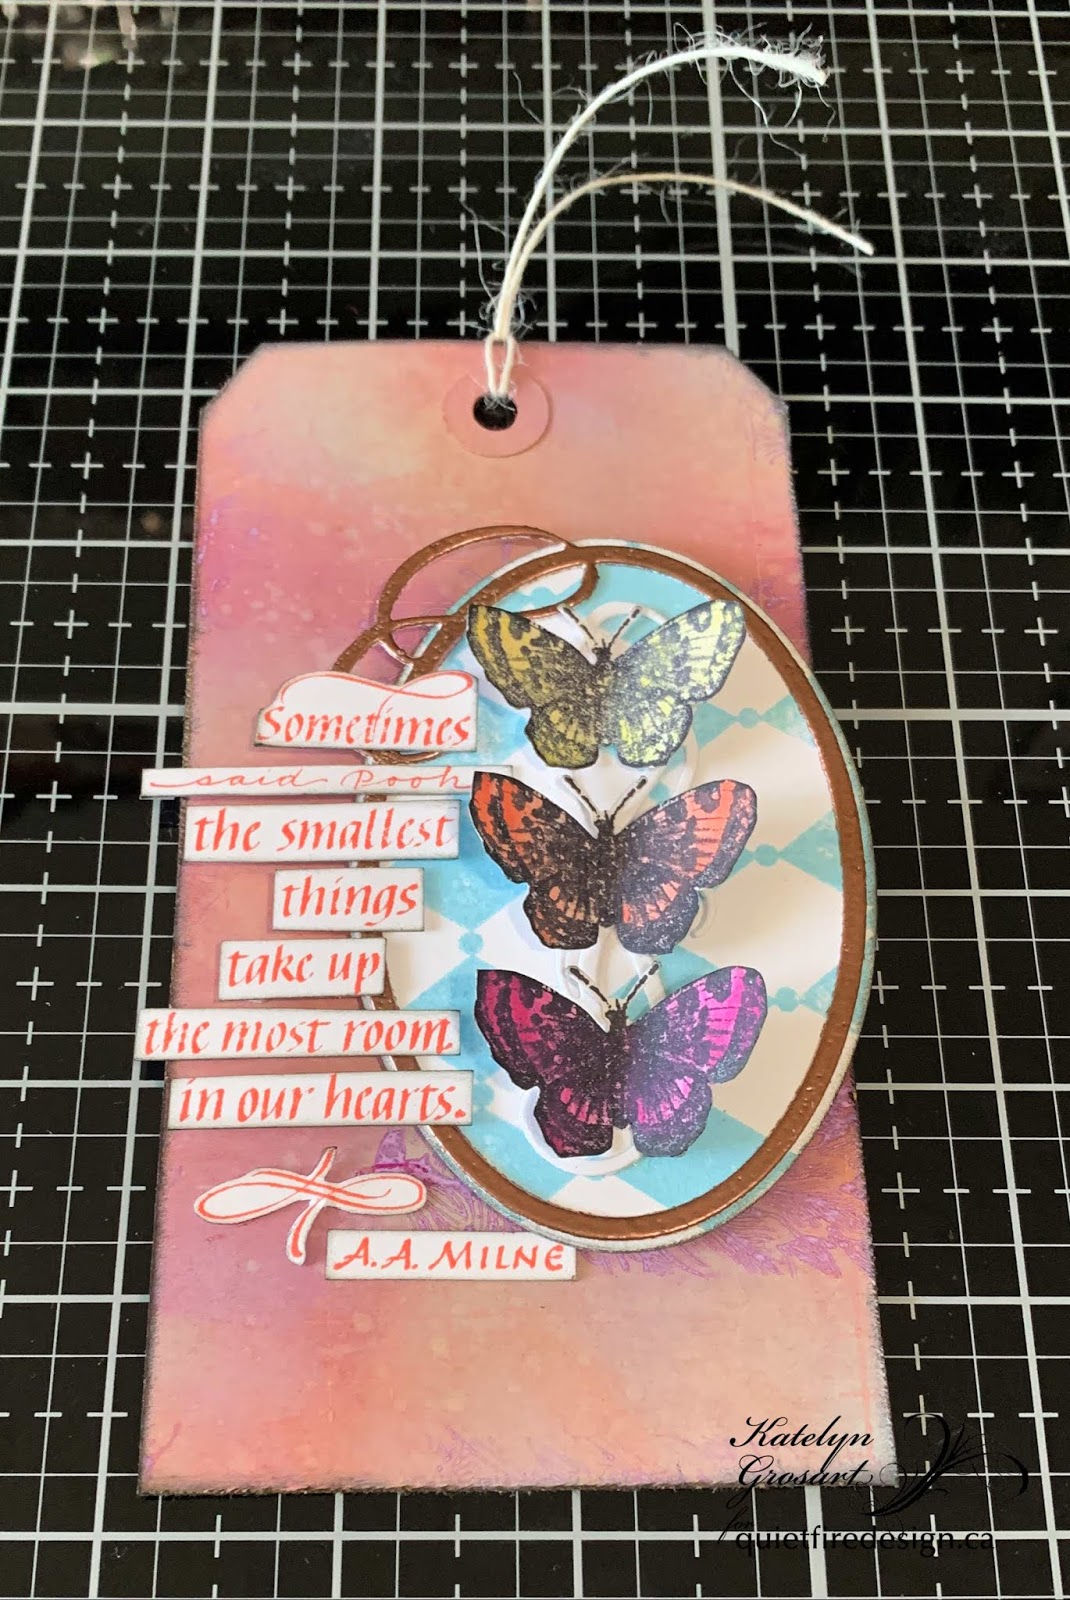
The Smallest Things Tag


Hey Quietfire Fans! For today's project I'm sharing with you my The Smallest Things Tag. By combining a variety of stamps, dies and the Modern Gilding Powders, they were all perfect for creating my tag. You'll want to grab a cup of your favourite beverage and learn how to recreate my The Smallest Things Tag at home.

To start, die cut a 2 1/2" Stitched Oval out of white cardstock. Apply Tumbled Glass Distress Oxide Ink to the Dotted Harlequin Background stamp and stamp onto the oval. Distress the edges of the oval. Ink the edges of the oval using Black Soot Distress Ink and a blending tool with foam.


From the Flourished Frame die, die cut the scroll out of white cardstock.


Die cut the Flourished Oval Frame out of white cardstock. Apply Emboss It Ink to the frame. Sprinkle Copper Scroll Modern Gilding Powder over the entire surface of the frame. Tap off the excess powder and emboss with a heat tool. 


Next, you'll need the small butterfly from the Butterflies/Dragonflies stamp set. Apply Jet Black Archival Ink to the small butterfly and stamp onto a piece of watercolour cardstock. Reapply ink to the stamp two more times and stamp onto the same piece of watercolour cardstock. Using a waterbrush and Seedless Preserves Distress Oxide Ink, colour in one of the butterflies. Using a waterbrush and Squeezed Lemonade Distress Oxide Ink, colour in a second butterfly. Using a waterbrush and Abandoned Coral Distress Oxide Ink, colour in the last butterfly. Fussy cut the butterflies out. Ink the edges of all three butterflies using Black Soot Distress Ink and a blending tool with foam. 


Apply Abandoned Coral Distress Oxide Ink to the Sometimes, Said Pooh stamp set and stamp onto a piece of white cardstock. Cut the quote into strips as desired. Ink the edges of the quote strips using Black Soot Distress Ink and a blending tool with foam.


Next, you'll need a tag that measures 3 1/8" x 6". Using a blending tool with foam, blend Squeezed Lemonade, Abandoned Coral, Seedless Preserves and Tumbled Glass Distress Oxide Ink over the entire surface of the tag. Spritz the tag with water. Dry the tag with a heat tool. 


Apply Abandoned Coral Distress Oxide Ink to the Grid Background stamp and stamp randomly seven times on the tag as desired. Reapply ink to the stamp as needed. Distress the edges of the tag. Ink the edges of the tag using Black Soot Distress Ink and a blending tool with foam.


Apply Seedless Preserves Distress Oxide Ink to the Leafy Acanthus Background stamp and stamp half of it on the right hand side of the tag. Reapply ink to the stamp and stamp randomly on the tag five times. 


Adhere the flourished oval frame to the stitched oval. Adhere the scroll to the middle of the stitched oval. Foam square the stitched oval slightly overtop of the leafy acanthus background. 


Adhere the three butterflies as desired overtop of the scroll.


Using adhesive and 3D foam squares to adhere the quote strips to the left side of oval as desired. To finish the tag, tie a piece of white twine through the top of the tag.


Here are a few closeup photos of the finished tag.


Here is the finished The Smallest Things Tag.


Quietfire Design Supplies Used:


Other Supplies Used:

- Tim Holtz for Ranger Ink: Distress Oxide Ink - Squeezed Lemonade, Seedless Preserves, Tumbled Glass & Abandoned Coral, Distress Ink - Black Soot and Blending Tool with Foam
- Ranger Ink: Emboss It Dabber
- Elizabeth Craft Designs: Stitched Ovals
- Misc: Tag, White Twine, White Cardstock and Watercolour Cardstock

Thanks so much for joining me today and I hope that I have inspired you to recreate my The Smallest Things Tag.

- Katelyn


Sunday, May 10, 2020

Sending Love on Mother's Day


Today is group post day over at Elizabeth Craft Designs, so head on over to their blog to see all the projects for Mother's Day!

Here is the card I made.  It can be for anyone (not just Mom!) in your thoughts.
Here is how you can make it...

Supplies:

A Way With Words Sending Hugs Kisses  QFD | ECD
A Way With Words Baby Love  QFD | ECD
A Way With Words Butterfly Flourish  QFD | ECD
A Way With Words Flourished Night Sky  QFD | ECD
A Way With Words Hearts & Pawprints Spray   | ECD

American Crafts Bazzill Cardstocks in Turquoise Mist (pale), Patina, Navajo and Blue Oasis (dark)
Cardstocks in pale and dark yellow
Pink cardstock
White cardstock
Glue Dots
3D Foam Squares

Instructions:
  1. Form a 6.5 x 6" tent-fold card base from Navajo turquoise.
  2. Die cut flowers from Flourished Night Sky in the three palest colours of turquoise; 10 of Turquoise Mist, 9 of Patina and 10 of Navajo.
  3. Die cut the Flourished Butterfly base from white, Navajo and dark yellow, stack them and adhere together.  Die cut the free butterfly from pale yellow and use a Glue Dot to attach to the base.  Fold up the wings. Die cut a pink heart from the Hearts spray and adhere it to the butterfly as shown in photo.
  4. Diecut "Sending" and "love" from dark turquoise.
  5. Cut a panel 5.5 x 5.75 wide from pale yellow and another, slightly larger to create a mat, from dark yellow. Attach together.
  6. Adhere the butterfly flourish to the panel as shown and surround by the flowers in a pattern as shown.
  7. Adhere "Sending" and "love".
  8. Mount this assemblage onto the card base with 3D Foam Squares.
  9. Send to someone you love!
Thanks for visiting!  Stay safe, stay calm and patient, and stay home. <3
Suzanne


Saturday, May 9, 2020

Thursday, May 7, 2020

If Nothing Ever Changed...


Hello everyone!  Betsy here today showing you how to make this beautiful
butterfly card using:

Gentle Thoughts Rubber Stamps:

To start I chose my papers other supplies for my project:


I then chose another coordinating paper for the stamped quote.  I stamped my
quote onto the pale pink paper with a hybrid black ink.  It gives me
such a clean image.  Then I heat embossed it with


I then die cut this with a 3" circle die.  Next I prepared my base.  I used a white
A2 size top folding card base and first covered it with the green patterned paper.  Next
I cut my butterfly paper 1/2" narrower than the green and adhered it so it was
flush with the right side.  To add a bit of definition I added a narrow peel-off
between the 2 papers.


I took my die cut quote piece and adhered pleated ribbon behind it.  I added
foam tape and adhered it with about 1/4" handing off the right side which I 
trimmed off.  I fussy cut 4 of the butterflies from left over paper, adhered
them down the center only and added glitter glue for a bit of sparkle and shine.
And that completed my project!


I hope you enjoyed today's tutorial!

Quietfire Products used:


Other products used:

Patterned paper
Pleated Ribbon
Glitter Glue
Peel-off
Foam Tape

Thanks so much for stopping by!

Betsy

In my capacity as a design team member for Quietfire Design, I do receive the products I use from them.
 All opinions and creative decisions remain my own, and I only work with companies/use products that I love.


Tuesday, May 5, 2020

A Mother's Greatest Masterpiece

Today I am sharing a card that would be great for a mother-in-law or aunt, best friend's mom... it's just such a great quote.  "A Mother's Greatest Masterpiece is her children."  I knew I wanted the sentiment framed with a small bouquet of flowers to the side:


I sponged a circle frame from Divinity Designs with a combination of Raspberry Pink and Seedless Preserves Distress Ink.  The flowers and wood background are both from Tim Holtz  - extras from previous projects that were sponged and colored with Copics.  


The sentiment was stamped in black pigment ink and then embossed with clear embossing powder.  A gray card base kept the card soft and serene.  


A Mother's Greatest Masterpiece - Set of 4 Stamps


Related Posts Plugin for WordPress, Blogger...