Monday, May 11, 2020

The Smallest Things Tag


Hey Quietfire Fans! For today's project I'm sharing with you my The Smallest Things Tag. By combining a variety of stamps, dies and the Modern Gilding Powders, they were all perfect for creating my tag. You'll want to grab a cup of your favourite beverage and learn how to recreate my The Smallest Things Tag at home.

To start, die cut a 2 1/2" Stitched Oval out of white cardstock. Apply Tumbled Glass Distress Oxide Ink to the Dotted Harlequin Background stamp and stamp onto the oval. Distress the edges of the oval. Ink the edges of the oval using Black Soot Distress Ink and a blending tool with foam.


From the Flourished Frame die, die cut the scroll out of white cardstock.


Die cut the Flourished Oval Frame out of white cardstock. Apply Emboss It Ink to the frame. Sprinkle Copper Scroll Modern Gilding Powder over the entire surface of the frame. Tap off the excess powder and emboss with a heat tool. 


Next, you'll need the small butterfly from the Butterflies/Dragonflies stamp set. Apply Jet Black Archival Ink to the small butterfly and stamp onto a piece of watercolour cardstock. Reapply ink to the stamp two more times and stamp onto the same piece of watercolour cardstock. Using a waterbrush and Seedless Preserves Distress Oxide Ink, colour in one of the butterflies. Using a waterbrush and Squeezed Lemonade Distress Oxide Ink, colour in a second butterfly. Using a waterbrush and Abandoned Coral Distress Oxide Ink, colour in the last butterfly. Fussy cut the butterflies out. Ink the edges of all three butterflies using Black Soot Distress Ink and a blending tool with foam. 


Apply Abandoned Coral Distress Oxide Ink to the Sometimes, Said Pooh stamp set and stamp onto a piece of white cardstock. Cut the quote into strips as desired. Ink the edges of the quote strips using Black Soot Distress Ink and a blending tool with foam.


Next, you'll need a tag that measures 3 1/8" x 6". Using a blending tool with foam, blend Squeezed Lemonade, Abandoned Coral, Seedless Preserves and Tumbled Glass Distress Oxide Ink over the entire surface of the tag. Spritz the tag with water. Dry the tag with a heat tool. 


Apply Abandoned Coral Distress Oxide Ink to the Grid Background stamp and stamp randomly seven times on the tag as desired. Reapply ink to the stamp as needed. Distress the edges of the tag. Ink the edges of the tag using Black Soot Distress Ink and a blending tool with foam.


Apply Seedless Preserves Distress Oxide Ink to the Leafy Acanthus Background stamp and stamp half of it on the right hand side of the tag. Reapply ink to the stamp and stamp randomly on the tag five times. 


Adhere the flourished oval frame to the stitched oval. Adhere the scroll to the middle of the stitched oval. Foam square the stitched oval slightly overtop of the leafy acanthus background. 


Adhere the three butterflies as desired overtop of the scroll.


Using adhesive and 3D foam squares to adhere the quote strips to the left side of oval as desired. To finish the tag, tie a piece of white twine through the top of the tag.
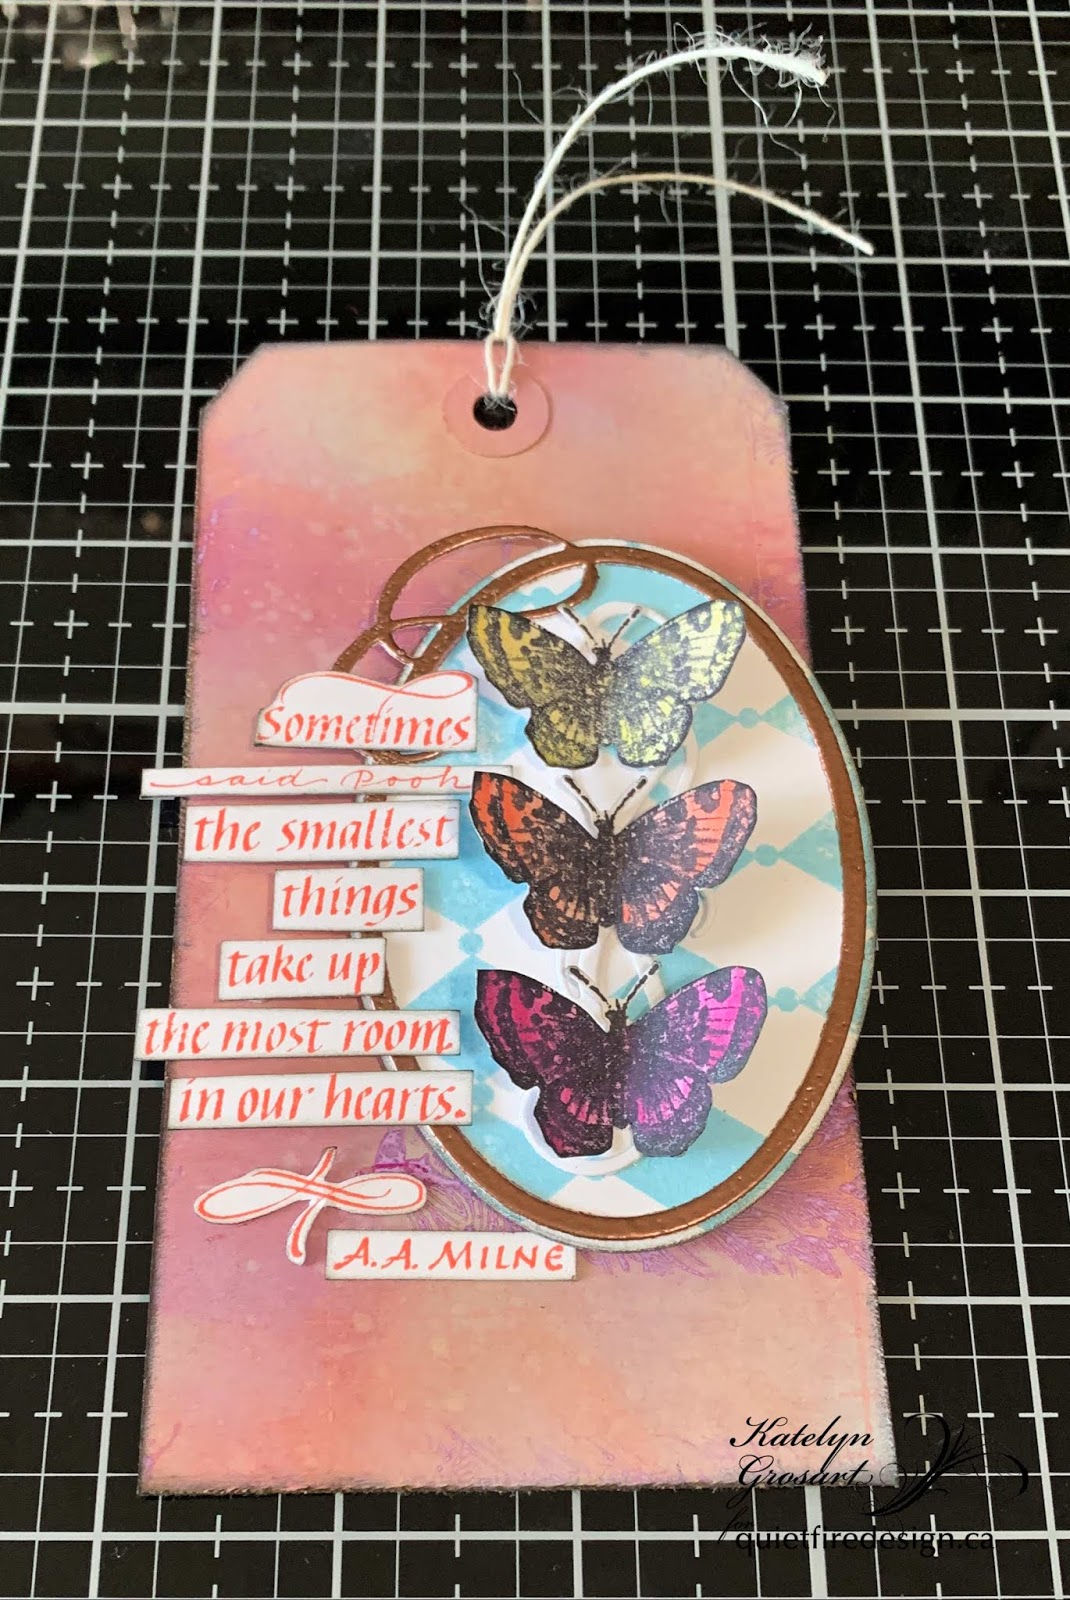

Here are a few closeup photos of the finished tag.


Here is the finished The Smallest Things Tag.


Quietfire Design Supplies Used:


Other Supplies Used:

- Tim Holtz for Ranger Ink: Distress Oxide Ink - Squeezed Lemonade, Seedless Preserves, Tumbled Glass & Abandoned Coral, Distress Ink - Black Soot and Blending Tool with Foam
- Ranger Ink: Emboss It Dabber
- Elizabeth Craft Designs: Stitched Ovals
- Misc: Tag, White Twine, White Cardstock and Watercolour Cardstock

Thanks so much for joining me today and I hope that I have inspired you to recreate my The Smallest Things Tag.

- Katelyn


Sunday, May 10, 2020

Sending Love on Mother's Day


Today is group post day over at Elizabeth Craft Designs, so head on over to their blog to see all the projects for Mother's Day!

Here is the card I made.  It can be for anyone (not just Mom!) in your thoughts.
Here is how you can make it...

Supplies:

A Way With Words Sending Hugs Kisses  QFD | ECD
A Way With Words Baby Love  QFD | ECD
A Way With Words Butterfly Flourish  QFD | ECD
A Way With Words Flourished Night Sky  QFD | ECD
A Way With Words Hearts & Pawprints Spray   | ECD

American Crafts Bazzill Cardstocks in Turquoise Mist (pale), Patina, Navajo and Blue Oasis (dark)
Cardstocks in pale and dark yellow
Pink cardstock
White cardstock
Glue Dots
3D Foam Squares

Instructions:
  1. Form a 6.5 x 6" tent-fold card base from Navajo turquoise.
  2. Die cut flowers from Flourished Night Sky in the three palest colours of turquoise; 10 of Turquoise Mist, 9 of Patina and 10 of Navajo.
  3. Die cut the Flourished Butterfly base from white, Navajo and dark yellow, stack them and adhere together.  Die cut the free butterfly from pale yellow and use a Glue Dot to attach to the base.  Fold up the wings. Die cut a pink heart from the Hearts spray and adhere it to the butterfly as shown in photo.
  4. Diecut "Sending" and "love" from dark turquoise.
  5. Cut a panel 5.5 x 5.75 wide from pale yellow and another, slightly larger to create a mat, from dark yellow. Attach together.
  6. Adhere the butterfly flourish to the panel as shown and surround by the flowers in a pattern as shown.
  7. Adhere "Sending" and "love".
  8. Mount this assemblage onto the card base with 3D Foam Squares.
  9. Send to someone you love!
Thanks for visiting!  Stay safe, stay calm and patient, and stay home. <3
Suzanne


Saturday, May 9, 2020

Thursday, May 7, 2020

If Nothing Ever Changed...


Hello everyone!  Betsy here today showing you how to make this beautiful
butterfly card using:

Gentle Thoughts Rubber Stamps:

To start I chose my papers other supplies for my project:


I then chose another coordinating paper for the stamped quote.  I stamped my
quote onto the pale pink paper with a hybrid black ink.  It gives me
such a clean image.  Then I heat embossed it with


I then die cut this with a 3" circle die.  Next I prepared my base.  I used a white
A2 size top folding card base and first covered it with the green patterned paper.  Next
I cut my butterfly paper 1/2" narrower than the green and adhered it so it was
flush with the right side.  To add a bit of definition I added a narrow peel-off
between the 2 papers.


I took my die cut quote piece and adhered pleated ribbon behind it.  I added
foam tape and adhered it with about 1/4" handing off the right side which I 
trimmed off.  I fussy cut 4 of the butterflies from left over paper, adhered
them down the center only and added glitter glue for a bit of sparkle and shine.
And that completed my project!


I hope you enjoyed today's tutorial!

Quietfire Products used:


Other products used:

Patterned paper
Pleated Ribbon
Glitter Glue
Peel-off
Foam Tape

Thanks so much for stopping by!

Betsy

In my capacity as a design team member for Quietfire Design, I do receive the products I use from them.
 All opinions and creative decisions remain my own, and I only work with companies/use products that I love.


Tuesday, May 5, 2020

A Mother's Greatest Masterpiece

Today I am sharing a card that would be great for a mother-in-law or aunt, best friend's mom... it's just such a great quote.  "A Mother's Greatest Masterpiece is her children."  I knew I wanted the sentiment framed with a small bouquet of flowers to the side:


I sponged a circle frame from Divinity Designs with a combination of Raspberry Pink and Seedless Preserves Distress Ink.  The flowers and wood background are both from Tim Holtz  - extras from previous projects that were sponged and colored with Copics.  


The sentiment was stamped in black pigment ink and then embossed with clear embossing powder.  A gray card base kept the card soft and serene.  


A Mother's Greatest Masterpiece - Set of 4 Stamps


Thursday, April 30, 2020

THANKS For all You Do!


Good Morning! Kim here, on this last day of April 2020! Despite the uncertainty that has been our past month, this I know for sure; it’s tulip season and Mother’s Day is right around the corner. Today’s card share could be used for your Mom or a Thank You in general.

This card uses a simple watercolour technique that should be on everyone’s ‘to try at least once’ list. If you have never tried it, let me show you a quick step by step. I have used the Quietfire Design Tulips stamp for my focus image.


1- Use water based markers like Tombow, Stampin’ Up or Ranger’s Distress markers. I have used two colours of green, a pink and a light purple.

2- Colour your stamp, not worrying too much if your colours overlap a bit, I often add in order of light to dark.

3- Gently mist your coloured stamp with water. This reactivates the ink and will allow for the watercolour effect.

4- Carefully stamp your image onto watercolour paper, using other types of paper will produce slightly different results, not quite as soft as watercolour paper.


When you lift up the stamp, the magic is revealed!


My sentiments both come from the Quietfire Design Thanks Cuddlers set. I used the watercolour technique using just one colour on ‘for all you do’.


For a little extra fun I embossed the word stamp ‘THANKS’ using Armenian Pink Modern Gilding Powder.


Check out that colour and shine! Armenian Pink makes my knees week, it is absolutely GORGEOUS!


Hope this technique finds it’s way to a card near you!

Tuesday, April 28, 2020

Everyday is a Journey Notecard


Hey Quietfire Fans! For today's project I'm sharing with you my Everyday is a Journey Notecard. By combining a variety of stamps, dies and the new Modern Gilding Powders, they were all perfect for creating my notecard. You'll want to grab a cup of your favourite beverage and learn how to recreate my Everyday is a Journey Notecard at home.

To start, die cut a 3 1/2" Stitched Rectangle out of white cardstock. Apply VersaMark Ink to the Leafy Acanthus Background stamp and stamp on the right side of the rectangle. Reapply ink to the stamp and stamp on the left hand side of the rectangle. If the background doesn't match up completely, it's okay as there will be other elements layered up on the card. Ink the edges of the rectangle using Black Soot Distress Ink and a blending tool with foam.


Die cut a 2 1/2" Stitched Rectangle out of a piece of book page. Ink the edges of the rectangle using Black Soot Distress Ink and a blending tool with foam.


Die cut a 2" Stitched Rectangle out of white cardstock. Apply VersaMark Ink to the "Everyday is a journey" quote and stamp in the middle of the rectangle. Sprinkle Armenian Pink Modern Gilding Powder over the stamped image. Tap off the excess powder and emboss with a heat tool. Ink the edges of the rectangle using Black Soot Distress Ink and a blending tool with foam.


Die cut the Flourished Oval Frame out of white cardstock. Apply VersaMark Ink to the frame. Sprinkle Celtic Mint Modern Gilding Powder over the entire surface of the frame. Tap off the excess powder and emboss with a heat tool. 


Apply VersaMark Ink to a piece of white cardstock. Sprinkle Dilly Dilly Lavender Modern Gilding Powder. Tap off the excess powder and emboss with a heat tool. Die cut the butterflies from the Butterflies and Stars Spray out of the embossed paper. Apply VersaMark Ink to another piece of white cardstock. Sprinkle Armenian Pink Modern Gilding Powder. Tap off the excess powder and emboss with a heat tool. Die cut the butterflies from the Butterflies and Stars Spray out of the embossed paper. You'll need a total of three purple butterflies and two pink butterflies.


Adhere the 2" stitched rectangle to the 2 1/2" stitched rectangle. Foam square the 2 1/2" rectangle to the middle of the 3 1/2" stitched rectangle.


Adhere the Flourished Oval Frame to the middle of the 2 1/2" rectangle.


In the top right corner of the frame, adhere two purple butterflies and one pink butterfly. In the bottom left side of the frame, adhere one purple butterfly and one pink butterfly.

To finish the card, cut a cardbase out of white cardstock that measures 3 1/2" x 9 1/2", score at 4 3/4". Adhere the cardfront to the cardbase.


Here are a few closeup photos of the finished notecard.


Here is the finished Everyday is a Journey Notecard.


Quietfire Design Supplies Used:


Other Supplies Used:

- Elizabeth Craft Designs: Stitched Rectangles
- Imagine Crafts: VersaMark Ink
- Tim Holtz for Ranger Ink: Distress Ink - Black Soot and Blending Tool with Foam
- Misc: Book page and White Cardstock

Thanks so much for joining me today and I hope that I have inspired you to recreate your own version of my Everyday is a Journey Notecard.

- Katelyn


Related Posts Plugin for WordPress, Blogger...