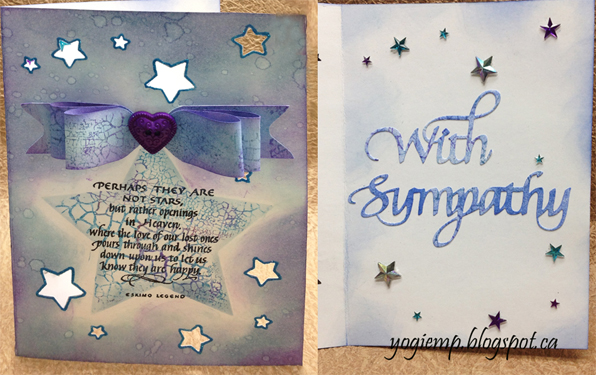
Yogi here today with a sympathy card and a envelope punch board paper bow tutorial.
Scored and folded my white card.
Created a stencil using Spellbinders "Stars Five" set, die cutting with the largest die in the center of a larger piece of scrap cardstock. Placed the stencil where I wanted it on my card front. Inked the crackle stamp using Distress pads ("Broken China" all over, "Faded Jeans" & "Wilted Violet" here and there), misted with water and stamped. Used some of the unused portions of the stamp to stamp the unstamped sections. Sponged some of the faded jeans around the edges of the stencil to define the star shape. Dried thoroughly.
Stamped the quote ("Perhaps They Are Not Stars...") using Versafine Black Onyx and clear embossed.
 Punched and die cut the various stars (McGill star punch for the medium stars and Fiskars star punch for the smallest stars), and the smallest of the Spellbinders stars. Used a Quickie glue pen to outline each of the stars and sprinkled with Ritz micro fine glitter "Royal Blue".
Created a background paper for the bow using the crackle background stamp and the same ink pads as above (see pic below). After cutting the bow pieces, sponged them with the blues and violet to get deeper tonal values. Also sponged the backs of the pieces since they are partially visible. (The larger the bow, the more visible is the underside...)
When the front of the card was completed, kept it closed to adhere various sized rhinestone stars through each opening to the inside of the card using Glossy Accents. (See pic at the top)
 Inside: Sponged some blue around the edges with a dirty sponge.
Die cut the "With Sympathy" (also available on Quietfire Design HERE) from a scrap piece of the background, then sponged more "Faded Jeans" to bring out the color. Adhered to inside.
See instructions for "Paper Bow" below. When completed, adhered to card front adding a purple heart button to the center.
To see the step by step pics, check out the post I did in Feb 2014 (PS I used slightly different sizes for this bow)
http://quietfirecreations.blogspot.ca/2014/02/a-smile-that-you-send-out-paper-bow.html

Step 1: ink stamp with various colors, mist with water and stamp. Repeat as necessary to create a large enough background. I stamped twice to create a piece 8.5"w x 3.5"h

Step 2: Sponge with same colors to create depth.
Step 3: Cut background paper 1"h x the various sizes (1 pce 6.5"w; 1pce 5.5"w & 1 pce 4.5"w)

Use your envelope punch to punch the notch in the middle of each piece. Turn each piece 180º and repeat. On the shortest piece also notch both ends to create the picot.
Use the corner round of the envelope punch to round the edges of the 2 longest strips to create what the image looks like.
PS if you don't have an envelope punch, using a square or rectangle punch to create your notches and a basic corner rounder punch for the ends will work as well, although it probably won't give you the same roundness to those center notches, but that gets hidden anyways with the center embellishment if large enough....
After punching the notches and corners etc, use a pencil or other round shape to massage your paper so it rolls nicely (similar to curling curling ribbon), to both longest pieces. Adhere the ends matching the notch shape of the longest strip, then do the same for the medium sized strip. Adhere both of these together at the center, then adhere these to the smallest strip. Voila, your bow is made. Adhere to your card and add a center embellishment.


No comments:
Post a Comment