

Is it Monday again?! LOL Without Monday we can't have Friday so I guess it's all good. I had fun making this card and even have some step-outs for you.

I began with a Gel Press print I pulled from my stack.

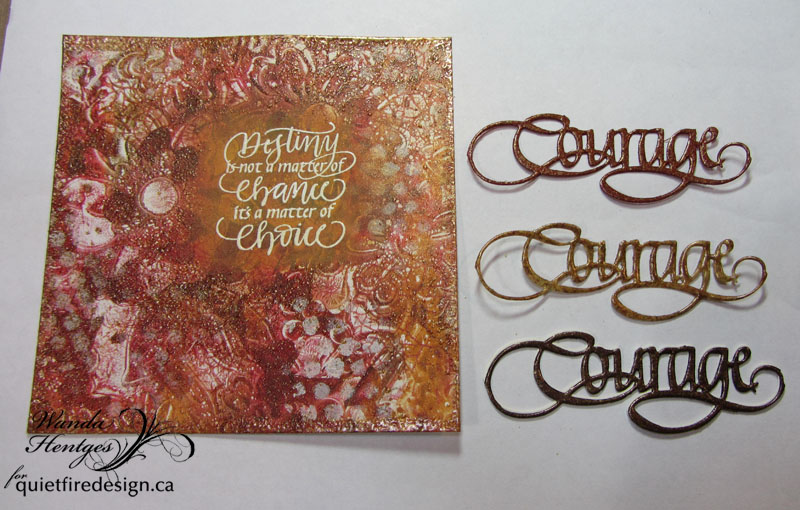
It is cut to 5" square and dots stenciled on (Tim Holtz stencil; PaperArtsy Fresco Finish Paint Chalk Paint in color Chalk).

Crackle Background stamped with Archival Ink Red Geranium (Ranger Ink - Wendy Vecchi).

A close up so you can see the stamped Crackle.

*I hope I can be clear on this next part* I put the print in my Stamp Platform, put the stamp on my print to determine placement, closed the platform so the stamp stuck to the cover, put grid paper in the platform, inked and stamped the quote onto the grid paper to be sure it was straight, tweaked the placement of the stamp on the cover to make it straight, stamped it again on the grid paper to be sure it was straight, removed the grid paper from the Platform, and finally (without inking the stamp again) stamped onto my print. I wanted just a light stamping to know exactly where I would be stamping for the next part.

Because my background was busy I wanted to "calm" the area I would be stamping the quote - Destiny. I sponged on PaperArtsy Fresco Finish Paint - Caramel and Pumpkin Soup and then added a litte Brown Shed around the edges of this area to help blend into my background.

I took the print out of the Platform, dried it, put it back into the platform, stamped with Embossing Ink, removed it from the platform, added white Embossing Powder and heated it. I wasn't sure if it would be better in black or white and went for white. I'm still not sure if it was the best choice?

I tore a post it note paper just big enough to cover the quote to use as a mask. I wanted to use Distress Resist Spray to add Baked Texture Ancient Amber Embossing Powder (Emerald Creek - Seth Apter) to my background. I had my powder ready to go. I put my panel in a box. (A box is best because you want to be sure you are not getting the Resist Spray on anything except your paper). I gave a couple spritzes of the Resist Spray, immediately took my panel from the box, removed the mask, added the Embossing Powder, and heated (baked) the powder. Isn't it cool!!!!

I then added Ancient Amber around the edges using Embossing Ink.

Next I decided I would also use a die cut word and picked Courage. I first cut it from a reddish cardstock and embossed the die cut with Ancient Amber. Decided it matched with the background too much so I also cut one from white cardstock thinking I could stack them off-set and that would work. Still didn't work for me so next tried white cardstock also embossed with Ancient Amber. It still wasn't quite right so then I did black cardstock and embossed with Ancient Amber. I was determined to find something that would work embossed with Ancient Amber. LOL I decided the black cardstock and using the white off-set would work.
The flower is made using the Elizabeth Craft Design's Susan's Garden cutting die set, Anemone. All the pieces were cut from white cardstock and color was added with inks. I wanted to do more with quote. I put the small, square, Tim Holtz acrylic block over the quote, traced around it with a Pitt Pen, removed the block, made a squiggly line over that line with a Sharpie marker and also added dots.

I attached the panel to a dark brown panel and then to a folded white card. My finished card measures 5 1/4" square.
I hope you like today's project!!!!!! Have a great week!!!
Hugs, Wanda


No comments:
Post a Comment