Showing posts with label Card. Show all posts

Monday, June 15, 2020

Wine Is Sunlight Gift Card

Hello and happy Monday! Kim here today with a simple but fun card share. As a wine drinker I love to give and receive wine. I also like to always include a handmade card or tag with the bottle of wine for a personal touch.

Quietfire Design / Wine is Sunlight / card designed by Kim Gowdy


My card was made using the Quietfire Design set, Wine is Sunlight. It is one of my first sets acquired in my Quietfire Design collection and still remains one of my favourites!


For this card I knew I wanted my Southern Ridge chipboard wine bottle a deep warm purple, almost black but not! I grabbed some acrylic paints and custom blended a purple, black and beige to get the look I wanted. I used my trusted colour wheel to guide me through choices that would play well with that purple undertone. When using a colour wheel let it guide you, but remember you do not have to aim for perfection. As you see, my green has a bit more blue than the colour wheel, but I’m OK with that!


I used the green and yellow inks to add colour to the bottom and left side of my card which left a nice spot for my sentiment to sit.

Quietfire Design / Wine is Sunlight / card designed by Kim Gowdy


My sentiment and wine bottle were embossed with Modern Gilding Powder - Copper Scroll! I adore this colour and use it often! I LOVE how it turned out!

Quietfire Design / Wine is Sunlight / card designed by Kim Gowdy


I had some old, dried out metallic gold paint that I brushed on over the grapes to give the look of a label. I was surprised that it just needed to have some water sprayed over it to bring it back to life. I try hard to add old product from my stash to most projects ~ this was a WIN!

Quietfire Design / Wine is Sunlight / card designed by Kim Gowdy


Before I permanently adhered my wine bottle, I felt I needed a bit more on the card, so I pulled out my Colorbox Spritzers [another OLD product in my stash!] and added a splash of colour. I made a quick mask to cover my quote so the splatter would not detract from the sentiment. I edged with some Vintage Walnut Distress Ink and secured my wine bottle!


Now, it’s ready to gift with a yummy bottle of Merlot or Syrah 🥰

Quietfire Design / Wine is Sunlight / card design by Kim Gowdy


Supplies:


Southern Ridge Trading Company chipboard 
Ranger acrylic paints, inks and media paper
Scrapbook Adhesives by 3L
Colorbox Spritzers [ discontinued]

Tuesday, March 10, 2020

Mixed Media Cardmaking ~ Every Day is a Journey


WOW! Kim here, the days go by so quickly between my blog post schedule, and here we are in March already. Despite the fast passing of time, I’m really thrilled to have more winter behind me! I find myself turning to warm colours in my projects, those that represent sunshine and sunsets. It’s not a conscious choice, but a readiness. Not surprising than, is that my project started with an older background in my stash with just these colours!


I added some random placements of the QFD Grid stamp to my background.


Using a mix of gesso & gel medium [~1:3], I brushed it where my focal points would be. This translucent layer visually recedes the background so the focal points can come to the forefront. My image is glued on using a glue stick.


I stamped a quote from the QFD Every Day is a Journey set onto some deli paper with archival ink. This next technique is one of my favourites!


Tear around the quote and adhere to card using matte gel medium. When using tissue or deli paper in this way, the paper becomes almost transparent, especially with the gesso underneath! This allows you to have a perfectly stamped image over a rough surface! No concerns about trying to go back and stamp areas that got missed due to texture!


When my layers were all dry, I lighted brushed my card with Perfect Project powder. This reduces static for easier embossing.


My favourite ink to emboss with when using colour is Distress Oxide. It stays nice and juicy while providing a crisp image. I always try to match my colours, so it’s forgiving if I miss a spot with the embossing powder. Using a cardboard and plastic tube as my ‘stamp’ I added some circles over my project.


The QFD Modern Gilding Powders I used were Gothic Black and Dragon Berry but there are many more gorgeous colours to choose from, you need to check them all out! I love the texture and shine these circles add to my card.


As my final steps, I added a grungy border and did a bit of mark making using Dylusions paint pens. I am happy with how it turned out and I LOVE that quote!


Thanks for checking out my project! I understand it may not be everyone’s style but mixed media is so fun and forgiving! It challenges my brain and really teaches me how my products work. I hope you try one or two of these ideas on a future project...or just for fun!


Supply List:


Emerald Creek Perfect Project
Ranger Industries Distress Oxide inks
Ranger Industries Gesso & Gel Medium
Ranger IndustrieS Dylusions Paint Pens
Scrapbook Adhesives by 3L adhesives


Monday, February 24, 2020

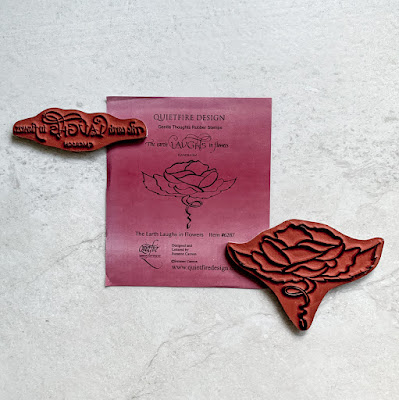
The Earth Laughs in Flowers - Watercoloured Card Technique

Quietfire Design-cardmaking-The EarthLaughs in Flowers-©kdgowdy-Kim Gowdy

Hello and Happy Monday! Kim here on the Quietfire Creations blog again. I am just returning from a week in Las Vegas and must say...I am so ready to be done with winter! Funny how we adapt so quickly and fully to warmer temperatures! With that being said, let’s create with lovely stamp set, The Earth Laughs in Flowers!

Quietfire Design-cardmaking-The EarthLaughs in Flowers-©kdgowdy-Kim Gowdy


This simple technique is one of my favourites and can be quite relaxing to do. Just what I needed after a very ‘people-y’ and busy week away!

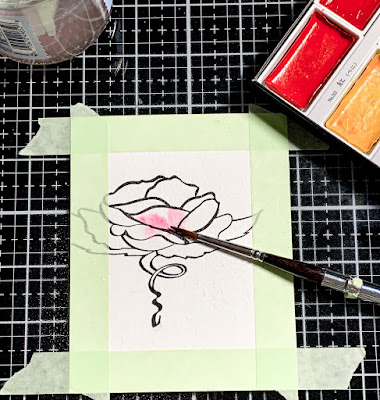
I stamped my flower image onto a piece of water colour paper with Ranger Archival Black Ink. Using a stamp positioner, I layered my ink about 4 times. I find that water colour paper requires multiple impressions to achieve a crisp, inked image. It’s important to use an archival ink so the next steps do not cause the image to bleed.

Quietfire Design-cardmaking-The EarthLaughs in Flowers-©kdgowdy-Kim Gowdy

Once the image was stamped I used a narrow strip of painter’s tape to my edges, creating an even border around my image. Be sure the tape is pressed down on the inside edges.

Quietfire Design-cardmaking-The EarthLaughs in Flowers-©kdgowdy-Kim Gowdy

Spritz the paper with water.

Quietfire Design-cardmaking-The EarthLaughs in Flowers-©kdgowdy-Kim Gowdy

You’ll want a nice amount of water on your working area, but not pooling.

Quietfire Design-cardmaking-The EarthLaughs in Flowers-©kdgowdy-Kim Gowdy


I colour my image with water colours. The spritz of water to the page allows your paint to flow onto the image, add more as required or pick up excess water/colour with a small piece of paper towel and a light touch.  

Quietfire Design-cardmaking-The EarthLaughs in Flowers-©kdgowdy-Kim Gowdy


Once your image is dry, your paper will flatten. Sometimes it needs a bit of help, I use an dry iron with paper towel or parchment paper placed over painted image.

Lastly, I stamped my sentiment, again using multiple layers of ink to get a crisp image. I love the look of the image and sentiment extending past the edges. It creates an interesting contrast to the water coloured focal point.

Quietfire Design-cardmaking-The EarthLaughs in Flowers-©kdgowdy-Kim Gowdy

Thanks for checking into the blog. Hoping this card inspires you to pull out some water colour and play. Don’t overthink the process, water colours are very forgiving and are perfectly imperfect!

Supplies:


Tim Holtz Stamp Platform
Ranger Archival Black Ink
Koi Watercolours
Scrapbook Adhesives by 3L - ultra strong
Bazzil cardstock

Strathmore Watercolour Paper

Thursday, February 6, 2020

I Love You Alphabet

Quietfire Design Gentle Thoughts and Grid Background stamps / Dragon Berry Modern Gilding Powder / Valentine's Card

Good morning from Alberta! Kim here with a quick card share today! I was thinking Valentine's Day when I put this card together but it would be equally useful for an anniversary card!

I don’t know about you, but I can often over complicate a project and get caught up with too much product in front of me! I challenged myself to keep this simple!

The Gentle Thoughts stamp from Quietfire Design has long been a favourite and is the focus of my card!

Quietfire Design Gentle Thoughts and Grid Background stamps / Dragon Berry Modern Gilding Powder / Valentine's Card

Using a light ink colour, I stamped the Grid Background onto some white cardstock. Using Distress Oxide, I stamped my alphabet/quote over the grid and embossed with Dragon Berry Modern Gilding Powder. This fine powder grabs the tiny details of the images and adds beautiful texture!

Quietfire Design Gentle Thoughts and Grid Background stamps / Dragon Berry Modern Gilding Powder / Valentine's Card


I was lucky enough to have some papers from the Prima Darcene Collection. The colours play nicely with the Dragon Berry Gilding Powder. It was an easy decision to use it as a a supporting layer to my card! From the same collection, I used a chipboard heart!

Quietfire Design Gentle Thoughts and Grid Background stamps / Dragon Berry Modern Gilding Powder / Valentine's Card


Quick, simple....DONE! An easy card to give to those you love! I think I’ll be making a few!

Quietfire Design Gentle Thoughts and Grid Background stamps / Dragon Berry Modern Gilding Powder / Valentine's Card


Supply List:


Creative Scrapbooker Superstock
Prima Marketing Darcene Collection
Scrapbook Adhesives by 3L

Monday, January 6, 2020

Stamp focus: "Believe in You" elegant sweetness

Hello Crafty Friends!

Yesterday in the Suzanne Cannon Fan Group, I shared a card using the lovely stamp, The Best Thing- Believe in You stamp:

The Best Thing - Believe in You - Mounted
It is beyond beautiful stamp with the elegant calligraphy and the sweet, heartwarming quote.  The card I created for Show Me Sunday had the stamp heat embossed using the Gothic Black Modern Gilding PowderKells Gold Gilding Powder was applied along die cut edges.
I really adore the stamp and couldn't bear putting it away until I created another project using it.  Lighter colored papers were used on the card and roses were fussy cut around the quote.  Again, the stamp was heat embossed using the Gothic Black Modern Gilding Powder.  The Modern Gilding Powders have a beautiful smooth finish and really add a special touch to a crafting project.
The black "pops" against the light colors- emphasizing the wonderful quote.  Suzanne's gorgeous stamps and dies allow crafters- new and experienced- to create crafty treasures.

Product used:
The Best Thing- Believe in You stamp
Modern Gilding Powders in Kells Gold and Gothic Black

Are you a member of the Suzanne Cannon Fan Group?  Feel free to request joining (two simple questions to answer to make sure you are not a robot!) and you will find more inspiration, lovely crafty friends and a happy, crafty spot!
Thank you for stopping by!
Have a great day!
Hugs,
Kathy Jo

Thursday, January 2, 2020

New Year Cheers Card


Happy New Year! Kim here, hoping everyone had a lovely holiday season, shared with friends and family! I certainly did! The New Year is certainly a time to raise our glasses with lots of good cheer! It’s also a time I love to send cheer to friends I may have missed sending a Christmas card to!

Today’s card share is a simple design that uses Quietfire Design’s Cheers die as the element that packs the most punch on the card!

Cheers Die from Quietfire Design / Burnished Silver Modern Gilding Powder


I layered 4 cuts of card-stock “cheers” and then embossed with Burnished Silver Gilding Powder. It looks amazing in real life, like a heavy, metal embellishment!

Cheers Die from Quietfire Design / Burnished Silver Modern Gilding Powder


Before cutting each layer of the word “cheers” I added a piece of double sided adhesive to my card-stock, making it easy to layer the pieces together.

Once my word embellishment was created, I layered patterned paper, acetate ephemera and  sticker phrase from Pink Fresh’s Just A Little Lovely collection with my DIY Cheers word. I love how it tuned out!

This is a great time of the year to send cheer to friends who live away. I promise it will put a smile in their heart!

Cheers Die from Quietfire Design / Burnished Silver Modern Gilding Powder


SUPPLIES:


Pink Fresh Just A Little Lovely collection
Ranger Glossy Accents
Ranger Distress Oxide
Scrapbook Adhesive by 3L Ultra Permanent EZ Runner Grand
Scrapbook Adhesive by 3L Double Sided Adhesive Sheets


Thursday, November 28, 2019

Dear Santa...Let Your Heart be the Light!

let-your-heart-be-the-light-kells-gold-distress-oxide-kim-gowdy

Hello and Happy Thursday, November 28th! How did we get to the end of the month already? With less than a month before Christmas, there is still lots of card making and gift buying to do (at least for me!). I have been so inspired by all the wonderful cards shared on the Quietfire blogs this past month and thought I’d add one more to the mix.

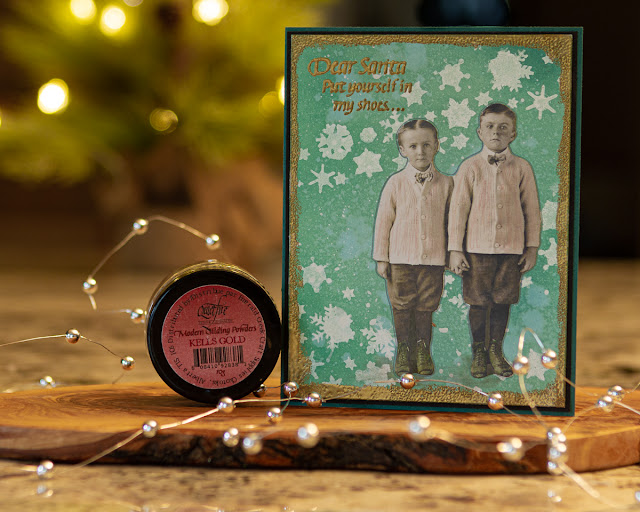
My card quickly came together as soon as I saw this wonderful quote from the ‘Let Your Heart be Light’ collection of stamps! The two little boys from Tim Holtz’s Idea-ology Paper Dolls play so perfectly with the sentiment!

stenicl-snowflakes-leaves-let-your-heart-be-the-light-kells-gold-distress-oxide-kim-gowdy


I used the Leaf and Snowflakes Spray stencil with some white acrylic paint on a piece of Creative Scrapbooker’s Superstock. Using the three colours of green Distress Oxide inks, I blended the colours over top of the snowflakes and spritzed with water for even more texture. I buffed the snowflakes to remove the ink and make them pop.

let-your-heart-be-the-light-kells-gold-distress-oxide-kim-gowdy


My sentiment was stamped and embossed with the Kells Gold Modern Gilding Powder. I love the shine and texture it provides. I also edged my cardstock border very randomly and embossed with the same Kells Gold Modern Gilding Powder, it’s the perfect way to bring your focus into the card!

let-your-heart-be-the-light-kells-gold-distress-oxide-kim-gowdy


Be sure to add this fun stencil and stamp set to your Christmas card making kit. The sentiments are perfect for every card you send! Of course no craft room would be complete without a few (or ALL!) jars of Modern Gilding Powders! Happy Card making! 

~kim

let-your-heart-be-the-light-kells-gold-distress-oxide-kim-gowdy

Supply List:

Let Your Heart be Light Collection - Clear Stamps

Creative Scrapbooker Superstock
Ranger Distress Oxide Inks
Scrapbook Adhesives by 3L

Thursday, September 26, 2019

Something Wicked Halloween Card

Halloween Card / Quietfire Design Grid background / Quietfire Design Something Wicked stamp set/ card design by Kim Gowdy

Good Morning! Kim here with my first Halloween card on the Quietfire Creations blog! Now that autumn is officially here, it is NOT too early to share. Being an October ‘baby’, I have a special love of the season and am always drawn into autumn and Halloween stamps, papers & colours...they call my name while I sleep!

I started my card by stamping the Grid stamp to the lower 2/3 of my cardstock. It has a somewhat distressed look to it as I blotted off some ink with a baby wipe before placing on my paper. I punched out a circle from a Post-it note, and placed it where I wanted my moon to be. (if you leave the sticky part of Post-it note as part of your punched circle you do not required temporary adhesive)

Halloween Card / Quietfire Design Grid background / Quietfire Design Something Wicked stamp set/ card design by Kim Gowdy


Using multiple colours of Distress Oxide inks I layered up my inks to create the evening sky. Once I was happy with the sky, I removed the Post-it note mask and inked up my moon with the yellow. At this point I am not concerned with my yellow ink extending into the sky.


Halloween Card / Quietfire Design Grid background / Quietfire Design Something Wicked stamp set/ card design by Kim Gowdy


I inked up my stamps using Clearsnap Top Boss; any clear embossing ink will work, and sprinkled some Modern Gilding Powder in Gothic Black over top and heat set. It’s always a good idea to remove static from your card before embossing so the powder sticks only to the stamped image. I use an Embossing Buddy that I have had for years, but there are other options such as a Swiffer pad or Fleecy sheet that are supposed to work as well!

Halloween Card / Modern Gilding Powder - Gothic Black / Quietfire Design Grid background / Quietfire Design Something Wicked stamp set/ card design by Kim Gowdy


If you have not heard about Quietfire design’s Modern Gilding Powders...check them out! They are amazing, fine powders ready to add shine, dimension and interest to your die cuts and stamped images. There are six amazing colours and they are wonderful!

Halloween Card / Modern Gilding Powders / Quietfire Design Grid background / Quietfire Design Something Wicked stamp set/ card design by Kim Gowdy


I finished up my card by adding some ribbon, sequin stars and of course a card base. I also added a quick dot of yellow to the eyes using my Dylusions paint pen. Now to decide which ghoul to send it to!

Halloween Card / Quietfire Design Grid background / Quietfire Design Something Wicked stamp set/ Modern Gilding Powders / card design by Kim Gowdy


Supply List:

Quietfire Design: Grid Background stamp
Quietfire Design: Something Wicked stamp set
Quietfire Design: Gothic Black - Modern Gilding Powder


Ranger Industry: Distress Inks + Dylusions Paint Pen [to pop the cat eyes] Clearsnap: Top Boss
Scrapbook Adhesives by 3L
SpiegleMom sequins


Thanks for checking out my card! Looking forward to seeing how you use these fun products! Share them on the Suzanne Cannon Fan Group on Facebook!
Related Posts Plugin for WordPress, Blogger...