

Hey Quietfire Fans! For today's project I'm sharing with you my Season's Greetings. I combined a variety of Quietfire Design Stamps, A Way With Words Dies and Modern Gilding Powders which were all perfect for creating this card. You'll want to grab a cup of your favourite beverage and learn how to recreate my Season's Greetings Card at home.
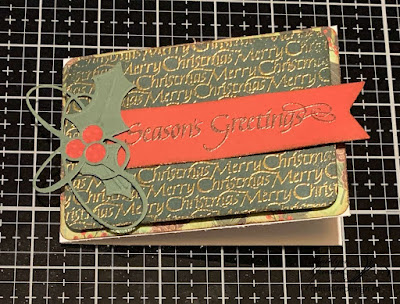
To start, you'll need a dark green piece of cardstock. Die cut a 3 1/4" Fitted Rounded Rectangle out of the cardstock. Apply Emboss It Ink to the Merry Christmas Background and stamp onto the rectangle. Sprinkle Kells Gold Modern Gilding Powders over the stamped background. Tap off the excess powder and emboss with a heat tool. Distress the edges of the rectangle. Ink the edges of the rectangle using Walnut Stain Distress Ink and a blending tool with foam.

Next, you'll need a red piece of cardstock. Die cut a 1" Fitted Fishtail out of the cardstock. Apply Emboss It Ink to the Season's Greetings Sentiment from the Poinsettia Banner & Sentiments Stamp Set and stamp onto the fishtail. Sprinkle Copper Scroll Modern Gilding Powders over the stamped sentiment. Tap off the excess powder and emboss with a heat tool. Trim the fishtail down to 4". Distress the edges of the fishtail. Ink the edges of the fishtail using Walnut Stain Distress Ink and a blending tool with foam.

From the Flourished Holly die, die cut the flourish and holly pieces out of a light green cardstock piece. Die cut the holly berries out of a piece of red cardstock.

From a piece of Christmas patterned paper, die cut a 3" Stitched Rounded Rectangle. Distress the edges of the rectangle. Ink the edges of the rectangle using Walnut Stain Distress Ink and a blending tool with foam.

Foam square the 3" rectangle to the 3 1/4" rectangle.

Adhere the 1" fishtail to the middle of the 3" rectangle as desired.

Adhere the flourished holly image together. Foam square the flourished holly to the left hand side of the fishtail as desired.

To finish the card, cut a cardbase out of white cardstock that measures 3 1/4" x 9", score at 4 1/2". Adhere the cardfront to the cardbase.
Here are a few closeups of the finish card.


Here is the finished Season's Greetings Card.


Quietfire Design Supplies Used:
Other Supplies Used:
- Elizabeth Craft Designs: Stitched Rounded Rectangle, Fitted Rounded Rectangle and Fitted Fishtail
- Ranger Ink: Emboss It Dabber
- Tim Holtz for Ranger Ink: Distress Ink - Walnut Stain and Blending Tool with Foam
- Vicki Boutin: 6x8 Warmest Wishes Paper Pad
- Simple Stories: Color Vibe Textured Cardstock - Winter Pack (Green Cardstock) & Bolds (Red Cardstock)
- Misc: White Cardstock
Thanks so much for joining me today and I hope that I have inspired you to recreate your own version of my Season's Greetings Card at home.
- Katelyn
No comments:
Post a Comment