Showing posts with label Poinsettia Banner & Sentiments. Show all posts

Tuesday, December 7, 2021

Season's Greetings Christmas Card


Hey Quietfire Fans! For today's project I'm sharing with how to create this vintage Season's Greetings Christmas Card. I combined a variety of Quietfire Design Stamps, A Way With Words Dies and Modern Gilding Powders which were all perfect for creating this Christmas Card. You'll want to grab a cup of your favourite beverage and learn how to recreate my Season's Greetings Christmas Card at home.

To start, you'll need a piece of red patterned cardstock. Die cut a 4" Stitched Indented Rectangle out of the cardstock piece. Distress the edges of the rectangle. Ink the edges of the rectangle using Walnut Stain Distress Ink and a blending tool with foam.


Next, you'll need a piece of dark green patterned cardstock. Die cut a 3 3/4" Fitted Indented Rectangle out of the cardstock piece. Apply Emboss It Ink to the Merry Christmas Background stamp and stamp onto the rectangle. Reapply ink to the stamp and continue stamping on the rectangle as desired. Sprinkle Kells Gold Modern Gilding Powders over the stamped background. Tap off the excess powder and emboss with a heat tool. Distress the edges of the rectangle. Ink the edges of the rectangle using Walnut Stain Distress Ink and a blending tool with foam.


Die cut a 3/4" Diagonal Stitched Fishtail out of a plain piece of red cardstock. Apply Emboss It Ink to the Season's Greetings sentiment from the Poinsettia Banner & Sentiments stamp set and stamp onto the fishtail. Sprinkle Kells Gold Modern Gilding Powders over the stamped sentiment. Tap off the excess powder and emboss with a heat tool. Distress the edges of the banner. Ink the edges of the banner using Walnut Stain Distress Ink and a blending tool with foam.


From the Flourished Candle, die cut the whole candle image out of a piece of copper foil paper. Die cut the candle edge and flame out of a piece of White Cardstock. Using a blending tool with foam, blend Squeezed Lemonade Distress Ink over the entire surface of the flame.


Adhere the 3 3/4" rectangle to the 4" rectangle. Adhere the 3/4" fishtail 1/4" from the bottom and all the way to the left hand side of the 3 3/4" rectangle.


Adhere the flame to the flame on the copper piece. Adhere the candle edge to the candle edge on the copper piece. 


Use foam squares to adhere the flourished candle 1" from the bottom and 1/2" from the left of the 3 3/4" rectangle.


To finish the card, cut a cardbase out of white cardstock that measures 4" x 10 1/2", score at 5 1/4". Adhere the cardfront to the cardbase.


Here are a few closeups of the finished Christmas Card.


Here is the finished Season's Greeting's Christmas Card.


Quietfire Design Supplies Used:


Other Supplies Used:

- Elizabeth Craft Designs: Stitched Indented Rectangle, Fitted Indented Rectangle and Diagonal Stitched Fishtails
- Ranger Ink: Emboss It Ink
- Tim Holtz for Ranger Ink: Distress Ink - Walnut Stain and Blending Tool with Foam
- Simple Stories: Color Vibes Textured Cardstock - Winter Pack
- Misc: Copper Foil Paper and White Cardstock

Thanks so much for joining me today and I hope that I have inspired you to recreate your own version of my Season's Greetings Christmas Card at home.

- Katelyn


Tuesday, November 9, 2021

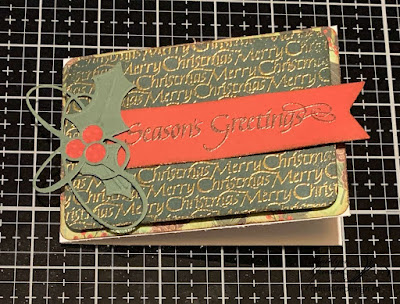
Season's Greetings Card


Hey Quietfire Fans! For today's project I'm sharing with you my Season's Greetings. I combined a variety of Quietfire Design Stamps, A Way With Words Dies and Modern Gilding Powders which were all perfect for creating this card. You'll want to grab a cup of your favourite beverage and learn how to recreate my Season's Greetings Card at home.

To start, you'll need a dark green piece of cardstock. Die cut a 3 1/4" Fitted Rounded Rectangle out of the cardstock. Apply Emboss It Ink to the Merry Christmas Background and stamp onto the rectangle. Sprinkle Kells Gold Modern Gilding Powders over the stamped background. Tap off the excess powder and emboss with a heat tool. Distress the edges of the rectangle. Ink the edges of the rectangle using Walnut Stain Distress Ink and a blending tool with foam.


Next, you'll need a red piece of cardstock. Die cut a 1" Fitted Fishtail out of the cardstock. Apply Emboss It Ink to the Season's Greetings Sentiment from the Poinsettia Banner & Sentiments Stamp Set and stamp onto the fishtail. Sprinkle Copper Scroll Modern Gilding Powders over the stamped sentiment. Tap off the excess powder and emboss with a heat tool. Trim the fishtail down to 4". Distress the edges of the fishtail. Ink the edges of the fishtail using Walnut Stain Distress Ink and a blending tool with foam.


From the Flourished Holly die, die cut the flourish and holly pieces out of a light green cardstock piece. Die cut the holly berries out of a piece of red cardstock.


From a piece of Christmas patterned paper, die cut a 3" Stitched Rounded Rectangle. Distress the edges of the rectangle. Ink the edges of the rectangle using Walnut Stain Distress Ink and a blending tool with foam.


Foam square the 3" rectangle to the 3 1/4" rectangle.


Adhere the 1" fishtail to the middle of the 3" rectangle as desired.


Adhere the flourished holly image together. Foam square the flourished holly to the left hand side of the fishtail as desired.


To finish the card, cut a cardbase out of white cardstock that measures 3 1/4" x 9", score at 4 1/2". Adhere the cardfront to the cardbase.


Here are a few closeups of the finish card.


Here is the finished Season's Greetings Card.


Quietfire Design Supplies Used:


Other Supplies Used:

- Elizabeth Craft Designs: Stitched Rounded Rectangle, Fitted Rounded Rectangle and Fitted Fishtail
- Ranger Ink: Emboss It Dabber
- Tim Holtz for Ranger Ink: Distress Ink - Walnut Stain and Blending Tool with Foam
- Vicki Boutin: 6x8 Warmest Wishes Paper Pad
- Simple Stories: Color Vibe Textured Cardstock - Winter Pack (Green Cardstock) & Bolds (Red Cardstock)
- Misc: White Cardstock

Thanks so much for joining me today and I hope that I have inspired you to recreate your own version of my Season's Greetings Card at home.

- Katelyn


Wednesday, December 2, 2020

Vintage "Tidings of Comfort and Joy" card

Hello Crafty Friends!

One of my favorite holiday stamps from Suzanne Cannon is the Tidings of Comfort and Joy.  It is a timeless beauty and I love finding new ways to use it every Christmas.  This year I combined it with the lovely poinsettia banner from the Poinsettia Banner Sentiments stamp set:

The Poinsettia Banner stamp was stamped in black alcohol proof ink onto 4" x 5.25" Kraft card stock.  After drying I used alcohol ink to color the banners.  Next, I stamped the poinsettia twice onto Kraft card stock, colored the flowers and then fussy cut.  

The Tidings stamp was applied onto Kraft card stock and die cut using an oval die.  Brown ink was applied along the edges of the oval die cut and the Kraft banner background.  Gold marker was applied along the edges.
A piece of 1/2" green ribbon was adhered to the background.  The background was mounted onto a 4.25 x 5.5 red tent fold card.  The oval die cut was assembled to the card using foam tape.  The fussy cut poinsettias were adhered as shown.  

The final touches were glitter in each corner and the poinsettia centers.  Nuvo Glitter Drops in red were applied to the holly berries. 

The vintage style and holiday colors coordinate so well with Suzanne's gorgeous stamps!

You can find all of Suzanne's beautiful red rubber stamps, dies, and stencils at Emerald Creek.

Thank you for stopping by!  Have a happy, crafty day.
Kathy Jo


Tuesday, November 17, 2020

Merry Christmas Card


Hey Quietfire Fans! For today's project I'm sharing with you my Merry Christmas Card. I combined a variety of dies, stamps and Modern Gilding Powder, which were all perfect for creating this Christmas Card. You'll want to grab a cup of your favourite beverage and learn how to recreate my Merry Christmas Card at home.

Start by choosing two pieces of Christmas patterned paper. Die cut a 4" Stitched Indented Rectangle out of the first patterned paper. Die cut a 3 1/2" Stitched Indented Rectangle out of the second piece of patterned paper. Ink the edges of both rectangles using Black Soot Distress Ink and a blending tool with foam.


Die cut a 3 3/4" Fitted Indented Rectangle out of a piece of book page. Ink the edges of the rectangle using Black Soot Distress Ink and a blending tool with foam.


Die cut a 2 1/2" Stitched Oval out of cream cardstock. Apply Emboss It Ink to the Merry Christmas stamp from the Poinsettia Banner & Sentiments stamp and stamp in the middle of the oval. Sprinkle Forever Platinum over the stamped sentiment. Tap off the excess powder and emboss with a heat tool. Ink the edges of the oval using Black Soot Distress Ink and a blending tool with foam.


Die cut the Flourished Oval Frame out of a piece of white cardstock. Apply Emboss It ink to the entire surface of the frame. Sprinkle Copper Scroll Modern Gilding Powder over the entire surface of the frame. Tap off the excess powder and emboss with a heat tool.


The next three steps use the new Christmas Accents Die.

Die cut the small leaves twice out of a piece of dark green cardstock. Ink the edges of the leaves using Black Soot Distress Ink and a blending tool with foam.


Die cut the medium flowers twice out of a piece of red cardstock. Die cut the small flowers five times out of a piece of red cardstock. Die cut the extra small flowers five times out of a piece of red cardstock.  Ink the edges of all the flowers using Black Soot Distress Ink and a blending tool with foam.


Die cut the centre of the flowers five times out of a piece of dark yellow cardstock.


Adhere the 3 1/2" rectangle to the 3 3/4" rectangle. Adhere the 3 3/4" rectangle to the 4" rectangle.


Foam square the stitched oval to the middle of the 3 1/2" rectangle. Adhere the flourished frame overtop of the stitched oval.


Shape and adhere the flowers.


Adhere the two flowers with leaves to the bottom left side of the frame. Adhere the three flowers to the top right side of the frame.


To finish the card, cut a cardbase out of white cardstock that measures 4" x 10 1/2", score at 5 1/4". Adhere the cardfront to the cardbase.


Here are a few closeup photos of the finished card.


Here is the finished Merry Christmas Card.


Quietfire Design Supplies Used:

- Christmas Accents

Other Supplies Used:

- Elizabeth Craft Designs: Stitched Ovals, Stitched Indented Rectangle and Fitted Indented Rectangle
- Tim Holtz for Ranger Ink: Distress Ink - Black Soot and Blending Tool with Foam
- Ranger Ink: Emboss It Dabber
- Misc: Book page, Red Cardstock, Dark Green Cardstock, White Cardstock, Cream Cardstock and Christmas Patterned Paper

Thanks so much for joining me today and I hope that I have inspired you to recreate your own version of my Merry Christmas Card at home.

- Katelyn


Friday, November 30, 2018

Mix and Match your stamps! Merry Christmas and Poinsettia Banner


Hello Crafty Friends!

This is called the most wonderful time of the year for many reasons.  We are able to see family and friends we may only see once a year.  We celebrate family and friendships at social gatherings.  Phone calls are shared with loved ones that we cannot visit.  And, as crafters, we make holiday projects to give to those dear to our hearts.  Today I am sharing a card that you can CASE and give to your family and friends.

The card focal point was created using stamps from two different sets:

Home for the Holidays Sentiments...
Home for the Holidays Sentiments, Set of 5 - Mounted
...and Poinsettia Banner and Sentiment.
Poinsettia Banner & Sentiment, Set of 4 Stamps - Mounted
Card Instructions:
  1. Create a 5.5 x 4.25 top fold card using red card stock.  Mat white card stock onto base.
  2. Cut Kraft card stock (or die cut) smaller than white mat.  (Mine was 5.25 x 4)
  3. Use Versamark to stamp Poinsettia Banner to Kraft from Step 2.  Heat emboss using white embossing powder.  Color using Spectrum Noir Glitter Markers.  (Or try colored pencils or chalk.)  Mount onto card base.
  4. Use Versamark to stamp Merry Christmas onto Kraft.  Heat emboss using white embossing powder.  Cut to size or die cut. Mat onto white card stock.  Mount onto card front using double sided foam tape.
  5. Create double bow and mount.
  6. Add gems as desired.


Thank you so much for stopping by!
Have a happy, crafty weekend.
Big Hugs,
Kathy Jo


Related Posts Plugin for WordPress, Blogger...