Showing posts with label Flourished Night Sky. Show all posts

Monday, July 20, 2020

Quietfire Summer Blog Hop - Day 1


Welcome to Day 1 of the Quietfire Summer Blog Hop! It’s Suzanne here today.  I was thinking it was way past time to pull out my newborn/baby designs, so that's the focus of today's project from me!  Even if you're not making a baby card, I hope some of the techniques in this project make their way into your other cards.

But first, here are the blog hop details.....

Each day we will be sharing a project or two to inspire your summer creativity.  We also have prizes!  There will be 2 prizes awarded, valued at $50 each and are a combination of Dies, Stamps and Digital files.  (Suzanne will have a look at the interests of the winners to decide what to give away! If you’re not a digital person, you won’t want those files!) To be eligible to win, you must leave a sweet comment on each Blog Hop blog post!  Visit Quietfire Creations and Quietfire Digital blogs to enter.

Here is the list of posts that you will need to comment on:
Monday: Suzanne on Quietfire Creations (You are here!)
Deadline for commenting is midnight Saturday, July 25, 2020
Winners will be announced on Sunday, July 26th.

Good luck!


Now back to the project! Here is how you can make it:

Supplies for this project:

Welcome
Little Ones
Flourished Night Sky
Flourished Frame
Welcome Little One Stamps
My Little Girl Paper
white cardstock
dark and pale pink cardstock
green cardstock
VersaMagic Malted Mauve stamp ink
Glue Dots
3D Foam Squares

Instructions:

  1. Stamp the oval sentiment on a panel of light pink paper measuring 4.25 x 6.25" closer to the top of the panel, as shown.  (You will need to leave room for the Welcome die below.)
  2. Die cut Welcome and the solid backing of the onesie from dark pink paper.  Die cut the Flourished Moon and the little flower (both from the Flourished Night Sky) and the Flourished Frame from white cardstock.  Also cut a panel slightly larger than the pale pink panel from white cardstock as well.
  3. Die cut the onesie from patterned paper.  Form a 6" x 7" high side-fold card base from coordinating patterned paper.
  4. Die cut the flower leaves from green cardstock.
  5. Assemble the onesie and adhere to the center of the stamped oval. 
  6. Mount the stamped oval panel to the white panel.  Cut the Flourished Frame in half lengthwise.  Adhere the halves of the frame so they peak outside the white panel as shown. I used Glue Dots to do this.
  7. Adhere Welcome below the stamped oval sentiment. Add the leaves behind the flower with Glue Dots and adhere it to the flourish on Welcome with Foam Squares to give some dimension.  Adhere the Flourished Moon as shown with Foam Squares.
  8. Adhere this to the cardbase with Foam Squares.

All done!  I hope this gives you some ideas for creating your own card. Congrats to the new parents and happy creating to you!

Don't forget to leave a comment on the blog to be eligible to win a prize!  Good luck.
Suzanne


Sunday, May 10, 2020

Sending Love on Mother's Day


Today is group post day over at Elizabeth Craft Designs, so head on over to their blog to see all the projects for Mother's Day!

Here is the card I made.  It can be for anyone (not just Mom!) in your thoughts.
Here is how you can make it...

Supplies:

A Way With Words Sending Hugs Kisses  QFD | ECD
A Way With Words Baby Love  QFD | ECD
A Way With Words Butterfly Flourish  QFD | ECD
A Way With Words Flourished Night Sky  QFD | ECD
A Way With Words Hearts & Pawprints Spray   | ECD

American Crafts Bazzill Cardstocks in Turquoise Mist (pale), Patina, Navajo and Blue Oasis (dark)
Cardstocks in pale and dark yellow
Pink cardstock
White cardstock
Glue Dots
3D Foam Squares

Instructions:
  1. Form a 6.5 x 6" tent-fold card base from Navajo turquoise.
  2. Die cut flowers from Flourished Night Sky in the three palest colours of turquoise; 10 of Turquoise Mist, 9 of Patina and 10 of Navajo.
  3. Die cut the Flourished Butterfly base from white, Navajo and dark yellow, stack them and adhere together.  Die cut the free butterfly from pale yellow and use a Glue Dot to attach to the base.  Fold up the wings. Die cut a pink heart from the Hearts spray and adhere it to the butterfly as shown in photo.
  4. Diecut "Sending" and "love" from dark turquoise.
  5. Cut a panel 5.5 x 5.75 wide from pale yellow and another, slightly larger to create a mat, from dark yellow. Attach together.
  6. Adhere the butterfly flourish to the panel as shown and surround by the flowers in a pattern as shown.
  7. Adhere "Sending" and "love".
  8. Mount this assemblage onto the card base with 3D Foam Squares.
  9. Send to someone you love!
Thanks for visiting!  Stay safe, stay calm and patient, and stay home. <3
Suzanne


Wednesday, March 18, 2020

Spring Love


It's time to welcome spring!
Today is group post day over on the Elizabeth Craft Designs blog and the theme is Spring!  I thought this was a fun opportunity to use the new spring colours of Modern Gilding Powders and combine some dies!

Here are the supplies:
4 Seasons   ECD
Baby Love QFD | ECD
Flourished Frame  QFD | ECD
Flourished Night Sky QFD | ECD
Stitched Rectangles  ECD
Modern Gilding Powders: Celtic Mint, Armenian Pink, Dilly Dilly Lavender, Dragon Berry, Acanthus Teal
white cardstock
pale pink cardstock (I used Bazzill Tutu Pink)
Wordwin Petallic Spring Larch coverstock
Glue Dots - Micro
Scrapbook Adhesives 3D Foam Squares

Instructions:

  1. Form a 5x7" tent fold card base from Petallic cardstock.
  2. Die cut the Flourished Frame and larger Stitched Rectangle from Petallic cardstock.
  3. Die cut the smaller rectangle from pink cardstock.
  4. Die cut 3 flowers and their leaves from white cardstock as well as Spring and Love.
  5. Use the Modern Gilding Powders to gild the flowers.  I used Dragon berry and Dilly Dilly Lavender for two and then a combination of Armenian Pink and Dragon Berry on another. These are absolutely gorgeous colours!!
  6. Gild the leaves with the brand new Celtic Mint and Acanthus Teal.  Assemble the flowers with Glue Dots by tucking the leaves behind.
  7. Gild Spring with Armenian Pink and love with Celtic Mint.
  8. Assemble as shown.  Use foam squares between the rectangle layers and card base and to attach the assembled flowers.  Use Glue Dots for all the other elements.
  9. Now you have a sweet and cheery card!  Welcome Spring!
Thanks for visiting.  Just ask if you have any questions!
Suzanne


Thursday, August 8, 2019

Butterfly Flourish - Flourished Night Sky (Flowers) - The Earth Laughs - Just For You


Yogi here today and I've been meaning to do something with this little flower from Suzanne and finally got around to it... BIG GRIN

I'm using a couple dies "Flowers" 3pce set, "Butterfly Flourish" 3pce set and "Flourished Night Sky (Flower)" 4pce set from Elizabeth Craft Designs, also available on Quietfire Design HERE, HERE and HERE   

And I'm using a rubber stamp sentiment, quote and design element stamps from Quietfire Design ("Just For You"  4pce set); ("The Earth Laughs..." 2pce set); ("Crackle Background")

I'm using a clear stamp sentiment from Quietfire Design ("Love & Hearts Collection") also available on Elizabeth Craft Designs HERE

Cut, scored and folded my white cardstock to create the side fold structure. Adhered a piece of Olive toned paper edge to edge.

Dry embossed the ivy frame (Gemini "Ivy Frame") on white cardstock and hit direct to paper with Distress "Antique Linen" and then with "Bundled Sage", Trimmed down and adhered to front.
Created the vase from a basic oval die cut cutting away about a 1/4" from the bottom and an 1" from the top. Stamped with the crackle stamp inking with Versafine and clear embossing then sponging with Distress "Tumbled Glass" and a touch of "Faded Jeans" for shading. Adhered to card front.

Die cut  a whole pile of the little flowers and leaves from a bunch of scraps laying around including some alcohol backgrounds. Adhered them to front and then added a mini nail art rhinestone to each center with Gem-Tac adhesive.

Stamped the sentiments with Versafine Clair "Rain Forest".

Die cut the "Flowers" word from white cardstock, inked with the green and clear embossed. Adhered to card front.

Die cut the small butterfly from a scrap piece of alcohol background and adhered to card.

On the inside: Die cut the flourish butterfly and colored with Tombow markers. Adhered to inside. Adhered mini rhinestones to the body.

Adhered a bunch of leftover flowers from the front adding the mini rhinestone centers.

Stamped the quote using Versafine Clair "Verdant" and here and there with "Rain Forest" and clear embossed.


Tuesday, March 12, 2019

Flourished Night Sky - You Are Amazing - Where Flowers Bloom - Easel Flower Branch


Yogi here today with a bit of a surprise... This is the 1st time I've used Suzanne's basic flower from Flourished Night Sky die set. It was a little too plain for my style of card making, but then I looked at it... and decided to put slits in it and voila I love this die. BIG GRIN My whole perspective changed, Love when that happens.

I'm using a die "You Are" 2pce set, "Amazing" 2pce set  and "Flourished Night Sky" 4pce set from Elizabeth Craft Designs, also available on Quietfire Design HERE, HERE and HERE  

I'm also using a clear quote stamp ("Where Flowers Bloom Collection" 8pce set) from Quietfire Design also available from Elizabeth Craft Designs HERE


Scored and folded my white cardstock to create the easel structure. Cut a piece same size as card and adhered to card front then cut a piece of Mid toned blue paper and adhered to card front. Cut a smaller rectangle from cream toned textured cardstock and adhered to card front.
Die cut the "flower" shape from a light blue cardstock that I had sponged and hit direct to paper with various Distress blue pads. Cut slits between the scallops to create a 4 petal flower. Tooled with a split oval shape tool on the backside. Turned flower right side up and pressed down with a small balled stylus.
 
Die cut the "Berry Spray" (Elizabeth Craft Designs) from a white cardstock and colored with Distress brown pads. Adhered to card front. Adhered a bunch of the tooled flowers. Added a dot of Liquid Pearls "Petal Pink" to each flower center.

Die cut some "Curvy Leaves" (Elizabeth Craft Designs) from alcohol decorated paper. Adhered to card.

Stamped the butterflies on another alcohol background piece of paper using Versafine Black Onyx and clear embossed, then fussy cut them out. Adhered to card front adding mini amber rhinestones to the bodies.

Die cut the words from an aqua blue glitter adhesive backed cardstock and adhered to card front.


On the floor:
Stamped the quote onto white cardstock using the black and clear embossed. Die cut with Elizabeth Craft Designs "Stitched circles" die set. Adhered to card floor.

Adhered some branches, a few flowers and some leaves and another butterfly - this one just colored with Distress blue.


Thursday, August 23, 2018

A baby is a little bit of heaven

School starts today - it's one of those days when it hits you your baby is growing.  I haven't made baby cards in a while but I had to with this beautiful Welcome Little One Collection.  I masked off the heart and the flourish from the top and bottom so that it would fit in the Flourished Oval Frame better.


I also trimmed the flourish off the star to keep it not so busy.  (I realize now that my Flourished Frame is backwards but this design is simple enough it works either way in case you're wondering!)  The paper is from some scrap paper WAY BACK when I was scrapbooking pages for my kids' baby books.  Lol!  I believe it was DCWV though.


Thanks for looking and if you're in the United States, I hope your kids are off to a great start at school!

Flourished Night Sky - Metal Cutting Dies
Flourished Night Sky Metal dies

Welcome Little One Collection - Clear Stamps

Flourished Oval Frame - Metal Cutting Die


Thursday, June 21, 2018

Flourished Night Sky - Moon and Stars Earrings

Yogi here today with some earrings... I love the new dies Suzanne just came out and the clear stamps under the Elizabeth Craft Designs label. I've made some samples for Els to take to her shows including these earrings.

I'm using an A Way With Words dies  "Flourished Night Sky - Moon & Stars" 4pce set from Elizabeth Craft Designs, also available on Quietfire Design HERE

And I'm using a clear quote stamp set from Quietfire Design ("Soar Collection") also available on Elizabeth Craft Designs HERE 


I colored a piece of clear Shrink Plastic with alcohol inks in a raspberry and a blue. Die cut and then shrunk using my heat gun. I was worried about the skinny tail on the flourish, but it just wrapped itself around making a natural loop for my earring findings. The earring shrunk to about 3/4" square.

NOTE: I find Shrink Plastic has a grain and depending in which direction you cut, it reacts differently when heated. I cut mine parallel to the long side.

For the tag: I dry embossed the bottom half of the tag using Elizabeth Craft Designs "Clouds" embossing folder from a pearlized white/gold cardstock. Hit the high points with Distress "Stormy Sky".

Stamped the quote using Versafine "Majestic Blue" and clear embossed.

Die cut the star at top to hang the tag. Punched a couple holes to loop the earrings to the tag.


It was fun making these earrings. Hope you give it a try.


Tuesday, June 5, 2018

No More Sneaking! The New Release!


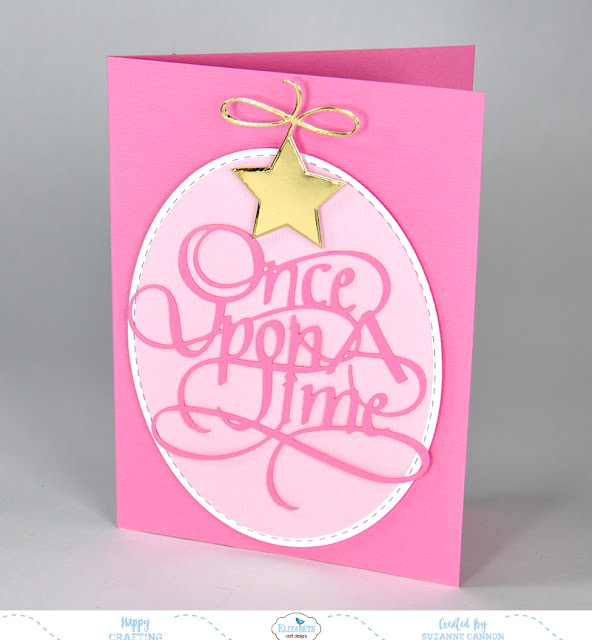
Once Upon a Time there was a girl who loved formal calligraphy and worked long and hard at making letters as perfectly as she could.  Years later, she is a very lucky girl!  That'd be me today.   Thanks to Elizabeth Craft Designs, I can now share my amazing new release with you!! There's a lot to love: A baby onesie, a long-stemmed rose and rosebud wreath, party and calendar themes, a treat box and more.  There is something here for everyone.  I hope you've been watching our sneak peeks on Quietfire Creations (here!) and on the Elizabeth Craft Designs blog over the last week.


Today is Focus on the Release over on the Elizabeth Craft Designs blog and really, I think I should be throwing a party.  Did you all want to come over?  I'm serving paper! Stay tuned as we share our ideas to help inspire your own creations.  Make sure you visit the Elizabeth Craft Designs blog for even more ideas and also subscribe to the Quietfire Design YouTube Channel where you'll see some projects come to life in the next few weeks!

The complete release is available online today here on the Quietfire Design site in the What's New Department, on the Elizabeth Craft Designs site and (hopefully) at your local retailers.

Now let me tell you how I created this quick and easy card with two of my new dies!

Once Upon a Time..... there was a girl and she longed to meet her wonderful other half.  And she did. 
Once Upon a Time..... there was a couple who longed for a baby.  Then it happened.
What occasion and person(s) will you make your Once Upon a Time project for?

Here is how I made my version!


Elizabeth Craft Design Supplies:
Once Upon a Time  Quietfire SiteECD Site
Flourished Night Sky  Quietfire SiteECD Site
Fitted Ovals   ECD Site
Stitched Ovals    ECD Site
Clear Double Sided Adhesive  ECD Site

Others:
Cardstock in dark, medium and pale pink
Gold cardstock
Foam tape


 Instructions:

  1. Form a 5x7" side-fold card base from dark pink cardstock.
  2. Die cut Once Upon a Time from medium pink cardstock.  Die cut the star from the Flourished Night Sky set from gold cardstock.  Die cut the fitted oval from white cardstock and the smaller fitted oval from pale pink cardstock. 
  3. Adhere everything, layered as shown, with Clear Double Sided Adhesive, except the large oval which is attached with foam tape to give the whole design some dimension.
  4. Send it to someone special!


Thank you for stopping by for a little look.  I hope you love the new dies and stamps!
Now let's go create something!

Here is the whole release - for more information, see the Quietfire site and/or the Elizabeth Craft Designs site
Happy creating, Suzanne


Related Posts Plugin for WordPress, Blogger...