Showing posts with label My Idea of a Perfect Christmas. Show all posts

Monday, August 10, 2015

A Way With Words - Merry Christmas and Season's Greetings Mini Album!


Welcome to A Way With Words!  Each day during this event we’re sharing projects made with the brand new Elizabeth Craft Designs word dies.  All these designs are from original hand lettering by Suzanne Cannon and can be found on the Quietfire site and on the Elizabeth Craft Designs site.  

It’s Kathy Jo here today and I am beyond excited to share my project using two of the new dies, Merry Christmas and Season's Greetings.  


Merry Christmas - Metal Cutting DieSeason's Greetings - Metal Cutting Die 


I used both dies on a festive 5x7 Christmas album.  Full disclosure: this is the first time I have made an album.  I always thought that an album would be overwhelming or difficult but it was the opposite - it was easy to do using the new dies and stamps from Quietfire.  (I plan on making more!)
The Merry Christmas die was the focal point on the album cover. 
The first two album pages...
...have a sweet Santa scene on one page...
...and the next page has Quietfire's stamped sentiment, May your longest list this Christmas.  What a sweet sentiment!
Next we have a cute indoor stocking scene.
On the left is Santa filling the stockings with the wee ones looking on...
...on the right is Quietfire's stamped sentiment, Christmas is a piece of home.
The last two pages remind me of my hubby and I.  
The first sheet has a cover scene from The Saturday Evening Post and the heartwarming sentiment, My idea of a perfect Christmas.
The right side is an old postcard with snowflake tags:
The back of the album is a mirror of the front's layout.  The die used is the new Season's Greetings die.  Gorgeous die!
Thanks for visiting!  I really hope you enjoyed the new dies and stamps!  Don’t forget to stop by the Quietfire site and the Elizabeth Craft Designs site to see all of the lovely new dies!  

Big Crafty Hugs,
Kathy Jo

Friday, December 5, 2014

Jingle Bells - My Idea of a Perfect Christmas


Yogi here today with a Jingle Bells card... another one of my itches to do...

Click on either image to enlarge. Enjoy.

I scored and folded my white card (5"w x 7"h). Embossed the frame design using Spellbinder's "Decorative Labels Eight" largest die and my tan mat. Ran through my machine, then hit the high points with Distress "Pumice Stone". Dried.

Stamped the quote "My Idea of a Perfect Christmas" (minus the word "you") using Versafine Black Onyx and clear embossed. Added the three black dots with a micron pen.

Die cut the jingle bells (Sizzix Tim's Movers & Shapers) from white cardstock, then hand cut a solid under layer. Adhered the two together, inked it with Versamark and embossed with silver embossing powder, twice. Applied Quickie glue to the two little curved areas and sprinkled with Ritz micro fine glitter "Stardust".

Die cut the pine branches (Impression Obsession "Fall Branch") from white cardstock. Left it clinging to my large piece of cardstock and inked it with Distress "Forest Moss" and sponged "Evergreen Bough", then removed it from the larger cardstock. Adhered the branches to the front of the card. Then adhered the bells.

I won a bunch of ribbon from "Little Scrap Pieces" and the green one was perfect for this card. I tied it in a double loop bow using my quilling comb like a fork... going over every second prong. This little bow style was taught at our last quilling session and definitely comes in handy...

As a final touch on the front, added some white pearl flourishes.

On the inside, stamped the Santa (Stampers Anonymous "Christmas Memories") using the black, clear embossing and coloring with Prisma colored pencils.

Stamped part of the other quote ("We Believe in Santa"), using only the word "Santa", stamping with the black and clear embossing.

Sponged the edges with Distress "Worn Lipstick".

Hope you enjoyed the techniques I used and maybe give using the tan mat for embossing designs with dies on your next card.

Wednesday, August 13, 2014

PERFECT CHRISTMAS & FAMILY STRENGTH - CARDS

Hi Everyone! Holly here with two cards for you today. 

First up, quick and easy, using this beautiful sentiment stamp called
and design paper called THESE DAYS. 
Add in a few pieces cut using the MACARENA DIE , sponge on some INK, then assemble the card. Foam tape under the sentiment provides depth.

Okay, so that was just too easy- let's do another one! Inspired by Design Team buddy Kathy Jo, I opted to make a Christmas card.

 
No designer paper on this one- we'll make our own background paper. 
Using JET BLACK ARCHIVAL INK, randomly stamp Christmas designs, and the sentiment. I used 
MY IDEA OF A PERFECT CHRISTMAS for the sentiment, and DECK THE HALLS, and CHRISTMAS IS THE DAY for the images. After sponging loose circles of FIRED BRICK and PEELED PAINT  DISTRESS INK, I picked up ink with a brush and coloured in the images.
The circles for the sentiment and red mat were cut with Spellbinders CIRCLES then the red mat and strip were embossed with the REINDEER MAGIC M-Bossabilities.
The same inks were watered down a bit and splattered onto the card base and sentiment.
Once assembled, I added some pearls from my stash, and called it done.


If you feel inspired, remember that Quietfire Design has some great specials on right now, including in stock CHRISTMAS STAMPS!

Thanks for stopping by!


Friday, December 13, 2013

Love Is What's In The Room Ornaments

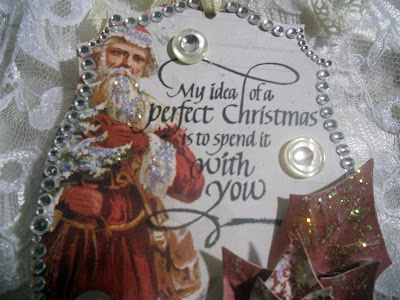
Hello Everyone, Terre here with some vintage Christmas tags/ornaments using Quietfire Design stamps. I used the new stamps "Love Is What's In The Room" and "My Idea of A Perfect Christmas"


For the first tag/ornament I used Label Twenty-Five, die cut it then placed it on a piece of Want2Scrap© Nestaboard Labels Twenty-Five, added a Silver Labels Twenty-Five Nestabling. I die cut the Poinsettia die template from Spellbinders and added some glitter glue to make it shine.


For the second tag/ornament I used the same die template, Nestaboard and Nestabling but I also added the Birds One die template from Spellbinders Media Mixage line. I hope you have enjoyed my walk down vintage lane, I just love creating vintage items! Thank you for stopping by my blog post and I wish you all a very Merry Christmas and a Bright New Year! Crafty Smiles, Terre

Wednesday, December 4, 2013

MY IDEA OF A PERFECT CHRISTMAS- CARD

Hi Everyone!
This is Holly, with a holly covered card today. :)
 
I began by selecting the holly branch from the Silhouette Online Store and after sizing it, cut it out three times with my Cameo. These cutting files are currently on sale.
I embossed the holly branches, then sponged with Ranger Distress Inks, peeled paint and forest moss.
 
After stamping My Idea of a Perfect Christmas onto white card stock, with Jet Black Archival Ink, I cut around it using the second largest die from Spellbinders Marvelous Squares. I went back over it with the next size down die and the embossing mat. I sponged the green distress inks along with some sepia ink to age the paper and show the embossing a bit.
I cut the red paper from Kaisercraft Paper Pad -These Days-, sizing it to fit just inside the edge of the base card. Once it was adhered, I attached the sentiment square, on a slight angle, with foam tape.
 
I snipped a few leaves from the holly branches, and once they were arranged across the corner, I added the snipped leaves to fill the corner of the card. Then, I spritzed everything with heavily watered down Walnut Ink.
Using white ribbon , I tied it into a three layer bow, and sponged ink on it, to age it. Then, I attached it to the cluster of holly branches, completing the card.
 
I hope you enjoyed your visit here today.
We love it when you come to see us!


Related Posts Plugin for WordPress, Blogger...