Showing posts with label Quietfire Creations. Show all posts

Tuesday, December 7, 2021

Season's Greetings Christmas Card


Hey Quietfire Fans! For today's project I'm sharing with how to create this vintage Season's Greetings Christmas Card. I combined a variety of Quietfire Design Stamps, A Way With Words Dies and Modern Gilding Powders which were all perfect for creating this Christmas Card. You'll want to grab a cup of your favourite beverage and learn how to recreate my Season's Greetings Christmas Card at home.

To start, you'll need a piece of red patterned cardstock. Die cut a 4" Stitched Indented Rectangle out of the cardstock piece. Distress the edges of the rectangle. Ink the edges of the rectangle using Walnut Stain Distress Ink and a blending tool with foam.


Next, you'll need a piece of dark green patterned cardstock. Die cut a 3 3/4" Fitted Indented Rectangle out of the cardstock piece. Apply Emboss It Ink to the Merry Christmas Background stamp and stamp onto the rectangle. Reapply ink to the stamp and continue stamping on the rectangle as desired. Sprinkle Kells Gold Modern Gilding Powders over the stamped background. Tap off the excess powder and emboss with a heat tool. Distress the edges of the rectangle. Ink the edges of the rectangle using Walnut Stain Distress Ink and a blending tool with foam.


Die cut a 3/4" Diagonal Stitched Fishtail out of a plain piece of red cardstock. Apply Emboss It Ink to the Season's Greetings sentiment from the Poinsettia Banner & Sentiments stamp set and stamp onto the fishtail. Sprinkle Kells Gold Modern Gilding Powders over the stamped sentiment. Tap off the excess powder and emboss with a heat tool. Distress the edges of the banner. Ink the edges of the banner using Walnut Stain Distress Ink and a blending tool with foam.


From the Flourished Candle, die cut the whole candle image out of a piece of copper foil paper. Die cut the candle edge and flame out of a piece of White Cardstock. Using a blending tool with foam, blend Squeezed Lemonade Distress Ink over the entire surface of the flame.


Adhere the 3 3/4" rectangle to the 4" rectangle. Adhere the 3/4" fishtail 1/4" from the bottom and all the way to the left hand side of the 3 3/4" rectangle.


Adhere the flame to the flame on the copper piece. Adhere the candle edge to the candle edge on the copper piece. 


Use foam squares to adhere the flourished candle 1" from the bottom and 1/2" from the left of the 3 3/4" rectangle.


To finish the card, cut a cardbase out of white cardstock that measures 4" x 10 1/2", score at 5 1/4". Adhere the cardfront to the cardbase.


Here are a few closeups of the finished Christmas Card.


Here is the finished Season's Greeting's Christmas Card.


Quietfire Design Supplies Used:


Other Supplies Used:

- Elizabeth Craft Designs: Stitched Indented Rectangle, Fitted Indented Rectangle and Diagonal Stitched Fishtails
- Ranger Ink: Emboss It Ink
- Tim Holtz for Ranger Ink: Distress Ink - Walnut Stain and Blending Tool with Foam
- Simple Stories: Color Vibes Textured Cardstock - Winter Pack
- Misc: Copper Foil Paper and White Cardstock

Thanks so much for joining me today and I hope that I have inspired you to recreate your own version of my Season's Greetings Christmas Card at home.

- Katelyn


Tuesday, March 23, 2021

Let Your Dreams Soar Tag


Hey Quietfire Fans! For today's project I'm sharing with you my Let Your Dreams Soar Tag. I combined a variety of dies, stamps and Modern Gilding Powders, which were all perfect for creating this tag. You'll want to grab a cup of your favourite beverage and learn how to recreate my Let Your Dreams Soar Tag at home.

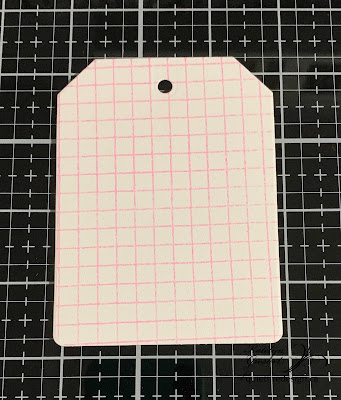
To start, die cut the small tag from the Planner Essentials - 2 die out of a piece of white cardstock. Apply Kitsch Flamingo Distress Ink to the Grid Background Stamp and stamp onto the tag.


Next, you'll need the Let Your Dreams Soar sentiment from the Soar Collection Stamp Set. Apply Emboss It Ink to the sentiment and stamp onto a piece of white cardstock. Sprinkle Copper Scroll Modern Gilding Powders over the stamped sentiment. Tap off the excess powder and emboss with a heat tool. Fussy cut the sentiment into two strips.


Choose two leaves from the Create a Wreath Die. Die cut one of the leaves once out of a piece of green paper. Die cut the other leaf four times out of the same piece of green cardstock.


From the Christmas Accents die, you'll need the large, medium, small and extra small flowers. Die cut the large flower once, the medium flower three times, the small flower three times and the extra small flower three times.


From the Christmas Accents die, you'll need the flower centres. Die cut the flower centres three times out of white cardstock.


Shape the flowers as desired. For one flower, adhere a large, medium, small and extra small flower as well as two centres together. For the other two flowers, adhere a medium, small and extra small flower as well as two centres together.


Adhere two matching leaves to the top left corner of the tag. Adhere the remaining two leave to the bottom left side of the tag. Adhere the single leaf to the middle left hand side of the tag as desired.


Foam square the large flower in the middle of where the leaves meet. Adhere one flower about the large flower and adhere the other flower below the large flower.


Use foam squares to adhere the Let Your Dreams Soar sentiment to the middle right hand side of the tag as desired.


To finish the tag, tie a piece of white crinkle ribbon through the hole at the top of the tag.


Here are a few closeup photos of the finished tag.


Here is the finished Let Your Dreams Soar Tag.


Quietfire Designs Supplies Used:


Other Supplies Used:

- Elizabeth Craft Designs: Planner Essentials - 2
- Tim Holtz for Ranger Ink: Distress Ink - Kitsch Flamingo
- Ranger Ink: Emboss It Dabber
- Graphic 45: Elegance 12x12 Patterns & Solids and Bird Watcher 12x12 Patterns & Solids
- Stella & Wolfe: White Ribbon
- Misc: White Cardstock

Thanks so much for joining me today and I hope that I have inspired you to recreate your own version of my Let Your Dreams Soar Tag at home.

- Katelyn


Tuesday, April 21, 2020

Friends, Be With Those Who Help Your Being ~ Rumi


Hello! Kim here with another share on the Quietfire Creation’s blog. My second now since the COVID-19 pandemic entered our world! Now is the perfect time to scrapbook layouts of happier times when physical distancing was not part of our norm.

I printed this photo from New Year’s Eve first. It didn’t take long to ‘audition’ a few stamps and dies from my Quietfire Design collection to find which ones worked best for the story I wanted to tell.

I cut the ‘Friends’ title using the Elizabeth Craft Designs steel cutting die, designed by Suzanne Cannon. I embossed with Kells Gold Gilding Powder twice, which gave it beautiful, dimensional shine, a fun touch for my New Year photo.


I stamped the Rumi quote “Be with those who help your being” using Distress Oxide ink on a small piece of cardstock. This stamp is sold unmounted. Do NOT let this scare you away, I just add temporary adhesive to the back and stick it on my stamping platform [or acrylic block], easy-peasy! It is the perfect quote for this fun group of friends who always make me smile!


The layout uses papers and embellishments from Pink Fresh, from a monthly kit I received from Scrap Shotz. The colours are fun and vibrant, like my friends!


Don't forget to pull out your Quietfire Design stamps and dies when scrapbooking, they just might be the PERFECT embellishment!

SUPPLIES:

Quietfire Design stamp ~ Gentle Thoughts
Emerald Creek Co. ~ Kells Gold Gilding Powder 
Elizabeth Craft Designs ~ Friends steel cutting die
Elizabeth Craft Designs ~ double sided adhesive
Scrap Shotz kit / Pink Fresh
Ranger ~ Distress Oxide Inks

Tuesday, March 3, 2020

Wishing you Rainbows & Unicorns Card


Hey Quietfire Fans! For today's project I'm sharing with you my fun Wishing you Rainbows & Unicorns Card. By combining a variety of stamps, dies and the Modern Gilding Powders, they were all perfect for creating my card. You'll want to grab a cup of your favourite beverage and learn how to recreate my Wising you Rainbows & Unicorns Card at home.

To start, die cut a 3" Stitched Rectangle out of a piece of white cardstock. Apply Emboss It Ink to the Grid Background stamp and stamp onto the rectangle. Reapply ink to the stamp and stamp as needed to make sure the entire rectangle is covered with the grid pattern. Sprinkle Gothic Black Modern Gilding Powder over the entire surface of the rectangle. Tap off the excess powder and emboss with a heat tool. 


Using a blending tool with foam, blend Wilted Violet, Worn Lipstick and Cracked Pistachio Distress Oxide Ink over the entire surface of the embossed rectangle. Spritz the rectangle with water. Dry the rectangle with a heat tool. Distress the edges of the rectangle. Ink the edges of the rectangle using Black Soot Distress Ink and a blending tool with foam. 


Die cut a 5/8" Fitted Rectangle out of white cardstock. Cut the fishtail down to 2 3/8". Using a blending tool with foam, blend Wilted Violet and Worn Lipstick Distress Oxide Ink over the entire surface of the fishtail. Spritz the fishtail. Dry the fishtail. Apply Emboss It Ink to the Wishing You words from the Wishing You Whimsy stamp set and stamp onto the fishtail. Sprinkle Gothic Black Modern Gilding Powder over the stamped words. Tap off the excess powder and emboss with a heat tool. Distress the edges of the fishtail. Ink the edges of the fishtail using Black Soot Distress Ink and a blending tool with foam.


From the Love, Joy, Peace Ornament, die cut the Ornament out of black cardstock.


Die cut a 2 1/2" Fitted Circle out of white cardstock. Apply Worn Lipstick Distress Oxide Ink to the Rainbows & Unicorns sentiment from the Wishing You Whimsy stamp set and stamp in the middle of the circle. Dry the ink with a heat tool. Apply Wilted Violet Distress Oxide Ink to the Grid Background stamp and stamp off onto a piece of paper and then stamp overtop of the circle. Dry the circle with a heat tool. Distress the edges of the circle. Ink the edges of the circle using Black Soot Distress Ink and a blending tool with foam.


Die cut the Peace on Earth from a piece of black cardstock. Cut the die cut piece in half. You will only need the left hand side of the piece. 


Die cut a 3 1/2" Stitched Rectangle out of white cardstock. Apply Worn Lipstick Distress Oxide Ink to the Grid Background stamp and stamp on all four edges of the rectangle. Dry the rectangle with a heat tool. Distress the edges of the rectangle. Ink the edges of the rectangle using Black Soot Distress Ink and a blending tool with foam.


Adhere the ornament to the circle. Adhere the Peace on Earth die cut piece to the back left hand side of the rainbows & unicorns circle.


Foam square the rainbows & unicorns circle 3/4" from the bottom and 1/2" from the left of the 3" rectangle.


Staple the Wishing You fishtail 1" from the top and all the way to the left hand side of the 3" rectangle. You will need to adhere the left side of the fishtail to the circle.


Adhere the 3" rectangle to the 3 1/2" rectangle. Cut a cardbase that measures 3 1/2" x 9 1/2", score at 4 3/4". Adhere the cardfront to the cardbase.


Here are a few closeup photos of the finished card.


Here is the finished Wishing you Rainbows & Unicorns Card.


Quietfire Design Supplies Used:


Other Supplies Used:

- Elizabeth Craft Designs: Stitched Rectangles, Fitted Fishtails and Fitted Circles
- Ranger Ink: Emboss It Ink
- Tim Holtz for Ranger Ink: Distress Ink - Black Soot, Distress Oxide Ink - Worn Lipstick, Wilted Violet & Cracked Pistachio and Blending Tool with Foam
- Misc: White Cardstock, Black Cardstock and Mini Stapler

Thanks so much for joining me today and I hope that I have inspired you to recreate your own version of my Wishing you Rainbows & Unicorns Card.

- Katelyn


Related Posts Plugin for WordPress, Blogger...