Friday, January 29, 2016

Snowflakes and Let it Snow!

Hi, Connie Nichol here today with two projects featuring a stamp from the Let it Snow Snowman set and  snowflake digital cutting files from Quietfire Design.


Here's a simple 8.5 x 11 scrapbook layout to feature a photo I snapped with my phone in the Rocky Mountains last fall. Snowflakes seemed like the perfect embellishment, so I used my Sizzix Eclips 2 to cut a bunch of large snowflakes using the Berry Leaf digital cutting file and layered them under the photo to form a snowy background.


And then, while I had everything scattered around my craft room, I cut some snowflakes in a much smaller size and put together a card featuring using the same Quietfire stamp as the scrapbook layout above.  I am amazed at how well the Eclips 2 cuts out the detail on a tiny snowflake.


A touch of glitter makes everything looks fancier, so I added some Stickles to both the title and the snowflakes.

I especially love this Berry Leaf snowflake cutting file from Quietfire Design because it includes the solid background layers you can use to add dimension and interest.  So many possibilities for layering different colours and types of paper to get different looks.  At only 99 cents, digital files are such a bargain.


Here's the stamp set I used for the scrapbook page title and card, the Let it Snow Snowman set.  So versatile for winter scrapbooking!


Supplies Used:  Quietfire Design stamps and digital cutting files, Sizzix Eclips 2, Simple Stories patterned paper and stickers, Stickles glitter glue, Clearsnap Ink, Chameleon markers, May Arts ribbon, cheesecloth.


Wednesday, January 27, 2016

Vintage "Love"

Hello Quietfire Design Lovers!  Kathy Jo here sharing a Valentine's Day card using Suzanne Cannon's newly released die, Love:
Love - Metal Cutting Die
So elegant!

For the Valentine's Day card, I went with a vintage style...and the Love die with it's romantic flourishes is the focal point.  It was double die cut using black and shiny red card stock.  Stickles was applied for a little bit of happy bling:
The vintage style papers are from Tim Holtz, as is the hearts stencil.  (If you don't have the Tim Holtz papers, Graphic 45's Kraft Reflections would provide a lovely vintage background.)
This card and several other Quietfire Valentine's Day cards will be brought to my work during the week of Valentine's Day.  I am the only female in my department and the guys appreciate having unique, handmade cards for Valentine's Day.  The Love die really makes this card- I have a feeling that I will have requests to make more! 

Before I close, did you hear about the Quietfire Design sale?  It is awesome!:

50% off Almost Gone Forever items! Items must be in stock.  The sale price will not appear until the item is in your shopping cart.
Dreamweaver Stencils - 50% Off!  In stock items only. Sale price will appear when the item is in your shopping cart.
50% off Sizzix (including Tim Holtz), Memory Box, CottageCutz and ECD dies.  Items must be in stock.  Sale price will not appear until the item is in your shopping cart.

For my American friends, the above is even better as the U.S. dollar is very strong compared to the Canadian and you will find items at a steal!

Thanks for stopping by!  I do hope you enjoyed the card.  :)

Have a happy crafty day!
Hugs,
Kathy Jo


Monday, January 25, 2016

Worry Does Not Empty


Hello to you on this Monday!!!  I'm so glad you've popped in!!!!  I love this quote - it is very true - and Suzanne has lettered it so beautifully!!  I've stamped it on the textured side of Soft Finish Cardstock which gave it a bit of a distressed look and as I thought of that and wondered if I should start over and use the smooth side of the paper it occurred to me that worry can give us a distressed look, so I left it as is.  

Here's how I made the card:

1.  Cut 100# Soft Finish Cardstock to 4 3/8" x 5 1/4".  Lay stencil over paper and ink with Salty Ocean, Wilted Violet, and Squeezed Lemonade.  Stamp quote with Jet Black ink in center of paper.

2.  Cut Ovals from 100# Soft Finish Cardstock backed with Clear Double Sided Adhesive. Separate ovals, ink the two I've used with Wilted Violet, remove adhesive liner and attach to card as shown.  Ink edges of panel with Wilted Violet.

3.  Cut 85# Soft Finish Cardstock 4 3/4" x 5 5/8".  Emboss with folder, embossing one half first and then the second half lining up the dots.  Ink around edges with Squeezed Lemonade.

4. Cut 100# Soft Finish Cardstock 5 7/8" x 10" and fold to make a card 5 7/8" x 5".  Attach yellow panel with Double Stick Tape.  Attach stamped panel with Foam Mounting Tape.

5.  Cut 2 Leafy Branches from 100# Soft Finish Cardstock, ink with Twisted Citron, tear off some of the back branches, shape leaves using Molding Mat and Loop Tool, glue to card as shown.  

6.  Cut all parts of Zinnia except the stem from 100# Soft Finish Cardstock.  Ink leaves with Mowed Lawn.  Ink flowers with Salty Ocean.  Ink pistil with Squeezed Lemonade.  Shape petals with Molding Mat and Loop Tool.  Add definition to leaves with Leaf Mat and Tool. Assemble flower onto card as shown. 

I hope you've enjoyed today's project and that you have a good week!!!  If you have a moment, please leave a comment and let us know what you think.

Supplies:

Quietfire Design Rubber Stamp - Worry Mounted
Distress Inks - Salty Ocean, Wilted Violet, Squeezed Lemonade, Twisted Citron, Mowed Lawn (Ranger)
Clear Double Sided Adhesive (Elizabeth Craft Designs)
Craft Sheet (Ranger)
Mini Ink Blending Tool and Foam (Ranger)
100# Soft Finish Cardstock (Elizabeth Craft Designs)
85# Soft Finish Cardstock (Elizabeth Craft Designs)
Fitted Frames 4 - Curvy Ovals Die (Elizabeth Craft Designs)
Leafy Branch Die (Elizabeth Craft Designs)
Garden Notes Zinnia (Elizabeth Craft Designs)
Flower Stencil (Elizabeth Craft Designs)
Lots of Dots Embossing Folder (Elizabeth Craft Designs)
Molding Mat (Elizabeth Craft Designs)
Susan's Garden Tool Set (Elizabeth Craft Designs)


Friday, January 22, 2016

Valentines Day Card

It's time to get started on Valentines day cards so today i have a really pretty one to share that i made with the New Graphic 45 Mon Amour 6x6 pad and the "Future is uncertain" stamp.


My favorite part of this stamp is how the Love sentiment in the center is done with double lines.  It's so gorgeous!!  I made the flowers in the center over the tulle and the ribbon and then added some ivory flowers to match that were in my stash... hope you like it.


Thanks so much for stopping by today and have a good weekend!!

Teresa

Thursday, January 21, 2016

Live In The Moment


 Good Morning.  This is Selma today with a card using a combination of the A Way With Words "Live" die, and the "Live In The Moment" rubber stamp.

Live - Metal Cutting Die 


Live in the Moment

This is a 6x6 inch card.  Using Elizabeth Craft Designs Stitched Squares and Fitted Circles, a frame was created for the beautiful Live sentiment.The flowers were created using Susan's Garden Notes Cosmos and a small Elizabeth Craft Designs butterfly added to complete the front of the card.


On the inside of the card, the Live In the Moment was stamped using VersaFine ink.  ECD Stitched Circles and Fitted Frame dies were used to frame the sentiment.

The beautiful Live die cut is so perfect paired with the Live In the Moment stamp.  Who do you think would enjoy receiving this card?

Products:

9500-1164 - Live
6142 - Live In The Moment

Tuesday, January 19, 2016

Have a heart....


Hello everyone,
Yvonne here with a card using Quietfire Design's stamp "Have a Heart That Never Hardens" (a quote by Charles Dickens).
Since it's a "heart"stamp/quote I chose the color red as main color for my card.


Used materials:

I hope you like the card!
Thanks so much for stopping by.
Wishing you a nice day.

Hugs from Holland,

Heart You

 
It's Suzanne popping in between the fine Quietfire designers to share a card that I just had to make!
<3 you!
 
This is so simple and goes together in minutes once you have decided on the designer paper!  You'll be combining dies from two of the brand new A Way With Words sets.
 
Here is what you'll need!:
 
A Way With Words Calligraphic Elements  Quietfire site | Elizabeth Craft Designs site
A Way With Words thank you  Quietfire site | Elizabeth Craft Designs site
Elizabeth Craft Designs Premium Palette Cardstock in Black and Pale Pink (coming soon!)
Patterned Paper  (I used Basic Grey's Kissing Booth)
 
Instructions:
 
  1. Form a 7" x 5.5" tent-fold card base from black cardstock.
  2. Die cut the flourished heart from pink cardstock and "you" from patterned paper.
  3. Cut a black panel measuring 4.75" x 3".  Mount the diecuts on it using Glue Dots.
  4. Cut alternating designer paper panels and black panels each of slightly larger size (leaving between 1/8" and 1/4" borders) and alternately adhering them with double-sided tape and foam tape as shown.  Yes, it's that simple!


If you can find a plaid with pink in it, this would be a perfect guy card!
Thanks for stopping in. Happy creating! 
Suzanne

Monday, January 18, 2016

It's A Party ~ Celebrate - Enjoy Your Day - Easel Alcohol Ink Splatter


Yogi here today with an alcohol ink splatter technique. 

They say everything old is new again and that's for sure with this technique - BIG GRIN. I did a bunch of them in 2009, some of which were published in a couple of Just Card magazine in 2010 Here & Here

I'm using two of the newest 2016 dies from Elizabeth Craft Designs "It's A Party" & "Celebrate" (also available on Quietfire Design HERE & HERE)

I'm also using a couple sentiment stamps from Quietfire Design  ("Twirl & Enjoy" 3pce set); ("Happy Birthday Plain and Simple" 7pce set) .


I scored and folded my mango toned  card. Cut using my circle scissor then scored and folded the front panel to create my easel. Card size is 5.25"w x 6.5"H - card closed. Cut another circle from the fuchsia cardstock and adhered to card front.

Created my alcohol splatter background on glossy paper (see pics below) using Ranger's "Butterscotch", "Pool" & "Raspberry". Dripped some of one color onto the paper and immediately blow through a straw to splatter it (you can use a spray dust tool or other aerosol tool). Dropped another color and blew and repeated till satisfied.

Stamped the 2 sizes of a firecracker type stamp (gg designs) using Versafine Black Onyx and clear embossed. Used the circle cutter to cut my circle. Adhered to a mango circle. Punched a couple notches in the circle and wrapped some blue twine around it twice. Adhered to card front. Wrapped the twine around two of my fingers several times to create the bow. Adhered using a hot glue tool, and then adhered the round jewel.


Die cut the "It's a Party" (also available on Quietfire Design HERE) from blue textured cardstock and some white cardstock. Adhered the two layers together slightly off set to add contrast. Adhered to outer edge of circle.

On the floor: Stamped the sentiment ("Twirl & Enjoy" 3pce set) using the black and clear embossed.

Stamped the firecrackers using Versamark and embossed with Emerald Creek Hot Stuff "Turquoise Shimmer" embossing powder.

Die cut the "Celebrate" (also available on Quietfire Design HERE) from fuchsia cardstock and white cardstock, adhering the two layers together slightly off set. Scored through the letters to create a fold, adhered to floor as my stopper.

Stamped the "Happy Birthday" several times around the edge of the circle using the black and clear embossed.


Click on any image to enlarge. Enjoy.


Friday, January 15, 2016

I love you alphabet

Hello!  Now that Christmas is over, I'm ready for the next holiday:  Valentine's Day!  Of course, you can send love notes any time of the year - it may even be more meaningful then but sometimes we just need a national reminder!  

I used the I Love You Alphabet on a corner of white cardstock and markers to color the stamps two different colors.  I then added a couple of heart dies just for a little more pop of color. 


This is just such a clever design - I love it!  


I Love You Alphabet


Thursday, January 14, 2016

Congrats!

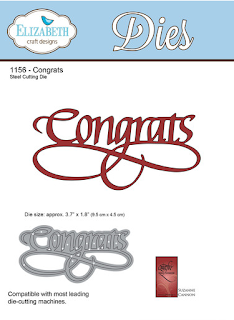
Hi there, Connie Nichol here today with a couple of Congrats cards featuring a new die from the Elizabeth Craft Designs Way with Words collection designed by Suzanne Cannon.  I just love these word dies for making cards - whether you put the die cut on a simple background or a fancy textured background, they always look stunning.

So, this is a fancy textured background, but not hard to make.  I adhered crumpled up white tissue paper to a piece of cardstock with Mod Podge, and then sprinkled some Nuance powders on top to add some colour.  I then spritzed lightly with a little water to dilute and spread the colour.  Nuance is a very concentrated water soluble powdered dye available in a number of colours from Magenta.  After the tissue dried, I adhered the diecuts.  The fancy border die cuts are cut from cardstock using the very versatile 'Ribbons and Jewels' set from Elizabeth Craft Designs.  


This card is a much different style.  I cut the Congrats word and stars from a Shimmer Sheetz (iridescent Mylar from Elizabeth Craft Designs) and adhered them to a piece of pre-glittered cardstock.  The border is made from dry embossing a small rectangle of Shimmer Sheetz to add some subtle texture and adhering an additional piece of the glittered cardstock that had been cut with a die from the ECS Ribbons and Jewels die set.  Easy but  elegant.

Supplies Used:  Elizabeth Craft Designs dies, Shimmer Sheetz and embossing folders, Core'dinations cardstock, Magenta Nuance powders and Plaid Mod Podge


Wednesday, January 13, 2016

"The best kiss..." Valentine's Day card

Hello Crafty Friends!  Kathy Jo here sharing a Valentine's Day/Love card using Quietfire Designs' "The Best Kiss" stamp:
The Best Kiss - Mounted
Such a lovely stamped sentiment!
For the card I used several papers from Graphic 45's Mon Amour mounted on black card stock.  The sentiment was stamped using Jet Black Archival ink.  It was mounted on several layers of dies from Spellbinders and Cheery Lynn.  A sheer white and gold double bow was the finishing touch. 
Here is a link to all of the stamps in the "Love" collection- perfect for your special Valentine or for an upcoming wedding!

Thanks for stopping by!  
Have a happy crafty day!
Big hugs!

Monday, January 11, 2016

For Your Thoughtfulness, Thanks!!


Hello!!  It's Wanda here today.  I hope you had a good weekend and your week goes great!!!  On today's card I've used a die, a stamp, and a napkin for the background.  I've also used part of the packaging (the pink, glittery, thin cardboard) from a gift I received from one of the little girls I watch in the nursery at church on Sunday mornings.  This thank you card is for her.  

Let's get started!!

1. Cut white cardstock 4 1/8" x 5 3/8".  Separate the layers of the napkin so you only have the top, printed layer and cut out the area you want to use a little larger than the cardstock. Brush Fluid Matte Medium over cardstock, lay napkin carefully over medium, brush medium over napkin and leave to dry.  Once dry, trim off extra napkin from edges.

2. Sponge Snow Cap over lower area of napkin panel where the die cut will be, dry.  Ink edges of panel with Vintage Photo, dry.  Sponge Tea Dye over white ink, dry.  Stamp "for your thoughtfulness" with Jet Black Ink.  Brush Wink of Stella on edges. 

3.  Die cut Thanks from the pink, glittery packaging material and from a Silver Deco Sheet. Use Gel Medium to glue the pink thanks to the silver thanks.  Peel off liner from the silver thanks and stick to panel.  Add black along the die cut with pen. 

4. Cut white cardstock 5 1/2" x 8 1/2".  Fold to make a card 4 1/4" x 5 1/2".  Attach panel to card.  

I hope you like this card and that you inspired to create something!!! 

~ Wanda 

Supplies --

A Way With Words - Thanks, Metal Cutting Die
Distress Inks - Vintage Photo, Tea Dye (Ranger)
White Cardstock
Deco Sheets Silver (Idea-ology)
Wink of Stella - Gl. Clear
Zig Millennium 01 Black Pen
Mediums - Fluid Matte, Semi-Gloss Gel (Golden)


Related Posts Plugin for WordPress, Blogger...