Friday, August 31, 2018

I Don't Need An Inspirational Quote - Cathy Potosky, Guest Designer


Hi everyone! It’s Cathy here again today with my last Guest Designer post for Quietfire Design. Thank you Suzanne for letting me create with your wonderful projects and share my projects here.

I am a coffee addict! As soon as I saw the “But First, Coffee…” stamp set I knew it was meant to come to my house!
I used a number of the stamps to create a background for my card. I had some coffee dyed paper in my stash and had to use it. I randomly stamped images and words from the set using Ranger Tim Holtz Distress Ground Espresso.


I then used embossing ink and covered the page with Emerald Creek Baked Texture in Vintage Beeswax and melted it. I did this 3 times to give it a vintage look.


I then place this piece in the freezer and while that was getting cold, I stamped a coffee phrase onto some burlap ribbon that I had in my stash.


I retrieved my embossed piece from the freezer and very gently started to bend it, and it cracked so wonderfully.


The Vintage Beeswax is very glossy when it’s embossed, so to bring down the shine I did a quick, thin layer of Dina Wakely Gel Medium over it.

I used foam tape to attached this to a 5 ½ X 5 ½ card base, edged in Ground Espresso, then attached the stamped burlap across the front and added my saying. It needed just a little something more, so stamped 3 coffee cup images on a scrap of my coffee dyed paper, fussy cut them and added them on the burlap.
Love this stamp set! I could make backgrounds all day, while I drink my coffee! Here a few extra close ups of my Vintage Coffee card.


Hope you all have  great long weekend and thank you letting me share my creations with you!
But First, Coffee - set of 8
Cathy Potosky

Products Used:
Emerald Creek Baked Texture Vintage Beeswax
TH Distress Ink Ground Espresso
Ranger Archival Ink Sepia
Dina Wakely Gel Medium


A big thanks to Cathy for sharing her fun projects with us. You may see her other recent project HERE. Visit her blog for more of Cathy's projects.

Tuesday, August 28, 2018

"Always believe" 15 minute CAS (and elegant!) inspirational card

Hello Crafty Friends!

There are many reasons why I adore Quietfire Design stamps and dies.  Today's project is an example of one of those reasons: the elegant stamps and dies can make the simplest of cards stunning.

The focal point of the card front is the inspirational stamp, Always believe:
Always Believe - Mounted
The below instructions can be used with many Quietfire Design stamps.  In a jam to get a card out quickly?  Follow the instructions below to create a card that the recipient will love!

Card instructions:

  1. Create a 4.25 x 5.5 top fold card using ivory card stock.
  2. Cut patterned paper smaller than card front.  Use black archival ink to stamp quote onto patterned paper.  Mount to card front.
  3. Die cut frame using ivory card stock.  Mount to card front.  (I added a slight bend to the die cut to add some dimension.)
  4. Create bow and mount to top of frame.
  5. Done!

So easy!  And what elegant results!  Imagine doing this for your Christmas cards.  Pick your stamp and patterned paper, then create a stack of holiday cards in a flash.
Thank you for stopping by!
Have a happy, crafty day.
Big Hugs,
Kathy Jo

Monday, August 27, 2018

Autumn - The Thankful Receiver


Hello!!!  It's Wanda here today to share an Autumn card.  I am ready for some cooler (not cold) weather but it's suppose to be in the 90s here in Southern Iowa today.  By Wednesday it's just the 70s.  70s will be nice but it won't stay and it'll be 80s the rest of the week.  

My background is created on translucent Yupo paper.  I used some bright alcohol inks in fallish colors.  Next I used wadded up plastic wrap to "stamp" Alcohol Lift-Ink.  As I lifted the alcohol ink I then stamped it onto regular white cardstock.  Once I was done stamping I blotted the lift-ink off the yupo and then buffed the paper.  


Next I flipped the yupo paper over and stamped the music image from the Crows Set multiple times with Archival Ink Jet Black until the paper was filled. 


I gently dried the black ink with a heat tool being sure not to get the yupo too hot.  You can see how the music comes through in this picture.


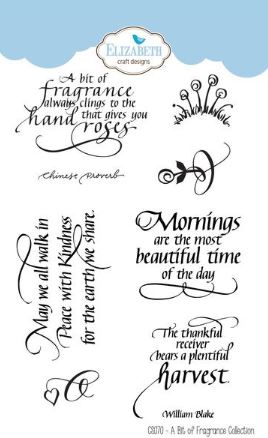
I stamped the harvest quote from the A Bit of Fragrance Collection on my stamped off paper and then die cut it with a Stitched Rectangle.  I also die cut my yupo with a larger Stitched Rectangle.  


The yupo paper was attached to white cardsock.  I stamped one image from the Where Flowers Bloom Collection on the center-bottom of the yupo paper.  I wrapped the quote panel with twine, tied a bow, and attached the panel to the yupo panel with thick foam mounting tape.  

You might notice that this card is not the card I showed at the top.  It was my original card and then after taking pictures I decided I should also use the Autumn die.  Everything was attached together so I created a panel by tearing around the main area using a metal ruler.  This would have been a very nice card also.


I die cut the word Autumn from white cardstock, inked it with Distress Ink Barn Door and Festive Berries, coated it with Embossing Ink and embossed it with Clear Embossing Powder.


I hope you've enjoyed today's card/cards.  Have a wonderful week!!!

Hugs, Wanda


Thursday, August 23, 2018

A baby is a little bit of heaven

School starts today - it's one of those days when it hits you your baby is growing.  I haven't made baby cards in a while but I had to with this beautiful Welcome Little One Collection.  I masked off the heart and the flourish from the top and bottom so that it would fit in the Flourished Oval Frame better.


I also trimmed the flourish off the star to keep it not so busy.  (I realize now that my Flourished Frame is backwards but this design is simple enough it works either way in case you're wondering!)  The paper is from some scrap paper WAY BACK when I was scrapbooking pages for my kids' baby books.  Lol!  I believe it was DCWV though.


Thanks for looking and if you're in the United States, I hope your kids are off to a great start at school!

Flourished Night Sky - Metal Cutting Dies
Flourished Night Sky Metal dies

Welcome Little One Collection - Clear Stamps

Flourished Oval Frame - Metal Cutting Die


Tuesday, August 21, 2018

Season's Greetings - Elizabeth Craft Designs August Designer Challenge


Hey Quietfire Fans! This month's challenge over at Elizabeth Craft Designs blog is using the newly released Joset Designs Character Dies. Which isn't a challenge as there are so many possibilities for the different characters combined with A Way With Words dies. By combining a variety of the A Way With Words Dies and the new Santa Claus Character Die, I was able to create this fun Season's Greetings Card.

Before I share with you how I created my card, here is some information about winning the monthly draw at Elizabeth Craft Designs. In order to be eligible for the prize, you need to answer a question. This month's question is: What of the characters from the new Joset Designs collection is your favourite?
 Due to some customers having issues leaving a comment each month on the Designer Challenge post for their chance to enter the give away … they are now giving customers two options to comment … the challenge blog post and the Designer Challenge post on our Facebook Page.

To start, choose a piece of patterned paper from the ModaScrap It's Christmas Time Paper Pack. Place the 5 3/4" Dashing Rectangle die onto the patterned paper piece. Run the die through your diecutting machine. Flip the same piece of patterned paper over and place the 5 1/4" Dashing Rectangle die onto the piece of paper. Run through your die cutting machine. Ink the edges of both pieces using Black Soot Distress Ink and a blending tool with foam.


Die cut the Flourished Frame Die out of White Soft Finish Cardstock. Using a blending tool with foam, blend Forest Moss Distress Oxide Ink over the entire surface of the flourished frame.


Die cut the Season's Greetings out of White Soft Finish Cardstock. Using a blending tool with foam, blend Candied Apple Distress Oxide Ink over the entire surface of the Season's Greetings sentiment.


Die cut all the pieces from the Santa Clause die out of White Soft Finish Cardstock.

The trim for Santa's suit, beard, moustache and pom pom for the top of his hat all stay white.


Using a blending tool with foam, blend Candied Apple Distress Oxide Ink over the entire surface of the hat, suit and half of the pants. Using a blending tool with foam, blend Black Soot Distress Oxide Ink over the bottom half of Santa's pants.


Using a blending tool with foam, blend Black Soot Distress Oxide Ink over the entire surface of the mitts and buttons.


Using a blending tool with foam, blend Tattered Rose Distress Oxide Ink over the entire surface of the face and nose. 


For the bell, use a blending tool with foam to blend Fossilized Amber Distress Ink over the entire surface of the bell.


Now it's time for assembly.

Foam square the 5 1/4" dashing rectangle to the 5 3/4" dashing rectangle.


Adhere the flourished frame to the 5 1/4" dashing rectangle. Adhere the Season's Greetings sentiment to the middle of the flourished frame.


Adhere Santa Claus together. To finish Santa off, use a black gel pen to add eyes to Santa's face.


Foam square Santa Claus to the left of the Season's Greetings sentiment.


To finish off the card, cut a cardbase out of White Soft Finish Cardstock that measures 5 3/4" x 9", score at 4 1/2". Adhere the cardfront to the cardbase.


Here are a couple of closeup shots of the card.


Thanks so much for joining me today and taking a look at my project! I hope that I've inspired you to want to recreate my card at home. 


Elizabeth Craft Designs Supplies Used:


Other Supplies Used:

- Tim Holtz for Ranger Ink: Distress Ink - Fossilized Amber, Distress Oxide Ink - Black Soot, Tattered Rose, Candied Apple & Forest Moss and a Blending Tool with Foam
- Misc: Black Gel Pen

- Katelyn


Monday, August 20, 2018

Home is the Heart Tag


Hey Quietfire Fans! I'm excited to be back on the blog today sharing my Home is the Heart Tag. My Home is the Heart tag is perfect to add to a bottle wine or a gift basket for someone who has just moved into a new home. To create my tag I used a variety of Quietfire Stamps and A Way With Words Dies. Grab a cup of your favourite summer beverage and learn how to recreate my Home is the Heart Tag at home. 

To start, you'll need two tags. Start with one tag and place the Diamond Stencil onto it. Sprinkle Orange, Olive and Cerulean Blue Magenta Nuance over the stencil. Leave the stencil on and spritz the powder with water. Grab the second tag and flip the diamond stencil overtop of it. Dry with a heat tool.


With the tag dry, rub Carved Pumpkin Distress Crayon along the edges of the tag. Randomly rub Chipped Sapphire Distress Crayon on the edges of the tag.


Apply Jet Black Archival Ink to the Crackle Background stamp and randomly stamp onto the tag. Apply Jet Black Archival Ink to the Diamond Background stamp and randomly stamp onto the tag.


To finish off the edges of the tag, distress the edges and then ink the edges with Black Soot Distress Oxide Ink and a blending tool with foam.


Die cut the Flourished Oval Frame out of white cardstock. Apply Emboss It Ink to the frame. Sprinkle Baked Texture - Deep Sea Embossing Powder over top of the frame. Tap off the excess powder and emboss with a heat tool. If there is still white showing on the frame, reapply emboss it ink to the frame and then sprinkle Deep Sea embossing powder overtop. Tap off the excess powder and emboss with a heat tool.


Cut a piece of book page that measures 1 3/8" x 5". Tear a bit off the top and the bottom of the piece. Cut a piece of white cardstock that measures 1" x 5 1/8". Tear a bit off the top and bottom of the piece. Place the Dotty Stencil overtop of the white cardstock piece and blend Faded Jeans Distress Oxide Ink through the stencil. Distress the edges of both pieces. Ink the edges of both pieces using Black Soot Distress Ink and a blending tool with foam.


Die cut a 2 1/2" stitched oval out of a cream piece of paper. Slightly trim around the oval. Apply Jet Black Archival Ink to the Home is the Heart stamp and stamp onto the oval. Ink the edges of the oval using Black Soot Distress Ink and a blending tool with foam.


Wrap green twine around the middle of the tag. 


Use foam squares to adhere the book page piece 1/2" from the right and 1" from the top of the tag. Use foam squares and adhesive to adhere the dotted piece of cardstock 3/4" from the left and 1 1/8" from the top of the tag.


Adhere the sentiment oval to the flourished oval frame. Foam square the flourished oval frame to the middle of the tag.


To finish the tag, add a piece of dark orange ribbon to the top of the tag. Crinkle the ribbon as desired.


Here are a couple of close up's of my Home is the Heart Tag.


Thanks so much for joining me today and taking a look at my project! I hope that I've inspired you to want to recreate my tag at home. 


Quietfire Supplies Used:


Other Supplies Used:

- Tim Holtz for Ranger Ink: Distress Oxide Ink - Faded Jeans & Black Soot, Distress Crayons - Carved Pumpkin & Chipped Sapphire and Blending Tool with Foam
- Ranger Ink: Emboss It Dabber and Jet Black Archival Ink
- Emerald Creek Craft Supplies: Seth Apter Baked Texture Embossing Powder - Deep Sea
- Elizabeth Craft Designs: Stitched Ovals
- Tim Holtz for Stampers Anonymous: Diamond Layering Stencil
- Magenta Nuance: Orange, Olive and Cerulean Blue
- Misc: Book Page, Tags, Green Twine, Dark Orange Crinkle Ribbon and Heat Tool

- Katelyn


Related Posts Plugin for WordPress, Blogger...