Tuesday, October 30, 2018

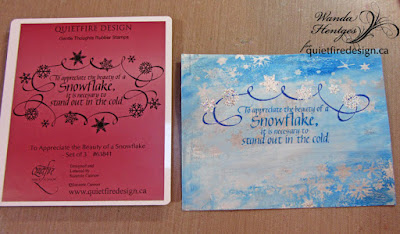
How to Make a Wintry Card with Reduction Stenciling


Hi!!  I really like today's card... and... I'm glad it is not snowing outside!!!  I have, however, been outside on a day when the snow was falling and the temperature was just right to see each snowflake when it landed.  Truly beautiful!!!!

1. Glue Tissue Wrap to cardstock with Collage Medium.  Trim excess from the edges and check to be sure the tissue wrap is adhered all the way to each edge.  Apply a thin layer of Collage Medium over Tissue Wrap.


2.  Paint over the tissue wrap with a mix of Snowflake and Pewter paint allowing it to cover some areas and keeping it thin in other areas to let the print show through.  Go back in with just Pewter on some areas.  Let dry completely.


3.  For this next part you need your paints, the stencil you are using and a baby wipe ready to go.  You don't want the baby wipe too wet.  I used my finger to paint on Blue Oyster and Glass Blue blending in some areas and keeping the center more Blue Oyster with the Glass Blue more around the edges.  While the paint is still wet, set the stencil on and use the baby wipe to remove paint by rubbing it in the open areas of the stencil.  Move the stencil to another area and repeat.  If you want, clean the back of the stencil in between moves which I did when moving the stencil to the center.  Let dry completely.


4.  I did all the stamping using a Stamp Platform.  Stamp quote with Manganese Blue.  I thought it would be fun to pull in some purple so I stamped the flourish with Majestic Violet.  After stamping I didn't like it (so glad I was using the stamp platform), so I stamped it again with Manganese Blue.  This made a deep blue color.  The snowflakes were stamped with VersaMark ink and embossed with Snowflake Tinsel.


5.  Let it Snow was die cut from white cardstock.  I added color by lightly rubbing the ink pad over the die cut.  I rubbed over the die cuts with both Majestic Violet and Manganese Blue so it would match the color of the flourish.


6.  Again I used both colors to rub direct-to-paper around the edges of a white cardstock panel so the next layer would also match.  


7.  I inked the edges of the main panel with Emboss It Dabber and embossed with Snowflake Tinsel.  Attached it to the inked layer.  Wrapped it with silver fiber.  Attached the layers to a folded white card.  Glued on "let it snow".  Die cut the snowflakes from white cardstock and added them to the card with foam tape.


Quietfire Supplies --


Other Supplies --

- PaperArtsy Fresco Finish Paints: Snowflake, Pewter, Blue Oyster, Glass Blue
- Ranger Ink: Snowflake Tinsel Embossing Powder, Emboss It Dabber, Manganese Blue Archival Ink, Majestic Violet Archival Ink
- Tim Holtz for Ranger: Distress Collage Medium Matte
- Kool Tak Clear Foam Adhesive
- Scotch Create Tacky Glue
- Tim Holtz Stamping Platform
- Tim Holtz Idea-ology Tissue Wrap - Postale
- Misc: White Cardstock, Heat Tool, Silver Fiber, Baby Wipe


Monday, October 29, 2018

"There are always flowers"

Hello Crafty Friends.

You know when you have a rough day and nothing seems to be going well?  This rough day may spread to two days, a week, whatever.  Your car may break down one day, the next day your washer breaks and spills out an entire load of water on your floor and this pattern may continue to the next day.  (That happened to me...what a week!)   It may wear on you and possibly put you in a not-so-happy state of mind.  It happens to everyone.  Gasp!  Spoiler alert:  Life isn't always sunshine and lollipops.  Next time this happens to a friend or loved one- or even you- head into the craft room, pull out the Floral Banner & Quote set, and make a card.  This thoughtfulness can mean so much to the person having a bad time.  Imagine if you received a card made using this stamp set.  Wouldn't that make you feel a little better?  Perhaps this beautiful stamp can bring sunshine to an otherwise gloomy day.
Floral Banner & Quote, Set of 2 Stamps - Mounted
For my card I made sure that the quote was the focal point of the front.  I chose darker patterned papers and card stock to ensure that the quote popped.
The gorgeous calligraphy quote is so very lovely and inspiring.  It is a wonderful stamp set to have on hand.  And don't forget to make a card or little sign for you, too.  Your future self may thank you.
Thank you for stopping by!
Have a happy, crafty day.
Big Hugs,
Kathy Jo

Thursday, October 25, 2018

Unforgettable Tulips Scrapbook Layout

Hello, Connie Nichol here today with a scrapbook layout featuring a number of Quietfire Design dies.


I started out gazing at Rosebud Wreath and Elements cutting die set and thinking to myself, it would be very cool to use the small wreath die as a photo frame.  Then, I started thinking about the best kind of photographs to use and the fact that the rosebuds remind me of tulips, and well, one thing led to another.....


This is such a cool die set - you can use some or all of the elements to create cards or to accent scrapbook pages.  It's very versatile.  The wreath fits perfectly on a 4x6 photo.

 
I cut a separate wreath out of green cardstock to frame the die cut photo, but look how pretty the photo wreath is.  I'm saving it for a future card.


I used Unforgettable as a page title and added a couple of flourished butterflies.  It's a very simple layout but I think the die cut photos add a unique element to the page.  And if you ever get a chance to go to the tulip festival in the Skagit Valley in upper Washington State, it's simply beautiful.  Thanks for stopping by, Connie


Tuesday, October 23, 2018

Autumn card with Alcohol Inks and Clear embossing

 I'm still playing with alcohol inks and I thought they would be a great way  to make a background.  But I tried something new by embossing it with the leaves from Leaves stamp set.  I then attempted to paint the leaves a slightly darker color than the background.


I then added a tag with a quote from the Autumn Collection and some hemp twine for texture.


I did notice that you have to be more careful embossing on Yupo - it'll warp like heated plastic!  I'd still like to figure out a way to keep the embossed lines nice and white too.  Any suggestions?

Autumn Collection, Set of 4 Stamps - Mounted


Leaves, Set of 6 - Mounted


Monday, October 22, 2018

Nature gives to every Time Card


Hey Quietfire Fans! I'm thrilled to be back on the blog today sharing with you my Nature gives to every Time card which features a variety of Quietfire Stamps and A Way With Words Dies. You'll want to grab a cup of your favourite Fall beverage and learn how to recreate my card at home.

To start, cut a piece of watercolour cardstock that measures 4" x 5 1/4". Grab a stamp block that is about the same size as the piece of cardstock. Rub Walnut Stain, Fossilized Amber and Spiced Marmalade Distress Oxide Ink onto the block. Spritz the block with water. Stamp the side of the stamp block that is inked onto the piece of watercolour cardstock. Dry the piece of cardstock with a heat tool.


Apply Potting Soil Archival Ink to the Crackle Background stamp and stamp randomly on the piece of cardstock. Reapply ink to the stamp as needed.


Apply Emboss It Ink to the Grid Background and stamp onto the piece of cardstock. Sprinkle Clear Matte Embossing Powder overtop of the grid background. Tap off the excess powder and emboss with a heat tool.


Cut the cardstock piece to 3 5/8" x 4 3/8". Distress the edges of the cardstock piece. Ink the edges of the cardstock piece using Walnut Stain Distress Oxide Ink and a blending tool with foam.


Die cut a 2 3/4" Stitched Circle out of white cardstock. Grab a smaller stamp block and rub Walnut Stain, Fossilized Amber and Spiced Marmalade onto the block. Spritz the block with water. Stamp the side of the stamp block that is inked onto the circle. Dry the circle with a heat tool.


Apply Potting Soil Archival Ink to the Nature gives to every Time stamp and stamp in the middle of the circle. Distress the edges if the circle. Ink the edges of the circle using Ground Espresso Distress Oxide Ink and a blending tool with foam.


Die cut two wreaths from white cardstock. Using a blending tool with foam, blend Forest Moss Distress Ink over the entire surface of both wreaths.


Apply Fossilized Amber Distress Oxide Ink to the wheat stamp and stamp onto a piece of white cardstock. Reapply the Fossilized Amber Distress Oxide Ink to the wheat stamp and stamp onto the same piece of white cardstock. Fussy cut the two wheat images out. Ink the edges of the wheat pieces using Ground Espresso Distress Oxide Ink and a blending tool with foam.


Foam square the circle to the middle of the cardstock piece. Adhere one wreath around the stitched circle. Adhere the other wreath on top of the first wreath, make sure the second wreath is slightly off set to create the leaves.


Adhere the wheat bunches at the bottom of the circle.


To finish the card, cut a cardbase that measures 3 7/8" x 9 1/2", score at 4 1/2". Adhere the cardfront to the cardbase.


Here are a few close up's of my Nature gives to every Time Card.


Thanks so much for joining me today and taking a look at my project! I hope that I've inspired you to want to recreate my card at home. 


Quietfire Supplies Used:


Other Supplies Used:

- Tim Holtz for Ranger Ink: Distress Ink - Forest Moss, Distress Oxide Ink - Walnut Stain, Fossilized Amber & Spiced Marmalade, Distress Spritzer and Blending Tool with Foam
- Ranger Ink: Emboss It Dabber and Potting Soil Archival Ink
- Emerald Creek Craft Supplies: Clear Matte Embossing Powder 
- Elizabeth Craft Designs: Stitched Circles
- Misc: Watercolour Cardstock, White Cardstock and Heat Tool

- Katelyn


Wednesday, October 17, 2018

Video Tutorial- Watercolor Poinsettia background

Hello Crafty Friends!

Don't you just love trying out new techniques?  Like creating a beautiful, yet easy to make, watercolor poinsettia background?  Or learning some new tricks to mount vellum- without seeing the adhesive through the vellum?  Or a simple way to adhere paper in a specific location with less fuss or messing up?  Well, perhaps today's tutorial video will provide those tips and tricks for you!  And, you get to create an oh-so-lovely Merry Christmas card.

This card is created using the newly released Merry Christmas die and Poinsettia stamp...a perfect festive duo!

Grab a cup of coffee or tea and enjoy!  If you wish to see this on YouTube, click HERE!


Feel free to ask any questions in the comment section below!  Or to share a link to your Quietfire Merry Christmas card.  We would love to see it!

Have a happy, crafty day!
Big Hugs,
Kathy Jo

Monday, October 15, 2018

How to use a Glue Stick with Leafing

Hello!!!  Happy Monday and Happy Anniversary for the hubs and I.  We have now been married for 35 years.  Wow!!!  
Autumn has arrived and the leaves are looking beautiful, however yesterday felt much more like winter outside and it even spit a bit of snow.  Thankfully the rest of the week will be more like fall than winter.


 I've started today's project with a tag from my stash that was already colored.  To tell you about the background already on it would be a total guess.  I'm thinking it's Distress Spray Stain along with Mica Spray but it's possible I'd have that wrong.  Either way I thought it was a beautiful start to an Autumn tag.


I've used glue stick with foil or leafing before but I'd never done it with a stencil/. I was thinking that it should work and had to play.  The stencil is the Leaf and Snowflake Spray (QF / ECD).  I placed it on my tag and dabbed over it with the glue stick being careful not to get globs in the design.  I then used my finger to rub the glue around pulling what was on the stencil into the cut outs, hoping to get good coverage. 


I was going to use my container of left over leafing but the colors were so similar to the tag that I chose to go with some plain gold.  I pressed it onto the glue and then rubbed over the tag to remove the excess leafing putting the pieces into my container.


As you can see, I didn't manage to get glue everywhere in all the areas.  This would look great if you were just going for the suggestion of falling leaves and I'm thinking an art journal page is in my future.  However, I wanted the whole design on my tag.  I almost started over with a whole new idea but then decided I would continue and take you along on the journey.  So what to do....


I decided on Embossing Powder on top of Embossing Paste.  Before beginning I used an anti-static bag over the tag to be sure the powder only stuck to the paste.  The stencil was placed back on lining it up with what was already leafed, Texture Paste Transparent Matte was applied with a pallet knife, the stencil removed, Queen's Gold Embossing Powder poured on the wet paste, and dump off the extra.  At this point you can allow the paste to dry with the powder on it and once the paste is completely dry then heat to melt the embossing powder.  This will create a smoother look.  If you like a more textured look then you can heat the powder to melt right away which will cause the paste to bubble.  Be sure to have adequate ventilation when heating acrylic mediums.  


Yes, I chose to heat right away and get lots of texture in my leaves.


Back to the glue stick.  I rubbed glue stick onto the edges of the tag, pressed all the edges into the little pieces in my container of leafing, and then rubbed over the edges to burnish the leafing and remove all the excess. 


The quote is from the new Autumn Collection of stamps.  It is stamped with Versamark Ink and embossed with Weathered White Powder.  


Some twine and a metal leaf to finish it.  The leaf was gold and color added with Alcohol Inks.


Related Posts Plugin for WordPress, Blogger...