Thursday, November 28, 2019

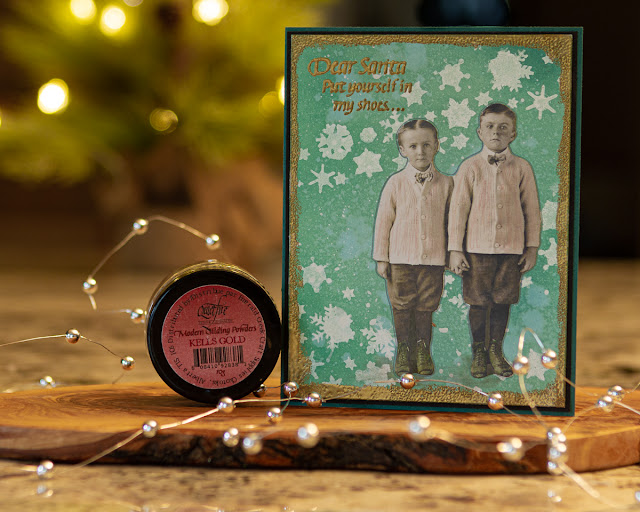
Dear Santa...Let Your Heart be the Light!

let-your-heart-be-the-light-kells-gold-distress-oxide-kim-gowdy

Hello and Happy Thursday, November 28th! How did we get to the end of the month already? With less than a month before Christmas, there is still lots of card making and gift buying to do (at least for me!). I have been so inspired by all the wonderful cards shared on the Quietfire blogs this past month and thought I’d add one more to the mix.

My card quickly came together as soon as I saw this wonderful quote from the ‘Let Your Heart be Light’ collection of stamps! The two little boys from Tim Holtz’s Idea-ology Paper Dolls play so perfectly with the sentiment!

stenicl-snowflakes-leaves-let-your-heart-be-the-light-kells-gold-distress-oxide-kim-gowdy


I used the Leaf and Snowflakes Spray stencil with some white acrylic paint on a piece of Creative Scrapbooker’s Superstock. Using the three colours of green Distress Oxide inks, I blended the colours over top of the snowflakes and spritzed with water for even more texture. I buffed the snowflakes to remove the ink and make them pop.

let-your-heart-be-the-light-kells-gold-distress-oxide-kim-gowdy


My sentiment was stamped and embossed with the Kells Gold Modern Gilding Powder. I love the shine and texture it provides. I also edged my cardstock border very randomly and embossed with the same Kells Gold Modern Gilding Powder, it’s the perfect way to bring your focus into the card!

let-your-heart-be-the-light-kells-gold-distress-oxide-kim-gowdy


Be sure to add this fun stencil and stamp set to your Christmas card making kit. The sentiments are perfect for every card you send! Of course no craft room would be complete without a few (or ALL!) jars of Modern Gilding Powders! Happy Card making! 

~kim

let-your-heart-be-the-light-kells-gold-distress-oxide-kim-gowdy

Supply List:

Let Your Heart be Light Collection - Clear Stamps

Creative Scrapbooker Superstock
Ranger Distress Oxide Inks
Scrapbook Adhesives by 3L

Tuesday, November 26, 2019

Glittered and Gilded Flourished Christmas Mini 2 Card

Hello, Connie Nichol here today with a Christmas card featuring the Flourished Christmas Minis 2 die set.  These mini's fit perfectly into the Christmas ornament die previously released by Quietfire Design.


This card is very simple to make - simply cut a card sized rectangle of a two sided adhesive sheet, then peel off one side and firmly place the die cut ornament and star onto the sticky surface.  Carefully sprinkle extra fine glitter where desired and burnish with your finger (rub firmly into the adhesive sheet).  Then, sprinkle Quietfire Design gilding powder in other areas and heat to melt.   You can use all glitter, or all gilding powder but I like the textural contrast when I use both.  Mount the glittered adhesive sheet to a cardstock base and add a stamped sentiment.  Easy, huh?  Be sure to try other combinations of glitter and gilding powders and see which you like best.  Thanks for stopping by!


Quietfire Design Supplies Used:  Dragon Berry gilding powder, Flourished Christmas Mini 2 dies, Love, Joy, Peace Christmas Ornament die, Let your heart be light stamp set

Other Supplies:  Elizabeth Craft Designs adhesive sheets and glitter, white cardstock and mirrored magenta cardstock


Monday, November 25, 2019

Kindness Wreath Wine Tag Tutorial - Margie Higuchi, Guest Designer


Hey everyone! I am excited to be back as a guest designer for Quietfire Design to dress up a bottle of wine with a sparkly tag for the holiday season! My Kindness Wreath Wine Tag highlights the Kindnessis Like Snow Stamp Set and Modern GildingPowder in Burnished Silver.

Wine Tag Basics

With a 4 x 10-inch strip of white cardstock, score at 3.5-inches on the long side. Either punch or die-cut a 2 3/8-inch circle on the short side of the score line.

On the long side of the score line, ink the four edges with VersaMarkInk Pad. Pour Modern GildingPowder in Burnished Silver over the inked areas, tap off excess and melt with a heating tool for a beautiful distressed edge. Set aside.


Cut a 3.5 x 6 1/8-inch rectangle panel from red cardstock. Ink the four edges with VersaMarkInk Pad. Pour Modern GildingPowder in Burnished Silver over the inked areas, tap off excess and melt with a heating tool. Set aside.


A Unique Wreath
Cut a 2.75-inch ring (with a 0.25-inch width) out of white cardstock. Cut the black backing of the Creative Photo Corner Silver. Start with two photo corners by tucking one corner into the other to create a chain of photo corners and work around the ring to create your wreath.


Using the wreath as a guide, stamp the snow design from the Kindnessis Like Snow Stamp Set using the VersaMark Ink Pad and Modern Gilding Powder in Burnished Silver. Tap off excess and melt with a heating tool.


Secure the wreath with 3D Foam Circles over the stamped image.


Add the Sentiment
Stamp the sentiment from the Kindness is Like Snow Stamp Set using the VersaMark Ink Pad and Modern Gilding Powder in Burnished Silver onto a strip of 1 5/8 x 4.5-inch white vellum. Tap off excess and melt with a heating tool.


Fold the white vellum ends over the red panel edges and secure it with Adhesive Lines. Add Crafty Foam Tape Black on the back of the red panel and adhere to the wine tag base.


It’s ready for the holiday festivities to begin! Take a second look.


What kind of hostess gifts are you bringing? HELP! I need ideas! LOL! Let me know in the comments below.

Thanks for stopping by!

Creative Time: 45 minutes
Skill Level: Intermediate

Materials Needed:
Quietfire Design

Other
Adhesives: Scrapbook Adhesives by 3L® (Creative Photo Corners Silver, 3D Foam Circles Black Mix, Adhesive Lines, and Crafty Foam Tape Black); Etched Dies: Spellbinders Paper Arts (Standard Circles LG + SM); Red and White Cardstock; White Vellum; Heating Tool


Save to Pinterest!


Thursday, November 21, 2019

There is always something to be thankful for

I can't let Thanksgiving pass without using this particular stamp from the Quietfire Design Give Thanks set.  It's one of my favorites and perfect for any time of the year really, but an especially appropriate now.


I recently received the Cherry Blosson Branch and Symbol Background dies by Elizabeth Craft Design so I had to work them into the card somehow.  After die cutting the Cherry Blossom die out of white card stock and the Symbol out of black card stock, I colored the flowers and leaves with Copic Markers.  I used a colored pencil to add some lines to the flowers for details.  The Symbol dies was trimmed so that the circle became 4 corner pieces as shown above.


I stamped the "There is always something to be thankful for" with black pigment ink and then added the Modern Gilding powder Gothic black on top of it.  Using black ink and black powder makes it a little harder to see where you've melted the powder but I love how crisp and defined it makes the image.

I then added some Nuvo drops to the center of the flowers to finish the card.

Give Thanks, Set of 2 Stamps - Mounted


Wednesday, November 20, 2019

Flourished Deer Puttin' On the Glitz! Ornament


Today is Group Post time over at Elizabeth Craft Designs and the theme is.... tada!.... Christmas!  The Quietfire Team is definitely going with home decor!

It's Suzanne here today and this is my project!  It was time to turn the Flourished Deer into a hanging 2-sided decoration.  Here is how I did it - and you can do it, too!  Ladies and Gentlemen, get out your glitter!


Supplies:
A Way With Words Flourished Deer  QFD | ECD
Silk Microfine Glitter
  • Cool Diamond  ECD
  • Teal Blue  ECD
  • Bright Cranberry  ECD
Clear Double Sided Adhesive Sheets  ECD
Tombow Mono Multi Glue
Gold cardstock

Instructions:

Cut two pieces of cardstock large enough for the Flourished Deer die.  Apply Double Sided Adhesive to each piece.


Die cut the one deer with the adhesive on the front and one with the adhesive on the back. 

Apply two different colours of Silk Microfine Glitter to each one.  I used Cool Diamond for one side and Teal Blue for the other.


Use your finger to firmly (but carefully!) polish the glitter to bring out the shine! It makes a huge difference, so don't miss out on this step!!


Use glue on the back of one deer in quite a few places then put the deer back to back, making sure everything aligns.  Allow the glue to set.

Glitter the deers' collars with Bright Cranberry and die cut the bells from gold cardstock.  Attach with glue to each side of the deer.


Then simply add a string or ribbon through the flourished antlers as shown.


Just hang one deer or a whole herd!  Since they're double-sided, they look great from all angles!


Just ask if you have any questions. Thanks for having a look!
Suzanne

Quietfire Quick Clips Calligraphic Snowflake - Tealight


Hello crafty friends!

I made this tealight to decorate my fireplace.

Materials used:
 AWWW Flourished Christmas Minis 2 
QF | ECD


 and self-adhesive golden wrapping paper.


Happy crafting!
Kora


Monday, November 18, 2019

May Peace be Your Gift Gift Bag


Hey Quietfire Fans! With November here and Christmas right around the corner, I decided I would share with you a fun gift bag perfect to put a little something in to give to a special someone in your life. By combining a variety of stamps as well as dies from A Way With Words, they were the perfect for my gift bag. You'll want to grab a cup of your favourite Christmas beverage and learn how to recreate my gift bag at home.

To start, you'll need a muslin bag. Apply Fired Brick Distress Ink to the Merry Christmas Background and stamp randomly on the bag. Reapply ink to the stamp as needed. Apply Forest Moss Distress Ink to the Grid Background and stamp randomly on the bag. Reapply ink to the stamp as desired.


Die cut the Love, Joy & Peace Christmas Ornament out of White Soft Finish Cardstock. Apply Emboss It Ink to the ornament. Sprinkle Acanthus Teal Modern Gilding Powder over the entire ornament. Tap off the excess powder and emboss with a heat tool. Apply Emboss It Ink to the embossed ornament. Sprinkle Acanthus Teal Modern Gilding Powder over the entire ornament. Tap off the excess powder and emboss with a heat tool. 


From the Flourished Christmas Minis 2, die cut the snowflake twice out of White Soft Finish Cardstock.


Die cut a 2 1/4" Stitched Circle out of White Soft Finish Cardstock. Apply Emboss It Ink to the May Peace be your Gift stamp and stamp in the middle of the circle. Sprinkle Kells Gold Modern Gilding Powder over the sentiment. Tap off the excess powder and emboss with a heat tool. Apply Forest Moss Distress Ink to the Grid Background stamp, stamp off on a piece of paper and then stamp on the circle. Repeat the previous step until the circle is covered with a grid pattern. Ink the edges of the circle using Walnut Stain Distress Ink and a blending tool with foam.


From the Peace on Earth die, die cut the stars twice out of White Soft Finish Cardstock. Apply Emboss It Ink to seven of the stars. Sprinkle Kells Gold Modern Gilding Powder over each star. Tap off the excess powder and emboss with a heat tool. Apply Emboss It Ink to seven embossed stars. Sprinkle Kells Gold Modern Gilding Powder over each star. Tap off the excess powder and emboss with a heat tool. 


Adhere one snowflake to the top right side of the bag. Adhere the other snowflake to the left middle of the bag.


Adhere the stitched circle to the flourished Christmas Ornament. Use foam squares to adhere the flourished Christmas ornament to the middle of the bag,  slightly overtop of the snowflakes.


To finish embellishing your gift bag, use adhesive and foam squares to adhere the stars as desired around the flourished Christmas ornament.


Here are a few closeup photos of the finished gift bag.


Here is the finished May Peace be Your Gift Gift Bag.


Quietfire Design Supplies Used:


Other Supplies Used:

- Elizabeth Craft Designs: Stitched Circles and White Soft Finish Cardstock
- Tim Holtz for Ranger Ink: Distress Ink - Fired Brick, Forest Moss & Walnut Stain and Blending Tool with Foam
- Ranger Ink: Emboss It Ink
- Misc: Muslin Bag

Thanks so much for joining me today and I hope that I have inspired you to recreate your own version of my May Peace be Your Gift Gift Bag.

- Katelyn


Related Posts Plugin for WordPress, Blogger...