Friday, June 13, 2014

Live in the Moment... Fancy Fold Card


Hello All!  Kathy Jo here to share one of my favorite fancy fold card styles.  The card is using Quietfire's Live in the Moment stamp and Kaisercraft's Bubblegum Hills paper, also available at Quietfire.  I do not remember the name of this folded card but I do remember how to make it!  So let's get started...


First, you will need four round die cuts.  For my card I used Couture Creations' Blossom Yarn doily die.  Other good dies to use are Spellbinders' Lacey Circles, Beaded Circles and Scalloped Circles (to name a few).
You will need to score them in half- make sure your "pretty side" is down.  After scoring, fold them to 90º.  Keep that scoreboard out because you will need to it join the folded doilies together.
Using the scoreboard, place the first folded doily along the top edge of your scoreboard.  Place a few mini glue dots on the underside of your second doily just in the areas where the two doilies will meet. Join it as shown below.  Make sure that the two doilies are 90º to each other or you will not have a perfectly square card.
Take the third doily and add a few more glue dots.  Line it up again at 90º to another doily and adhere.
The last doily will need to have glue dots placed on the bottom of the doily and on the top.  You are taking this last doily and placing it on top of one doily and on the bottom of the other adjoining doily.  You can see the overlaps in the photo below.
Take your pretty patterned Bubblegum Hills paper (I chose the butterflies!) and use a circle die to cut out the paper.  (I also used Tim Holtz Distress ink in Walnut Stain along the edge.)  Adhere to the inside of your folded card.
Next, cut 4 small circles from the matching blue paper in the Bubblegum Hills pad and apply more Walnut stain to the edges.  Score the blue die cut circles in half and apply to the outside of your card.
To keep the card folded, you an either make a band, use magnets or tie it.  This card is using white seam binding to tie the card.  To get the correct length, wrap the seam binding around the card and tie it on the side.  Cut with a few inches extra length on either side of the bow.  When you are happy with the bow, place a piece of tape on the back of the card over the seam binding...
...and cover that with a square of more of the butterfly paper (don't forget to ensure that your patterned paper inside and out are in the same direction).  The ribbon is super secured to the back!
Next, adhere the ribbon to the right circle half on the front of the card.
Stamp Live in the Moment in Walnut Stain on white paper and then die cut using a die from Spellbinders' Orchard Harvest Tags and Accents.  The same die is used to cut another piece of the butterfly paper.  The stamped die cut is then adhered to the front of the card and then the butterfly die cut is adhered to the inside.  (The double die cuts are needed to ensure that your sentiment on top lays flat to the folded card.)
Tie the bow and VOILA!  Your super special four fold card is complete.  Here is a view of the card completely open.  Isn't it lovely?  
Here is a closeup of the front...I love this stamp!  So pretty!
Thanks for making it to the end!  Hope it wasn't too long of a tutorial!

Have a good weekend!
Hugs, Kathy Jo

Wednesday, June 11, 2014

DIY Background - Let the beauty....Note Card

Hello and welcome to Quietfire Creations!

Jutta here today with the pleasure of sharing a Note Card project and DIY Background technique with you. 

One of the latest greatest craft tools for the multi media artist to come along is the Gelli plate. 
I confess that I love all those gorgeous Gelli plate backgrounds I keep seeing around the Web and especially the ones received as a gift from my very talented friend Holly! :)

Well not to be out done I had to have a go at Mono printing layers too. Only one little problem stood in my way, not owning a Gelli plate. 

This card has a background that I'm calling the Faux Jelly Printing technique and I think it's the perfect base for the beautiful quote stamp -Let the beauty of what you love from Quietfire Design .


To make my background I used the glass in an old photo frame as my Gelli plate substitute.

Working lightest to darkest, adding one colour of ink at a time with a brayer to the glass. Then quickly laying cardstock into the still wet ink to create a mono print. Clean the glass and repeat with next colour of ink.

I used a border punch and acetate to make my own stencil. Added stencil to glass and inked with brayer, lay cardstock over to make impression then quickly flip stencil over and onto the cardstock and make another impression with inked side of stencil. Add a few blotches and spritzes of ink with a mini mister to glass plate and again press cardstock to lift ink off of glass.

When I was happy with my design I cut it to 4"x 5-1/4" and stamped  the flower before running the green ink all around edge of panel.

Next I stamped the quote onto a piece of vellum and cut out leaving it an extra long strip. I crimped the one side only to just before the quote adding texture.  Folding vellum around panel I attached it to back with tape.

To complete card I triple knotted a piece of ribbon and tape ends to the back side of panel. Attach panel to a 4-1/4"x 5-1/2" white cardstock base. Using purple glitter pen traced around panel and drew a line just under vellum panel.


Supplies
Stamps - Quietfire Design,  Let the beauty of what you love and Dark Room Door, Carved flowers
Paper -White Cardstock and Vellum
Ink - Ranger Archival ( Jet black )  and Distress Ink ( Shabby shutters, Tumbled glass, Seedless preserves)
Misc. - Ribbon and Purple glitter pen

I hope that you'll be inspired to ink up your own background too. I'm happy to answer any questions.
Have a crafty day!
Jutta


Tuesday, June 10, 2014

Tuesday Winsday - Butterflies/Dragonflies


Teresa Horner created these gorgeous tags yesterday so today we're giving away our Butterflies/Dragonflies stamp set.  (I know, we've given this away before but it's such a versatile set - and who doesn't like butterflies?!)

Follow the Rafflecopter instructions.  Each time you accomplish a "task", you are entered again.  So when you do everything, you can add up a bunch of opportunities to win! You may already follow us on Twitter and Facebook and subscribe to our newsletter, so that's easy points! This week the sharing task is worth 2 entries! So make sure you tell your friends.
If you don't use Facebook, you can use your email address to enter - we don't share it, but it sure makes it a lot easier to contact our winners!
Good luck!
a Rafflecopter giveaway

Monday, June 9, 2014

Dragonflies and Butterfly Tags

Hi Everyone it's Teresa here on this wonderful Monday with
an easy and fun tag project for you.  I think i always need
tags and never have them ready so i thought that creating
some with the beautiful Butterflies/ Dragonflies stamp set
would be really fun.  And since i need Birthday the most the
brand new cling set Happy Birthday plain and simple fit perfect too.


To create my tags i used papers from the new Prima Seaside
paper pad and cut kraft tags from Spellbinders Labels 36
in two sizes.  I stamped on the printed ones with Ranger 
Archival ink in coffee and embossed with clear.  For the aqua
butterflies i used Versamark ink and embossed with clear to 
make them pop more.  After they were dry i added a little
vintage photo ink in the tops and let that dry too.


For the ribbons i tied sheer aqua ribbon from May Arts
and added some thin twine around the tops.  These would be perfect
to use for those kraft bags you see in the stores and you could
even stamp more butterflies on the bags to match them.


Hope you like my projects and i hope you have a wonderful 
week and maybe get a few friends together and craft!

Friday, June 6, 2014

CAS - Dahlia - Thank You card

Yogi here today with a CAS card.

Side folded the white cardstock to make a 4.25"w x 5.5"h card.

Die cut the Dahlia (Spellbinder's ""Dahlia") from white cardstock to use as a stencil and a mask.

Lay the die cut drop out piece on my card where I want the design to land. Taped it at one corner with removable tape. Lay the stencil down positioning it to fit around the Dahlia, taped the stencil down with removable tape, and then removed the drop out piece.

Stamped the two line "Thank You" stamp with Versafine Black Onyx, stamping off the edges, removed stencil and clear embossed. Stamped the butterfly with Versafine "Satin Red" and touching here and there with the black pad, clear embossed.

Placed stencil back in place and sponged Distress "Mustard Seed" heavily around edges and lighter toward the center, then "Worn Lipstick" lightly around the edges. Removed stencil.

Die cut a Cheery Lynn Designs "Fanciful Flourish" from white cardstock to use as a stencil. Placed my Dahlia drop out piece in place with removable tape, then positioned the Flourish sprig taping down with removable tape. Sponging with "Shabby Shutters" & the Lipstick.

Technique: ink up the sponge and press down firmly, lightly wiggling the sponge in place to transfer the ink. If you try to sponge in a normal circular motion, the stencil will lift and get destroyed. Continue till the area is colored, then go back in and touch here and there with a red sponge. Move the stencil to another area to continue the design.

Stamp the 1 line "Thank You" with the black.

Place the die over the design, tape down with removable tap and emboss using the tan mat to get a nice Dahlia impression.

Enjoy and have fun creating.

Wednesday, June 4, 2014

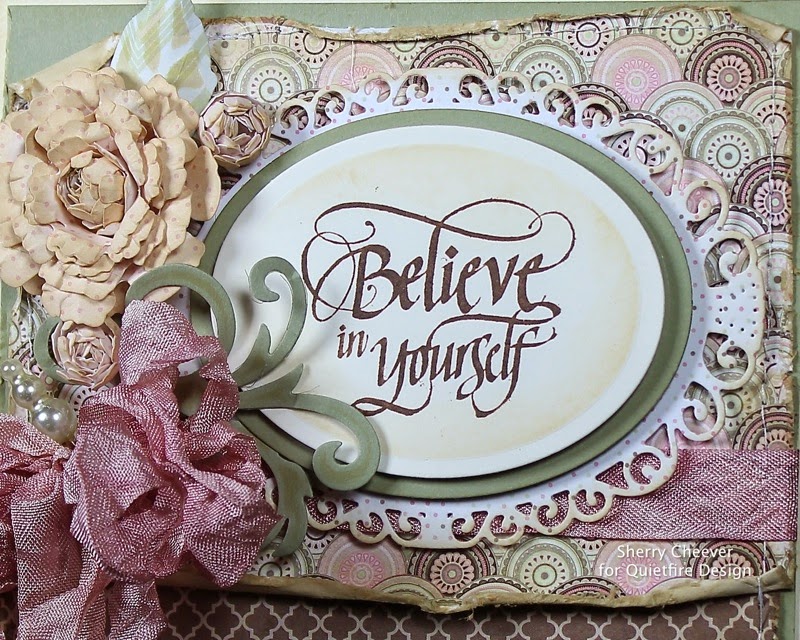
Believe In Yourself!

Good morning!  Sherry here today and I have a 5.5” square card using If You Don’t Believe in Miracles with you.

BelieveInYourself66

BoBunny Primrose was used for the background papers and florals.  The edges of the background were distressed, sponged with Antique Linen Distress Ink and then sewn to a green card stock layer.  

BelieveInYourselfCloseUp66

The sentiment was stamped on cream paper with Ranger Archival Potting Soil.  Spellbinders Bitty Blossoms were used for the flowers and Elegant Ovals was used for the background of the sentiment.

BelieveInYourselfRight66

Thanks for stopping by and joining me today!

SHERRY SIGNATURE


Project Supplies:


Tuesday, June 3, 2014

Tuesday Winsday - I Wouldn't Have Missed


This week our challenge involves sharing!  Leave a comment on this post and then go share this giveaway with your friends and invite them to come visit our blog and enter our giveaway.

This week we're giving away "I Wouldn't Have Missed Being Your Friend" as shown is this beautiful card made recently by Sherry Cheever.

Follow our Rafflecopter directions.  Good luck!


a Rafflecopter giveaway

Monday, June 2, 2014

SERENDIPITY TECHNIQUE ~ HAPPY BIRTHDAY ~ CARDS

Happy June Everyone! Holly here today, and I have an 'oldie but a goodie' technique to share with you. It uses up scraps, can be messy, and always turns out great. Let's get to it.

Begin with scraps- gather up papers that you might otherwise toss. This is recycling time. I also chose a stamp-off sheet for my base paper. It's copy paper, light enough to not add more bulk, and strong enough to support the glued on papers.

Time to glue on the papers. Layer, tear, punch, then glue them down, getting all the edges well.

  
 Time to stamp a little. I chose to mix a little IRIDESCENT EMBOSSING POWDER with the QUEEN'S GOLD EMBOSSING POWDER. Then, I stamped a FLOURISHES 1 stamp randomly around, using VERSAMARK INK. The embossing powder mixture gives a bit of a distressed look which goes well with the torn papers.

The sheet has been cut up, and can be used as is, or you can add a little more embossing if you have bare spots, and along the edges here and there. You can drag a gold marker along the edges of other pieces. You can also find other additions to this technique online, simply search ~ serendipity technique.

I added more heat embossing to these pieces, added a matching piece of embossed cardstock, and stamped HAPPY BIRTHDAY using Jet Black ARCHIVAL INK. I found the butterfly brad in my stash, and popped up the square it's on with foam tape. Before adhering any papers, purple ink was spritzed on the background.

The pieces on this card were edged with a gold marker. Before attaching them to the card base, I stamped HAPPY BIRTHDAY  to mimic the angle of the top strip, using Versamark, and embossed with Queen's Gold embossing powder, straight up, nothing mixed in. I also sprinkled some of  the embossing powder in a loose arc, and heat it from underneath, finishing with heat on top, once it melts.The strips and small squares were glued on, trimmed and touched up with the gold marker where needed.

I added a bit more of the mixed embossing powder to these squares, then used a corner rounder punch on two opposite corners on each piece. I sponged DISTRESS INK around each piece and the edges of the panel they are attached to. Stamped Happy Birthday with the same distress ink, added a bit of bling, purposely out of line. This adds a little movement and playfulness.

 I love this technique- it always turns out great, but can be messy. My fingers get sticky because I take the glue stick over the edges of the papers to make sure they really stay stuck down. I find a wet washcloth close at hand, really helps. Stick a few pieces down, wipe my fingers ~~ repeat.
Also, a little excess glue here and there creates a few more places for the embossing powder to stick.

I hope you like this project share today, but even more, I hope you get out your scraps and try it!
The great stamp set~ HAPPY BIRTHDAY PLAIN & SIMPLE is the perfect mix of styles for the different looks of the cards. You'll love it!

                            Have a wonderfully creative day, and thank you for stopping by.

Friday, May 30, 2014

With Heart Anything is Possible -Note Card


Hello and welcome to Quietfire Creations Blog!
Jutta here and today I have a Note Card project to share with you. 

On this Note Card I've used the Gentle Thoughts Calligraphic Quote Stamp
stamp set both from Quietfire Design. 

I added the cord as I wanted a knot to symbolize remember and
it also holds a paper insert inside. 


To make my card I started by stamping the Hydrangea in LT BL Dye ink on a 4”x5-1/4” WT cardstock panel. Coloured the flower with markers. Sponged LT BL Dye ink randomly to the back ground and all around edge of panel.
Using YL glitter pen I squiggled a line all around the panel then again with a LT BL fine tip marker. Added some definition to flower with a BLK fine tip marker.
Stamped the sentiment and the Dragonfly in Jet Black Archival ink. Added a few dabs of YL glitter pen to flower.
Adhered the panel to the card base before adding embellishments to complete.

Materials:
Stamps –Quietfire Design, With Heart Anything is Possible and Sm Dragonfly from the Butterflies / Dragonflies set. -Hero Arts, Hydrangea.
Cardstock –Stampin Up! (Black), Copic Stamp and Illustration paper.
Ink –Ranger Archival Ink (Jet Black), SU! (Coastal Cabana)
Markers -Bic Markit (Variety), Sharpie Fine (Black) and Glitter paint (Yellow), SU! SW (Coastal Cabana)  
Embellishments –SU! Butcher cord (Coastal Cabana), Metal pearls (gift)


Thanks for your visit and I wish you all a crafty day!
Jutta

Thursday, May 29, 2014

Mom Floral Ornament shaped card

Hello All!  Kathy Jo here to share a shaped card using the beautiful Mom Floral Ornament stamp from the new stamp set Keep Calm & Call Mom.
Quietfire, Mom Floral Ornament, Keep Calm & Call Mom, Spellbinders, Kathy Jo Wood, shaped card
The Mom Floral Ornament stamp was heat embossed on ivory paper.  The rose was colored using Tim Holtz Distress Stains in Spun Sugar, Tattered Rose, Worn Lipstick and Barn Door.  The petals were colored using Tim Holtz Stain in Crushed Olive and Peeled Paint.  Distress inks in Antique Linen, Tea Dye, Vintage Photo and Walnut Stain were applied to the paper as shown.  The image was die cut using Spellbinders Matting Basics and then the cutout had gold glimmer mist applied.  Clear Crackle Paint was applied to the rose and larger petals.
Closeup of stamped image and "crackle rose and leaves"
The ivory card base was die cut from the second largest die in the Spellbinders 5x7 Elegant Labels set.  Before removing the die cut from the die, Spun Sugar was applied to the embossed areas.  Paper die cut from Matting Basics was stained using Peeled Paint.  Seam binding ribbon was dyed using the same Distress Stains used on the rose.  Bling was applied around the Mom die cut and also to the crinkled double bow. 

Isn't the stamp beautiful?  I like the stamp not only because it is beautiful and fun to color, but also because it is a great "anytime" stamp.  I may save this card to send to my mom just to let her know I am thinking of her.  I think the card will brighten her day!  The other two stamps in the set are just as sweet.  Here are the stamps included in the set:

Keep Calm & Call Mom - Set of 3 Stamps
Lovely set...and it is on sale right now for 20% off!  Click here to see all of the stamps that are on sale at 20% off.

Thanks so much for stopping by!  Have a wonderful day!
Hugs,
Kathy Jo
Related Posts Plugin for WordPress, Blogger...