Showing posts with label Quietfire Design Team. Show all posts

Thursday, August 21, 2014

Expect the Unexpected!

I love the Quietfire Design Team!  They never fail to impress me, not only with the variety of their designs but sometimes by using Quietfire stamps in ways I never would have imagined.....

Flourishing Inside - Hearts

Such as using the Flourishing Inside - Hearts as flowers and leaves!  Wanda started this back in 2010 with a whole series which includes a box top and a series of cards.


Artwork by Wanda Hentges. See the details here.

Artwork by Wanda Hentges.  See the details on her blog here, here and here.

Holly had the same idea, but done a little differently!

Artwork by Holly Eastabrook.  See the details here.
Gingko Leaves


You'll remember recently Holly took the Gingko Leaves stamp and converted it into a flower.

Artwork by Holly Eastabrook.  See the details here.

And here she has taken Flourishes 1 and it has become the stem of a flower!

Flourishes 1

Artwork by Holly Eastabrook.  See the details here.

Robyn used the Ornamental Heart from Valentine's Day/Love to create a lovely flower.
Valentine's Day/Love set

Artwork by Robyn Josephs.  See the details here.

Flourished Noel set

And here she cleverly used our Ornamental Christmas Tree from the Flourished Noel set to create a star.


Artwork by Robyn Josephs.  See details here.
And then you can always turn it a stamp into a sweet teeny tiny charm as Yogi did here! Some of the quote is on the charm and the rest is inside the card full size.
Artwork by Yogi Grunwald. See the details here.

Friendship Quote Marks


Have we got your creative juices flowing?  Hope so!
Thanks for visiting! Suzanne

Wednesday, July 30, 2014

Personalize Your Patterned Paper - Thank You Card

Hello, Jutta here with a colourful thank you card project today!
For my card sentiment I chose to use the wonderful Quietfire Design large thanks! 
I think those tiny hearts on the beautiful letters are just too sweet!


Front view of card showing the coloured flowers, leaves and
blue background made by daubing over onion bag mesh.

Back of card showing the original patterned cardstock.

Close up to show the die cut layers, Rhinestones and glitter.

Supply List:

Stamps - Quietfire Design -Thank you - set of four
Cardstock / Paper -(Base) Kanban Patterned Cardstock - Shabby Chic Floral B&W, White Cardstock, Vellum
Ink / Marker - Staz On Jet Black, Distress Ink -Peacock Feathers, Distress Markers -Peeled Paint, Spiced Marmalade, Mustard Seed & Barn Door

Dies -Spellbinders Card Creator - Mystical Embrace 5x7
Ribbon - Olive
Glitter Pen - Wink of Stella
Embossing Powder - Silver
Misc. - Double Sided Tape, Rhinestones, Sponge Daubers, Onion mesh for stenciling.

Thanks for joining me today, happy creating!
Jutta

Monday, July 14, 2014

Paper Collage Tulip - Rough Hewn Thank You Card

Hello there, Jutta here today with a thank you card project using the smaller  Rough Hewn Thank You.

The tulip is paper collage, made using bits of a makeup advertisement from a magazine.


To make this card I started by cutting a piece of White Cardstock to 3-3/4"x5". Using a sponge, I swirled on some Blue and Yellow Ink. I rough cut the tulip shapes from a magazine advertisement then used Collage Glue to adhered them to scraps of Cardstock to give them some body.

When the glue dried I cut the tulip parts to the final shapes. The stem, leaf and lighter tulip petal were glued directly onto the background the final piece (dark pink petal) was attached with Pop Dots to give the tulip some dimension. I distressed all edges of the cardstock panel, mat and base. The front panel was added to a 1/8 " Pink Cardstock Mat prior to attaching to Green base.

I then Stamped the Thank you with Jet Black Archival Ink.

Paper collage a great way to add colour to Scrapbook Pages or Journals.
Thank you for spending time with us today!
Jutta


Monday, June 30, 2014

Word Art -Happy Birthday Plain & Simple -Birthday Card

Hello! Jutta here today with a fun and whimsical Word Art Birthday Card project.

On this card I used several stamps from the Quietfire Design -Happy Birthday Plain & Simple Stamp Set.


The latest greatest stamps came mounted so it was super easy to use them with the fun Stamping Gear - Circle Wheel.

To make this large card, fold a pc of 8-1/2" x 11" white cardstock in half. 

Then using the Stamping Gear - Circle Wheel  and the Happy Birthday Stamp on the SG Paddle 
(see stamp placement in photo below) stamp the center flower first with Ripe Persimmons Distress Ink using every 2nd slot as indicated by a small arrow on the gear. I coloured mine for quicker reference.

Before stamping the other two flowers mask the edges of your card by about 1/4". I stamped the upper flower (Sun) with Squeezed Lemonade  Distress Ink and the lower flower with Spiced Marmalade Distress Ink. 

When finished stamping the flowers, add stems in Mowed Lawn Distress Ink and several Happy Birthdays across the bottom.

Then add the Dragonfly from the Butterflies and Dragonflies Stamp Set. Complete by with some Wink of Stella Glitter Pen on the wings, also add some dabs of sparkle to the flower centers. Last I used a .01 Micron Pen to draw my frame.


Thanks for stopping by and sharing a part of your weekend with us!
Happy Canada Day tomorrow and Happy July 4th too!

Jutta

Wednesday, June 11, 2014

DIY Background - Let the beauty....Note Card

Hello and welcome to Quietfire Creations!

Jutta here today with the pleasure of sharing a Note Card project and DIY Background technique with you. 

One of the latest greatest craft tools for the multi media artist to come along is the Gelli plate. 
I confess that I love all those gorgeous Gelli plate backgrounds I keep seeing around the Web and especially the ones received as a gift from my very talented friend Holly! :)

Well not to be out done I had to have a go at Mono printing layers too. Only one little problem stood in my way, not owning a Gelli plate. 

This card has a background that I'm calling the Faux Jelly Printing technique and I think it's the perfect base for the beautiful quote stamp -Let the beauty of what you love from Quietfire Design .


To make my background I used the glass in an old photo frame as my Gelli plate substitute.

Working lightest to darkest, adding one colour of ink at a time with a brayer to the glass. Then quickly laying cardstock into the still wet ink to create a mono print. Clean the glass and repeat with next colour of ink.

I used a border punch and acetate to make my own stencil. Added stencil to glass and inked with brayer, lay cardstock over to make impression then quickly flip stencil over and onto the cardstock and make another impression with inked side of stencil. Add a few blotches and spritzes of ink with a mini mister to glass plate and again press cardstock to lift ink off of glass.

When I was happy with my design I cut it to 4"x 5-1/4" and stamped  the flower before running the green ink all around edge of panel.

Next I stamped the quote onto a piece of vellum and cut out leaving it an extra long strip. I crimped the one side only to just before the quote adding texture.  Folding vellum around panel I attached it to back with tape.

To complete card I triple knotted a piece of ribbon and tape ends to the back side of panel. Attach panel to a 4-1/4"x 5-1/2" white cardstock base. Using purple glitter pen traced around panel and drew a line just under vellum panel.


Supplies
Stamps - Quietfire Design,  Let the beauty of what you love and Dark Room Door, Carved flowers
Paper -White Cardstock and Vellum
Ink - Ranger Archival ( Jet black )  and Distress Ink ( Shabby shutters, Tumbled glass, Seedless preserves)
Misc. - Ribbon and Purple glitter pen

I hope that you'll be inspired to ink up your own background too. I'm happy to answer any questions.
Have a crafty day!
Jutta


Friday, May 30, 2014

With Heart Anything is Possible -Note Card


Hello and welcome to Quietfire Creations Blog!
Jutta here and today I have a Note Card project to share with you. 

On this Note Card I've used the Gentle Thoughts Calligraphic Quote Stamp
stamp set both from Quietfire Design. 

I added the cord as I wanted a knot to symbolize remember and
it also holds a paper insert inside. 


To make my card I started by stamping the Hydrangea in LT BL Dye ink on a 4”x5-1/4” WT cardstock panel. Coloured the flower with markers. Sponged LT BL Dye ink randomly to the back ground and all around edge of panel.
Using YL glitter pen I squiggled a line all around the panel then again with a LT BL fine tip marker. Added some definition to flower with a BLK fine tip marker.
Stamped the sentiment and the Dragonfly in Jet Black Archival ink. Added a few dabs of YL glitter pen to flower.
Adhered the panel to the card base before adding embellishments to complete.

Materials:
Stamps –Quietfire Design, With Heart Anything is Possible and Sm Dragonfly from the Butterflies / Dragonflies set. -Hero Arts, Hydrangea.
Cardstock –Stampin Up! (Black), Copic Stamp and Illustration paper.
Ink –Ranger Archival Ink (Jet Black), SU! (Coastal Cabana)
Markers -Bic Markit (Variety), Sharpie Fine (Black) and Glitter paint (Yellow), SU! SW (Coastal Cabana)  
Embellishments –SU! Butcher cord (Coastal Cabana), Metal pearls (gift)


Thanks for your visit and I wish you all a crafty day!
Jutta

Wednesday, May 14, 2014

Stamped Collage - Happy Birthday Plain & Simple - Tent Fold Card

Hello, Jutta here and today I'd like to share a tent fold Birthday Card
made using the cheery new Quietfire Design -Happy Birthday Plain & Simple stamp set.

The fact that these stamps are mounted makes doing a 
Stamped Collage super easy. 


To make this card start with a 4-1/4"x 5-1/2" tent fold card base.

(Note- make collage right on the storage sheet that the stamps come mounted on.)

Rearrange all but the very bottom stamp on the storage sheet. With repositionable tape adhere the entire storage sheet to a stamp block.

Then using distress markers colour each stamp a different colour. Stamp all at once directly onto your card base. Add dots, matching colours to each stamped Happy Birthday.

The final Happy Birthday is inked well and stamped bolder at bottom right.

Colour pearls to match and attach randomly along dotted lines, see photo.

To complete run the spiced marmalade distress marker all around  edge of  card base.
Add ribbon to button then adhere to card base with glue dot. Tie ribbon around top of card.

Extra tips: If you like the arrangement why not store stamps in that configuration then you are ready to go when it's time to make another card.  Use a variety of colours or go monochromatic the choice to personalize this card is almost endless.

Materials used:
Quietfire Design -Happy Birthday Plain & Simple stamp set.
Ranger Distress Ink - seedless preserves.
Ranger Distress Marker -wild honey, spiced marmalade, rusty hinge, barn door, aged mahogany 
                                          and fired brick.
White cardstock for base, Pearls and button.


Be sure to enter the Tuesday-Winsday Draw  this week for a chance to win these versatile set of stamps.

Good luck and thanks for the visit!
Jutta

Wednesday, April 16, 2014

Happy Anniversary - French Heritage Card and Scrap Book Page

Hello every one, Jutta here and for today's share I have a very special
anniversary card and scrap book page made using the
fantastic new French Heritage Kit and 
the Happy Anniversary Stamp part of the 
Happy Family Days Stamp Set from Quietfire Design. 

I have to admit it was love at first sight for me when Suzanne 
introduced her latest kit offer. I could barely contain my excitement as I
waited for the kit to arrive as I needed a card for my
parents upcoming 55th wedding anniversary. But then once I was on a roll
I decided to add a scrap book page into the offering.  Enjoy!


For my card I used the gorgeous 12 x 12 Fabscraps Peacock 
cardstock from the  French Heritage Kit. 
This card measures 9 x 4 overall and fits a standard #10 envelope.

For my scrap book page I used a gorgeous Rose 12 x 12 
Fabscraps cardstock from the  French Heritage Kit.  

Card Instructions:
Start by cutting a pc of blue cardstock to 9" x 8" then score and fold in half for the card base.

Then cut several strips from the 12 x12 Fabscraps Peacock CS to 8-3/4 x 3-3/4 and use
corner rounder on upper right of base and upper right and lower left of Peacock CS.

Add ribbon to Peacock CS before attaching to base. Cut die cuts from Spellbinders Feathers  and Divine Eloquence Dies. 

For the numbers I used the TH Alpha parts stickers, ran them through the Xyron sticker maker and covered with Olive/gold LSG embossing powder from the French Heritage Kit and heat embossed them. Attach to label. (Note the letters shrunk and deformed a bit but I'm okay with it as my project is shabby chic.)

The Feather die cuts are covered with a solid layer of Ranger Perfect Medium then added Olive, Rose and Gold LSG embossing powder randomly to get a multi-coloured effect and heat embossed.

Attach feathers to card then attach the label.

To complete outside of card outline some of the Peacock Feathers on the Cardstock with Sakura Clear Glitter Pen and attach Pearls.


Supply List:
Cardstock- Fabscraps from French Heritage Kit, and Stampin Up! Baja Breeze and Bashful Blue
Stamps- Happy Family Days Stamp Set
Dies- Spellbinders -Feathers and Divine Eloquence
Embossing Powder - Lindy's Stamp Gang from French Heritage Kit,
Ink-  Ranger Perfect Medium, Distress Ink - Faded Jeans
Misc. Markers, Glitter pen, Ribbon, Pearls


I hope you enjoyed my share today and I invite you to check out my blog here.

Have a crafty day!
Jutta

Wednesday, April 2, 2014

New Release, Parsley, Sage, Rosemary and Thyme - DIY Note Card and Herb Garden Gift Set

Hello and welcome! 
Jutta here and I am delighted to have you join me today for the debut of an
awesome new Quietfire Design Stamp Set - Parsley, Sage, Rosemary and Thyme.
This eight piece stamp set is sure to make any gardener smile and 
a great way to welcome spring into our crafting!

Now onto my project, well actually several little projects which 
when combined make this lovely Herb Garden Gift Set.

 
         This stamp set is the sweetest!                      Tip-I've added some dots with
                                                                     India ink to help me with line up of stamps.                                

Note Card Set of 4 Cards and 5 Envelopes and Pretty Folder

 
Closed view of folder 
and 
 inside view of folder with cards and envelopes. 


Decorated 6" Terracotta Pot
I stamped pot with forest moss distress ink and added a couple of gold stripes 
with a marker before sealing all with clear spray paint.


Plant ID Tags and Copper Stakes
For stakes I used reclaimed copper wire shaped with round nosed pliers.
The tags are wooden business cards from my stash which I punched, stamped
with jet black archival ink, colored around edges with peeled paint distress marker
 and added paper cord ties. 


Instructions for cards and folder
For cards I cut 2 sheets 8-1/2" x 11" yellow cardstock length wise and 
folded in half to make 4 top fold bases. 

I then used the 2nd and 3rd largest SB labels 4 dies and my Big Shot to cut white cardstock and patterned paper labels.

I crimped the white cardstock label and adhered it to base. 

Keep patterned paper label in die, use as stencil to draw line on label with
peeled paint distress marker. Stamped the four herbs on label with jet black archival ink.
Adhered stamped label to crimped label to complete cards. Tied with ribbon and set aside.

For folder I cut a sheet of 12" x 12" yellow Kraft core cardstock down to 12" x 9". Folded and cut as per photo below.

 Next I embossed the front cover using my Big Shot and the Rosa 5" x 7" embossing folder.
I cut 4 pieces 3/4" x 5" and 1 piece 3"x 5" from coordinating patterned papers.
Stamping as shown in photo below with vintage photo and shabby shutters distress ink. Then inked all paper edges with peeled paint distress marker. Adhered all patterned paper pieces to folder and and then folded over bottom flaps and adhered to inside to complete.
 Supplies Used
Quietfire Design Stamps -Dotted Harlequin Borders, Capital letters, Double Stroke, Parsley, Sage, Rosemary and Thyme
Card stock -Tim Holtz Cord'dinations Kraft-Core Card Stock 12" x 12"
Ink -Archival Ink -Jet Black, Distress Inks-Forest Moss, Shabby Shutters, Vintage Photo
Dies -Spellbinders Nestablities Labels 4
Embossing Folder Cuttelbug Anna Griffin -Rosa 5" x 7"
Ribbon -Grosgrain Stripes- Celery / white 3/16", Paper Cord


 I hope you have enjoyed my share today!
Jutta

Thursday, March 20, 2014

Blog Hop! My Dark Side is Chocolate and Scrapbook Adhesives Products

Welcome to our blog hop with Scrapbook Adhesives, makers of quality and creative adhesives!  

Thanks for dropping by today, Jutta here and my project is 
two Quote Magnets with Gift Cards. 


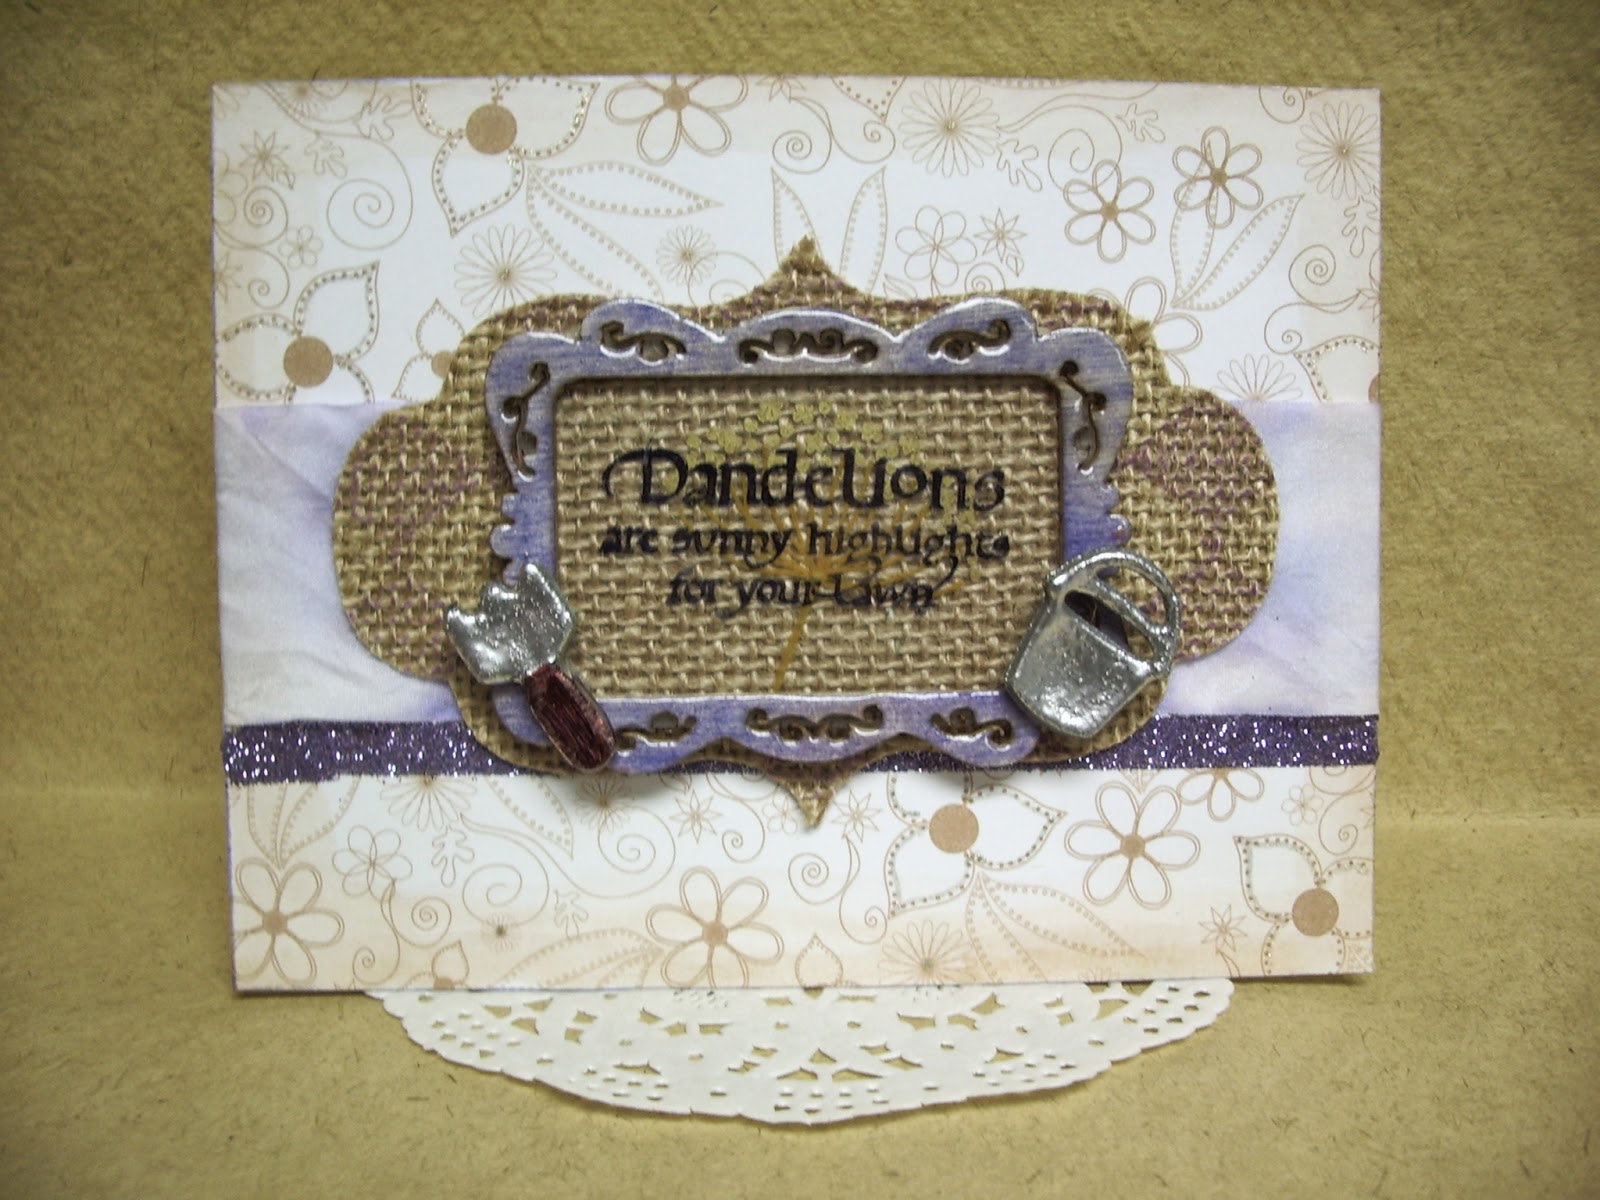
Left -My dark side is chocolate  quote stamp is from a Quietfire Design set of the same name. It is the perfect fit for the quote magnet embellishing the gift card.


And below another quote magnet with the happy Dandelions are sunny highlights for your lawn quote stamp from the Quietfire Design GardenDelights stamp set.
Here is a close up of the Quote Magnets with the fun little 
faux metallic charms made by heat embossing.  
Quote Magnet and Gift Card Instructions
For Dandelion Magnet:
First I coloured the Delight Icon Wooden Frame by swiping Milled Lavender Distress Ink on top only.  After ink dried I applied Perfect Medium to Delight Icon Wooden Frame and heat embossed with clear embossing powder. This was repeated several times until I had the look I wanted.

Next using Black StazOn Ink I stamped the Dandelion Quote from the Quietfire Design Garden Delights stamp set on a piece of Acetate. When this was dry I used Butterscotch Adirondack Pigment Ink and Gold Ink to stamp image from Stampin Up! on the reverse side of Acetate and in behind quote.

Then I cut the Magnet sheet, DCWV Burlap cardstock and stamped Acetate to 2-1/2” W x 1-3/4” H 
and adhered all layers together with Double sided tape then onto Delight Icon Wooden Frame.

For the bucket and rake faux metal charms I used the 3D Foam Garden Shapes which I heat embossed in silver embossing powder then used a brown permanent marker to color handle on rake. When cooled I attached them to front of Delight Icon Wooden Frame to complete.

For Chocolate Magnet:
First I coloured the front of Delight Icon Wooden Frame with Broken China Distress Stain.  After the stain dried I applied Perfect Medium to frame and heat embossed with clear embossing powder. This was repeated several times until I had the look I wanted.

Next with Espresso Adirondack Pigment Ink I stamped My dark side is chocolate  from the Quietfire Design set My dark side is chocolate on a piece of Vellum and heat embossed with gold embossing powder.

Then I cut the Magnet sheet, DCWV Burlap cardstock and stamped Vellum to 2-1/2” W x 1-3/4” H. 
and adhered all layers with Double sided tape to Delight Icon Wooden Frame.
For the faux metal heart charms I used 3D Foam Hearts which I heat embossed in gold embossing powder. When cooled I attached them to front of Delight Icon Wooden Frame to complete. 


To make gift card for Chocolate quote magnet:
I started with a 5-1/2” x 4-1/4” white cardstock base.
Then cut Patterned paper from Docrafts to 5-1/4” x 4”and antique edges using Antique linen Distress marker blended with a damp water brush.

Next I attached the DCWV Burlap cardstock oval to Patterned paper from Docrafts with E-Z runner tape. Under this I attached the Striped Ribbon with Crafty power tape adding the three pleats as I went along.

I attached the front panel to card base using the E-Z runner. To complete I added the gold cardstock SB diecut to the ribbon and paper with tacky glue. Folded and pleated a paper doily and adhered with 
E-Z runner tape.
To complete I attached the Quote Magnet with a couple of pop dots and added the pearls.


To make gift card for Dandelion quote magnet:
I started with a 5-1/2” x 4-1/4” white cardstock base.
Then cut Patterned paper from Docrafts to 5-1/2” x 4-1/4”and antique edges using Antique linen Distress marker blended with a damp water brush.

Next I ran a strip of Crafty power tape across panel before adding purple glitter to it.

Using Milled Lavender Distress Ink diluted with water I dyed the ribbon which I dried with my heat tool prior to adhering to center and back of panel with E-Z runner tape.

I stamped the Quietfire Design Dotted Harlequin Background stamp on a piece of DCWV Burlap cardstock with Adirondack pigment ink before using the TH Styled Labels Die to cut it out. Then I adhered the label to panel using E-Z runner tape.
To complete I added the Quote Magnet with pop dots.

Now for the finer print!!
Scrapbook Adhesives and Quietfire Design are giving away two prizes  valued at $60 each. Enter our raffle for  a chance to win $30 worth of Quietfire rubber stamps AND $30 worth of Scrapbook Adhesives by following the instructions in the Rafflecopter box below.  Comment on each blog post this week to enter to win! One (1) comment per person per blog post. Winner will be randomly drawn on 3-24-2014 and announced here on the Quietfire Creations blog! Earn additional entries by following us on Facebook and Twitter!


Thank you for joining us today and Good Luck!
Jutta

a Rafflecopter giveaway

Wednesday, January 22, 2014

Simple Creations with Quietfire Designs Digital Files

HI!!!  It's Wendy Jordan and today I am sharing a simple gift creation using Quietfire Designs digital files, a Silhouette Cameo digital cutting machine and software and vinyl.


This entire post was RIDDLED with technical difficulties on the user's  (ME) part.  The video below is a screen video of the file being  created in the Silhouette Cameo Designer Edition software.  I had plans of actually videoing the creation of the gift, BUT my wonderful son borrowed my video camera over the weekend and left it with a dead battery.  Gotta love sharing!!!

Anyhoooo…onto the important stuff…..


The file has been created and is being cut by a Silhouette Cameo.  I used red Oracal 651 vinyl.  I am applying the design to the glass of a 5 x 7 photo frame and I don't anticipate any harsh condition for the gift, but none the less, 651 will do the trick.


Here is the design after being weeded and transfer paper has been applied.  
I used R Choice Clear Transfer Sheets.  They are the perfect amount of tack for any project.


The design has been applied the glass and has been burnished.  The blue tool to the right is a burnishing tool.  I rub it over the design to adhere the adhesive from the vinyl to the glass.


See how easily the transfer paper comes off of the design and the glass.  Piece of cake.


Remember in the video how I flipped the design horizontally for cutting?  Now that the design is right way, can you see that you can't feel the vinyl on the outside of the glass?  

The finished gift!!  
I placed a white piece of card stock on the back of the design, but one of my favorite things to do is create a "floating" frame.  It is so simple.  Hot glue the glass to the frame from the inside and leave the back of the frame off.  You can then hang your frame not the wall and it looks as if the frame and design are floating.


Thank you so much for watching and reading along.  I apologize for the not having the second part of my project on video.  Dang kiddos!!

Enjoy your week and I will see you next time!!!

Here are the thumbnail links to the Quietfire designs available at Silhouette America.


Related Posts Plugin for WordPress, Blogger...