Showing posts with label Always die. Show all posts

Tuesday, January 2, 2018

Love and Hearts Always


Hello on this 2nd day of a new year.  I hope you got to spend some time with loved ones over the holidays!!  Valentine's Day is just a quick hop, skip, and jump away (maybe not even that far as it seemed 2017 went by in just a hop, skip, and jump) so my card today is totally Valentine's worthy.

I've used the A Way With Words Love & Hearts Clear Stamp Collection and the A Way With Words Always cutting die.


My background panel is kraft cardstock.  
  • Stamp the hearts border along the top and bottom with VersaMark Ink and emboss with Queen's Gold powder. 
  • Ink around edges with Distress Ink Festive Berries, splatter with water, blot and dry.
  • Color inside the hearts with Wink of Stella Gl. White.
  • Ink edges with Versamark and emboss with Queen's Gold. 
Hearts panel is Specialty Stamping Paper.
  • Using a craft mat, add Distress Oxide Inks (worn lipstick, candied apple, picked raspberry) to paper spritzing with water, drying, and redipping into ink until you like the color.
  • Stamp solid outline hearts with Archival Ink Jet Black
  • Stamp insides with Archival Ink Vermillion.  Dry well and tap with an anti-static bag.
  • Stamp solid outline hearts again with Versamark ink and emboss with Queen's Gold powder.
  • Add white around hearts with Gel Pen.
  • Add Wink of Stella to inside of little hearts. 
  • Distress edges.
Finishing Up.
  • Cut "Always" from both red and white cardstock.  Attach together so you see a bit of white. Glue to card as shown.
  • Attach everything to folded white card.
  • Add dots of Classic Cherry Enamel Accents as shown.
Finished card measures 6" x 4 3/4".


Thanks for following along.  If you have time, I hope you leave a comment and let me know what you think - good or bad.  

Hugs,  Wanda


Monday, March 13, 2017

Always Believe


Once those distress inks are out on my desk, I can't help but keep using them!  To make this colorful card, I sponged distress inks at the top of the base layer of the card and on the smaller layer, I did the bottom half with a lighter hand.  

The top was stamped with the quote from Quietfire Design: 


I emphasized the Always from the quote by adding a die with a black shadow to the bottom of the card.


My final touch was to add some dew drops to the card.

Always Believe - Mounted

Always - Metal Cutting Die


Tuesday, October 18, 2016

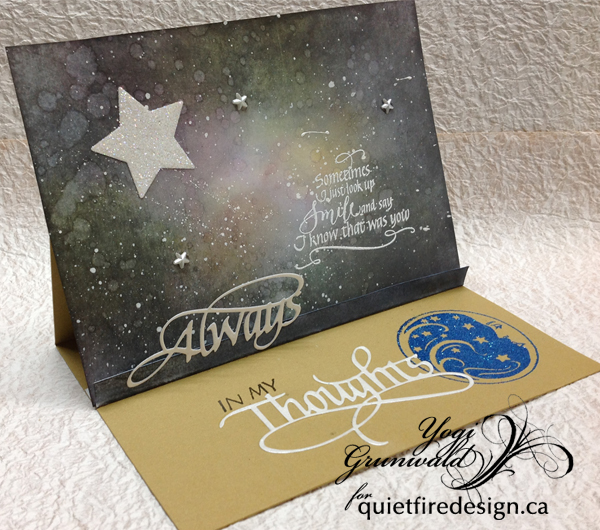
Always Thoughts - Sometimes I Just Look Up - Celestial Sky

  
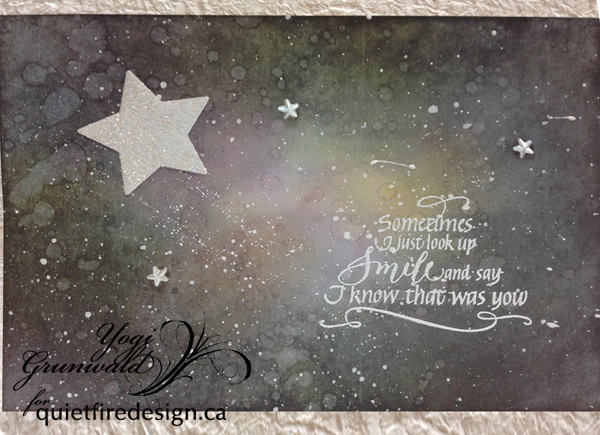
Yogi here today with a tutorial on how I made the "Celestial Sky" and using one of the newest stamps from Quietfire Design. "Sometimes I Just Look Up..." loving this one and the calligraphy contrast of the "smile" in the quote just makes me smile. BIG GRIN.

I'm also using a couple of the A Way With Words dies from Elizabeth Craft Designs "Always" and "Warm Thoughts" also available on Quietfire Deisgn HERE and HERE

I'm also using part of another quote "I Shut My Eyes..." for the "in my" 

This is going to be a long post. The tutorial is below the card. Click on any image to enlarge. Enjoy.


Scored, and folded my gold metallic card to create the easel.
Created the Celestial Sky (see step by step pics below)
Adhered some Sookwang tape to my white cardstock and die cut a star (Spellbinders). Applied Stickles "Star Dust"dry  glitter, then adhered to sky.

Stamped the quote using Distress "Picket Fence" and embossing with white embossing powder.
Adhered sky to card front adding some white rhinestone stars.


On the floor:
Die cut the words "Always" and "Thoughts" (on Quietfire Design HERE and HERE) from white cardstock, inked with Versamark and embossed with Pearlescent embossing powder.

Cut a piece of the white, scored and folded in half, inked the front with Distress "Black Soot" and adhered the word "Always" to the edge, then adhered to floor to act as the stopper.

Used a stamp positioner to stamp the "In My" using Versafine Black Onyx and clear embossed.
Stamped the moon (Faerie Song) using Versafine "Blue Lagoon" and embossed with Emerald Creek "Blue Sparkle" embossing powder.
Adhered the "Thoughts" die cut.

Sponge "Mustard Seed" in various places around the edge and working toward the middle on white cardstock.


Sponge "Picked Raspberry" over some of the yellow and in various white spots.


Sponge "Broken China" all over the edges and towards the middle.
 
Sponge "Chipped Sapphire" around all the edges and also working towards the center, leaving a lighter area.


Sponge "Black Soot" heavily in each corner and working around all the edges and towards the center, leaving the center very light.


Sprinkle water all over, leave for about 30 seconds, then blot up. Dry


Mix up some white ink or acrylic paint or gesso. I used my watered down Copic White Opaque ink on my craft sheet with a couple more drops of water to make it liquid. Dabbed my toothbrush in the wetness and flicked the ink over my sky to get very tiny dots. Used the paintbrush to flick some larger dots.
Dried.


Tuesday, September 13, 2016

Always and Forever Butterfly Frame Card

Hello, Connie Nichol here today with some simple cards I created with the Quietfire Design Always and Forever dies from Elizabeth Crafts Designs and a butterfly frame cut using a Quietfire Design digital cut file.


These are the dies I used - Always, Forever, and an ampersand from the Calligraphic Elements 2 set to tie them together.  Those calligraphic elements are so handy!


 The butterfly frame card digital cutting file is available in the Silhouette Store here.
I used paper from the Core'dinations Metallic Collection line.  This paper cuts and embosses beautifully and the metal look is very elegant.

I dry embossed the background and then sanded off the raised bits to show the kraft core and provide a little more depth to the card.   Here's a side view:


While I had everything out, I made two more cards just to have on hand.  I just used different Way with Words dies, and changed up the embossing folder and paper colour.  Once you cut that butterfly frame, it's easy to customize.

Obviously, this card used the Quietfire Design Congrats die.

And this one turned into a birthday card courtesy of the Happy Birthday die.  Any of the Way with Words dies will work beautifully and of course, you can resize your butterfly frame card as you like to fit different words or stamps.  Thanks for looking and have a crafty day!  


Monday, August 22, 2016

Mr, Mrs, Forever & Always - The Heart Has Its Reason

With all the new dies that have come out by Suzanne, I thought I'd make a card I rarely make - Wedding... I watched Susan Tierny Cockburn on the Elizabeth Craft Designs uTube create these beautiful Jasmin flowers and thought they would be perfect for my wedding card BIG GRIN. (I dropped the "e" on Jasmin using the French version... don't ask)

I'm using several of the newest  "A Way With Words" dies from Elizabeth Craft Designs which will be available soon ("Mr, Mrs" 2pce set); ("Forever"), ("Calligraphic Elements 2  Ampersand" 3pce set); ("Always") all available on Quietfire Design  HERE HERE; HERE and HERE

I'm using quote stamp on the inside from Quietfire Design   ("The Heart Has It's Reason"); 


Scored and side folded my white cardstock. Layered a piece of light blue Ruche cardstock leaving a 1/8" border all around.

Created my flowers from 65# Soft Finish cardstock, using the smooth side. Tooled the flowers and added a dot of ochre Pan Pastels. Added some ochre pastels to the stamen tips, rolled the die cut and adhered to the center of the Jasmin.

The leaves I colored with Distress "Mowed Lawn", both sides, tooled the vein and added a stroke of the ochre to the high point, then tooled the tip.

Adhered all the flowers onto the leafy branches.

Adhered a piece of blue/gold Sari ribbon and tied a multi loop fork bow.

Die cut the "Mr, Mrs" from a deep blue cardstock and the "&" from the white.  


On the inside left: Stamped the quote on white cardstock using Versafine Black Onyx and clear embossed. Die cut using a Stitched Rectangles die set (Elizabeth Craft Designs), Sponged some blue around the edge and adhered to inside of card.

Inside right: Stamped the flower sprig (Flourishes "Bees and
Blooms") using Distress pads in blues and greens, misted with water and stamped. Inked the stamp again using Black Onyx and stamped again.

Die cut the "Forever & Always" from the deep blue cardstock and then the words from white cardstock. adhered the words offset to the blue layer, then onto the card.


Click on any image to enlarge. Enjoy


Related Posts Plugin for WordPress, Blogger...