 Yogi here today with a Pyramid card for a guy. It's that time of year again, for me, when I need a couple guys cards... It's been eons since I last made one and I forgot how much I enjoy them BIG GRIN. They look complicated but are really easy and so much space to decorate. This one ends up being 5"w x 6"h (when closed) and folds flat for mailing.
Used a couple of the Elizabeth Craft Designs A Way With Words dies "Laugh", "Celebrate"; also available on Quietfire Design HERE and HERE. And I'm using a sentiment ("Happy Birthday") and part of a quote ("Home, Congratulations" 5pce set) stamp.
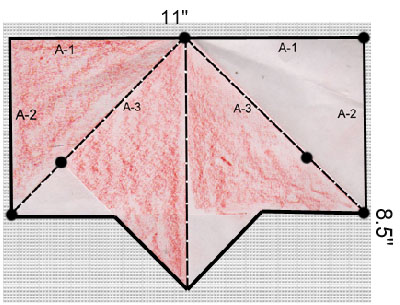
 I started with an 8.5" X 11" piece of deep brown textured cardstock, scored and folded it (see cutting/folding image below). Also created a template slightly smaller of the triangle shape. Used it to cut 3 pieces from 90# hot press watercolor paper.
I created the background pieces with a wax crayon resist technique. Inked the watercolor paper triangle, direct to paper, with Distress "Salty Ocean", ran through my embossing machine using Sizzix "Blueprint" for side 1; "Gears" for side 2; & "Steampunk" for side 3. Kept the paper on my embossing folder and used a white wax crayon (any wax crayon will work depending on the look you want) and hit the high points here and there. Removed from folder and used Distress stains "Vintage Photo", misted with water, smoodged with my finger a bit, then went here and there with "Tea Dye", dried. Adhered to card sides. On side 1, I cut off one leg and adhered to the under piece so they matched up. Love the distressed look it gives.
Created eCut files for the gears (Gel A Tin "Shifting Gears") and also die cut one of Tim's "Gadget Gears". PS you can use any gear images you have either die cut or stamped and fussy cut, or even electronic images. Just get a nice assortment in small to medium sizes. Inked the stamps with Versafine Black Onyx and embossed with a mix of embossing powders. A touch of "Kettle Copper", a touch of "Chic Camo" and a touch of "Turquoise Shimmer". All these are Emerald Creek Hot Stuff embossing powders. I did this on a piece of scrap paper leaving the excess
 powders on the sheet as it fell to press the other gears into, adding powder as needed. Love the verdigris/rusted kind of look.
Die cut the word "Laugh" and the word "Celebrate" from white cardstock, inked with the ocean and embossed with the Turquoise Shimmer. Adhered to card.
Stamped the "Happy Birthday" with the ocean and embossed with the turquoise on white cardstock. Die cut with Spellbinders "Grommet Tags", sponged some brown around the edges, removed from die and sponged "Old Paper" lightly all over to tone down the white. The grommet was a bit too long for my side, so cut of the ends...
Added a screw head brads in the gear centers.
Inside Flap:

Die cut the lower case letters for "Birthday" (Elizabeth Craft Designs "Alphabet 2 - Lower Case") from various decorated scraps. Adhered to card.
Stamped the quote ("Home, Congratulations" 5pce set), minus the word "Home" using the black and clear embossed.
Added an adhesive backed Velcro closure.
PYRAMID INSTRUCTIONS:
Start by finding the mid point on your long side. (it can be any size you want). For this card it's 9"w with a mid point of 4.5".
Measure from the mid point to the end (A1), Then place a tic mark on the side edge (A2) using the same measurement (mine is 4.5").
Score from those 2 marks. Repeat on other side.
Along that score line, use the same measurement as for A2, starting from the mid point (A3). Repeat on other side.
Using a quilting or right angle ruler, lightly draw a line to connect and create your bottom point. This should be a square shape.
Now draw a line to connect your outside edges to the center square and cut along that solid line.
Score down the middle
You are ready to fold and decorate.


1 comment:
Love the creativity! Thanks for sharing this, a must do! Joleen
Post a Comment