Showing posts with label stamps. Show all posts

Tuesday, April 10, 2018

The Only Time Card


This week is a really special week because it's your first peek at the newest stamp release by Quietfire Design that you can see HERE>>>. I picked one of my favorites from this release that is perfect for alot of different occasions.  I love the swirls on this sentiment and it fit perfectly inside the circle die that i used to stamp it in.  


The base is a black and ivory print so i found this chipboard design that was similar so i inked it with pink chalk ink and then sprinkled on some Stampendous antiqued embossing powder in pink and heated it up.  And this is what it came out like.  I went back and tipped the edges in the same pink chalk ink and added the ribbon bow with the rhinestone to match.  It was pretty simple to do and didn't take long at all so you can make up a bunch to send throughout the year.  

Thanks for stopping by and don't forget to stop back and get inspired with the other new stamps!!

Teresa


Monday, December 11, 2017

Merry Christmas to you


Hi everyone and it's so nice to have you stop by our blog today to see what is new for the holidays.  Today i am sharing a pretty card that i made with one of Suzanne's newest stamp sets called "Home for the Holidays" sentiments.  This is a gorgeous set with 5 stamps in it that you can use for your cards this year.  I made my card super simple with just a few dies, ribbon and some poinsettia's.


I went really traditional with it and mixed lots of ivory, red and green and the extra doily behind the die gives it a really country feel i think.  The dies are by Becca Feeken and the little hemstitch detail really sets off the sentiment.  It's perfect and is going to a special co worker for Christmas this year.


Here is the stamp set with all the other pieces in it.  As you can see there are lots of other gorgeous designs in the set that you can use for tags and other projects this year.

Thanks so much for stopping by...  Teresa

Monday, August 7, 2017

Friendship mini book

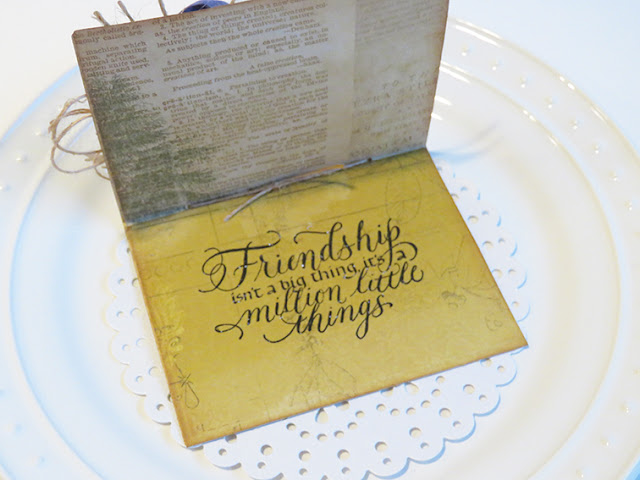
Hi Friends and welcome to the Quietfire blog today.  I have a pretty little mini card book to share that i did using a fun piece of watercolor paper that i had in my stash.

Sometimes you just want to tuck in a little something with your gift with a wonderful message to tell the receiver how much you care about them--- so i had this idea to create a little mini card using a book die i had from Becca Feeken.  I used a piece of watercolor paper and the die to cut this design on the outside and layered another piece under the top layer to make the colors pop.  

Then i cut the inside in the yellow part of the paper that you see below.  The stamp that i picked is called "Friendship isn't a big thing".  It was the perfect size and the perfect sentiment to fit inside my mini book.  And then all i had to do was decorate the outside with a pretty flower and some twine.  It's perfect and it went together so quick.


Here is the stamp and the link just in case you need to order one!!


Be sure and check all the new things in the store, it's pretty amazing!

Have a wonderful and crafty day...

Teresa

Tuesday, July 25, 2017

Cherish Today

It's my turn up today to share a few of the new products up in the Quietfire store this month.  We have a brand new backround stamp called the "Leafy Acanthus Backround" and i paired it up with a new Quietfire die called "Cherish".   It's simple to do so keep reading for a quick tutorial for it.....    


So to create this card you will need black cardstock and colors to coordinate with it.  I used gold and turquoise to go with the embossing powder.  To try something new i stamped with versamark ink and then used kaleidoscope embossing powder on it.  This created a fun muli-colored backround to put my gold die cut on.   


Start by stamping the ink on black card and then sprinkle the embossing powder on it and use a heat tool to set it.  Cut around it to your desired size.


This is what the transition from not embossed to how the colors change.  It's really fun and you never really get the same look because of the colors in the embossing powder.  Dark paper is best but it will also work on colored papers.  


Once i matted the paper i went ahead and cut 2 pieces of the Cherish die.  One in a soft muted gold and another in the turquoise that i use for the mat on the black.  This made the die pop really nice.


Then i used a fine line adhesive pen and glued it on my card.  For the today i had a tiny word piece and glued that right under the die cut.  Then i glued all of it together and to the card back to finish.

And here is a closeup of the LeafyAcanthus Backround stamp.  It's beautiful and you can really use this for alot of different things.  Be sure and stop by the store to check out all the new things this month  HERE... you will love them.

Thanks so much for stopping by and don't forget to pin us on Pinterest!!

Teresa


Monday, June 26, 2017

Creating cards with border dies

Today i have a simple but elegant card to share using one of my favorite stamp sets "Always be my friend" and a fun new border die from Becca Feeken.  Border dies can be really fun to use because you can cut them up and layer them and use them on jars and lots of other fun projects to make.


My card that i am sharing today uses simple papers from Canvas Corp combined with subtle shades of tan and off-white to compliment both the dies and the stamped sentiment.  I added the red bow to set off the colors and a tiny jewel in red to give it a little more pizazz.  Be sure and keep reading for a quick step by step to make it.


To make my card i first cut a square that measured 6x6 and then cut 2 border pieces from the die set just slightly bigger just in case.


Then  i attached the 2 borders in the center and glued them to the center of the printed cardstock. After that was glued, I trimmed the sides of the border and i matted it with the same color paper as the border and then also cut a brown card to fit as the base.  Set all of it aside.


To make the medallion i first stamped my image on the off white card stock and embossed it with clear embossing powder.  Then i cut it out with a circle die and then a small border around it in brown with the Lacey Circles die set.  I glued them together and added 3D pop dots to glue it to my card like you can see below.


Glue the printed card stock to the off white mat and then you can add a piece of red ribbon in the middle of the borders and attach it the back of the card. Adhere the sentiment as shown below.  Glue all of it to the brown card base and add the extra red bow and the jewel.


I love this set because it has 3 beautiful stamps in it and they are perfect to send a special card to those friends you really admire and adore.  Here is the link for it "Always be my friend".


Thank you so much for stopping by and be sure and check back for more wonderful ideas from the rest of the team this week.   Have a wonderful and crafty day!!

Teresa

Monday, May 8, 2017

Your friendship means so much

I think one of my most favorite stamps to have on hand and to make up is a card for a friend. Quietfire Design has so many gorgeous ones and sometimes it's really hard to pick a favorite but todays card is really special.


I love this stamp because it has the most gorgeous swirls and curls and really does the sentiment justice.  I chose a soft palette of aqua and pale ivory cardstock to make my card and layered it using a Becca Feeken die that i had in my stash.  To add a little more depth i inked the die with a little bit of aqua ink to make parts in the designs pop more and slightly offset it when i glued it together to frame it.  This gave it a gentle framing around the center and didn't make the ivory so bright.  It just blends more.


And here is a quick closeup of the sentiment... isn't it gorgeous!  And here is the stamp in case you need to place a quick order! 


Supply List:

Aqua and ivory cardstock
Cascading Grace Die by Becca Feeken
Ivory seam tape ribbon
Studio G ink in dark aqua
Paper trimmer, scissors, adhesives

Have a really fun and creative week and see you back soon!!

Teresa

Monday, December 26, 2016

In the Midst of winter....

Hi everyone... I hope that you all had a wonderful holiday with your family and friends for Christmas and I hope you have lots of memories to scrap in the days ahead... I am really looking forward to spending some relaxing time in the coming weeks ahead and can't wait to get crafty again for 2017.


Today I have a fun easel back project that i made with the new stamp "In the Midst of Winter".  It's one of my favorites because there are 3 other stamps that go with it in the series for all the other seasons so you could make a really pretty one with each stamp and set it out to decorate your house. How pretty would that be to do?  This one i did with shades of aqua, white, grey and dark charcoal. The chippy die is from Gypsy Soul Laser Cuts.  I thought it had the perfect shape to surround my stamped image and then add pretty snowflakes to set the scene.


I also stamped the lightest aqua piece of paper with clear stamped snowflakes from the 
"Let it Snow flurried snowflakes" stamp set.  I used a versa mark ink and embossed them with clear so that i would get just a subtle image on the back round and it wouldn't compete too much with the title stamp.  I love it so much i might even get a frame for it.


Here is the picture of the stamps... They are so pretty and there is so many designs that you can pick from to use on all kinds of projects.

Supply List:
In the Midst of Winter Stamp
Let it Snow flurried snowflakes stamp set
Versafine black onyx ink
Versamark ink
Stardust embossing powder, diamond stickles,
3D Foam squares by Scrapbook Adhesives
GSLC Chipboard Swirl
Cardstock

Thanks so much for stopping by ......  Teresa

Friday, August 26, 2016

Congrats on your Wedding Day...

It's Friday and time for another post celebrating our team mate Yvonne on her wedding this week.   We are all so happy for her and I am sure it is going to be a wedding to remember for the rest of their lives.  Today i made a card with the Congrats Way with Words die.  It's a simple card with embossed dies and flowers for the back round in pretty purples and white.


I love the Congrats die because there is so many ways that you can use it.  And it's really nice paired with some of the old and new sentiments in the stamp shop.  You can use the dies with just cardstock or try inking it up like a rainbow or even stamping clear ink on top and embossing with clear embossing powder to make it stand out even more.  I added tiny little rhinestones on the letters in a few places to pop it out a little more and a few on the back round to make it more sparkly.  Everything is better with bling!!


Here is a closer look at the die and the flowers that i put at the bottom.  Yvonne loves flowers so i thought i would do some pretty ones at the bottom for her.

Thanks so much for stopping over and be sure and check back for more ideas and inspiration from all of us next week...  Can't wait to share all the fall cards we have for you!!


Tuesday, July 12, 2016

The New All Seasons stamps...

Hi and thank you so much for stopping over to the Quietfire Design blog today.  I am sharing 2 stamps from the new collection with my projects, one with a card and the other with the new jewelry stamps.


I haven't done a fancy card in a while and so i got out some of my favorite dies and had fun.  This card is made with the new Autumn is a second spring stamp from the brand new "All Seasons Set".  There is a spring, summer, fall and winter one and i had lots of pretty papers from Bo Bunny and flowers in my stash that would match up perfect for a fall theme.  I stamped the card in black over the dotted paper and then cut it out.  This way i could be sure that it all lined up perfectly.  It's just a simple layered card and would be easy to do as a gift set for someone for Christmas or a birthday with each of the new stamps.  How pretty would that be....


And for these little bookmarks there is a new set of stamps that are "Jewelry Words" and will fit inside of jewelry findings.  These are some little metal bookmark pieces that i got from Prima and they fit perfectly.  All i did was stamp some pretty papers and emboss them and then glue them under the resin tops.  


And here is the set of the new "All Season stamps".   The sentiments are really beautiful and masterfully done by Suzanne Cannon.  I hope that you try a few yourself and maybe post what you did on our facebook page so we can see what magic you create with them. 

Have a really wonderful day!!  

Teresa

Monday, June 27, 2016

The Earth Laughs in flowers...

Happy Monday to all of you!!  I hope you all had a fabulous weekend and did something really fun and crafty.  I got out lots of things from my stash and a brand new stamp called "The earth laughs rose" and set to work to make something pretty.


To start my project I found a small wooden box in my stash that was bare wood.  It had a glass top on it but i decided to take it off and just create a pretty lattice design for the base and then color a pretty rose to put on top of it.  I stamped the flower and the sentiment first on white paper in a dark green ink and then embossed it in clear powder.  Then i colored it with 3 shades of Copic pens and 2 shades of green that matched really well.  When i finished i cut it all out and adhered it to the top of the box with 3D Foam dots by Scrapbook Adhesives.  It's really simple but i like how it came out.


For the box i painted it all white first and then after i added all the top pieces i went back and added some light pink paint and a bit of darker pink to shade it and match the flower.  And then i got a little crafty and added a stenciled design on the sides with white gesso.  I think i am going to sand it down a bit and paint a thin layer of white over it later but it was fun to try something new and think outside the box for decorating things.  Below is a photo of the things that i used for my project.  It's always good to see what new things others try so that you feel confident investing and trying it too.


Thanks so much for stopping by today on the Quietfire Blog to see what new from all of us to share and be sure and stop back for more summer projects!!  

                                                                              Teresa

Monday, May 9, 2016

Sunshine, freedom and a little flower

Hi everyone it's Teresa here on this beautiful Monday with a pretty spring card that i did with the brand new stamp "Just living is not enough".  I wanted to really bring out the idea of the flower that was in the sentiment so i did it with some pretty papers from Teresa Collins i had in my stash.


I wanted to keep it simple and only use the papers so i layered a light cream piece of the printed paper on a white card and on top of that another layer of green and then the coral dot.  And i have lots of doilies so i slid one under the oval that i stamped on to give it a little lacier effect.  


I stamped the card with Ranger Archival ink in coffee to match the paper and then added some tiny white pearls dots around the outside edges and let them dry.  And to finish it i fussy cut one of the flowers out in the paper and then added 2 yellow ones over it and a few tiny roses.  It's super easy and simple and you could make a couple of them to send out to friends tonight.  

Thanks so much for stopping over and hope you have a wonderful day!!

Tuesday, April 12, 2016

The Greatest Strength....

I love new stamps and making fun things with them. I haven't done a really pretty flowery card in a long time so today i am using the new stamp called "The Greatest Strength" and some new papers i just got from Prima.


I made the card super simple for the backround just by cutting layers of paper and inking them around the edges to make them pop.  And then i made this pretty flower cluster with Prima flowers and some twine and cheesecloth that i had in my stash.  It's super feminine and it would be a great card to give to a special someone that you really appreciate and care alot about.


Supply List: 

Stamp: The Greatest Strength
Prima Tales of you and me 6x6 paper pad
Prima Flowers
Momenta Ink in Rich Cocoa
Versamagic Chalk ink in Gingerbread
Ivory twine, cheesecloth and adhesives

Thanks for stopping by today and have a really wonderful week!

Teresa

Tuesday, September 29, 2015

Friendship and snowflakes

Although it's not time for snow yet it's always time to make up cards to send to friends.  Today i have a card to share using the "We are like Snowflakes" stamp.


I wanted to do a little something different with the shape so i started with a card that had a scalloped edge on the bottom and the cut a piece of the Maja Design winter snowflake papers to fit.  Then i layered lots of the other prints in both squares and die cuts.  And a few white snowflakes too.


For the front i stamped it in Versafine ink and embossed with white embossing powder and glued
that on with 3D Foam squares.  And just to add a little more glitz i put some small dots of diamond stickles around the border and on the snowflakes to make them shine.  I love how it came out.

Thanks for stopping by today and hope you have a fun day stamping and creating something fun!

Teresa


Monday, September 14, 2015

Never worry card

Hi everyone it's Teresa here today to share a card i did with the Corrie Ten Boom stamp " Worry".  I found some gorgeous papers by "Maja Designs" and it inspired me so much for using this stamp.  I love the way it came out.


The stamp fit perfect inside the circle die and to mat it i used both the Lacey Circles die and also the Picot edge dies.  And the papers are super vintage looking so i think it went well with her verse. The back is just layered with pretty papers and the card base is a pretty dark brown i had to match it.  Then i just tied a pretty crinkle ribbon on it in light blue and added a brad to match.

Thanks so much for stopping over today and be sure and check out all the other new stamps and dies that we have this month and lots of ideas for them too.  Have a wonderful day....

Thursday, December 18, 2014

Canadian Scrapbooker 12 Days of Giving Prize!

Wow, third post on Quietfire Creations today!  Lucky you!  Well I hope you're lucky, because we're  
sponsoring a giveaway today on the 


Win this and you'll win over $75 worth of rubber stamps from the Quietfire Gentle Thoughts Collection.  WooHooo! Stampin' party at your place!

And don't forget to follow along with our  


Friday, April 12, 2013

Mothers Hold Their Children's Hands Card


Hello everyone, Terre here with another creative card using this heartfelt sentiment "Mothers Hold Their Children's Hands" stamp from Quietfire Designs. I just have to ask did you look at all the amazing stamps that Quietfire Designs carries? This card I created not only has the amazing sentiment, it also has Spellbinders S5-158 Timeless Rectangles. The sentiment was stamped using Memento Tuxedo Black Ink from Tsukineko.
I also used S4-395 Les Papillons Two, die cut them using the Grand Calibur machine and My Minds Eye pattern paper, added a few Want2Scrap Pearls and Finesse Swirls.
Adding a delicate ribbon bow using May Arts ribbon just seems to give the finishing touches to this card. Thank you for stopping by my blog post and remember to visit Quietfire Designs on Facebook and "Like" their page for more creative inspiration. Crafty Smiles Terre
 
Related Posts Plugin for WordPress, Blogger...