Showing posts with label Design Team. Show all posts

Tuesday, November 23, 2021

Don't Even Think About It Gift Tag


Hey Quietfire Fans! For today's project I'm sharing with how to create this quick and easy Don't Even Think About It Gift Tag. I combined a variety of Quietfire Design Stamps and Modern Gilding Powders which were all perfect for creating this gift tag. You'll want to grab a cup of your favourite beverage and learn how to recreate my Don't Even Think About It Gift Tag at home.

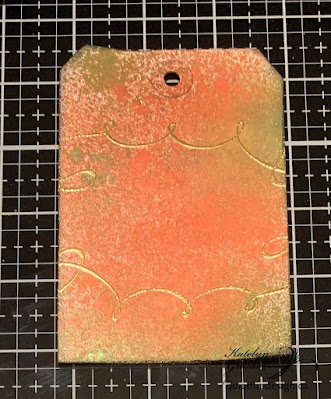
Start by trimming a tag down to 3 1/8" x 4 5/8". Spritz the tag with Tree Lot and Peppermint Stick Distress Mica Stain. Allow the tag time to dry.


Die cut a 2 1/2" stitched circle out of a piece of white cardstock. Spritz Peppermint Stick Distress Mica Stain on the circle. Once the circle has dried, apply Emboss It Ink to the Don't Even Think quote from the Christmas Sweet & Sassy Stamp Set and stamp in the middle of the circle. Sprinkle Kells Gold Modern Gilding Powders on the stamped quote. Tap off the excess powder and emboss with a heat tool. Distress the edges of the circle. Ink the edges of the circle using Black Soot Distress Ink and a blending tool with foam.


Distress the edges of the tag. Ink the edges of the tag using Black Soot Distress Ink and a blending tool with foam. From the To Appreciate the Beauty of a Snowflake stamp, you'll need the swirly stamp. Apply Emboss It Ink to the stamp and stamp on the top portion of the tag as desired. Reapply ink to the stamp and stamp on the bottom portion of the tag as desired. Sprinkle Kells Gold Modern Gilding Powders over the stamped images. Tap off the excess powder and emboss with a heat tool.


From the To Appreciate the Beauty of a Snowflake stamp, you'll need the snowflake stamp. Apply Emboss It Ink to the stamp and stamp on the top portion of the tag where the swirly image has been embossed. Reapply ink to the stamp and stamp on the bottom portion of the tag where the swirly image has been embossed. Sprinkle Forever Platinum Modern Gilding Powders over the stamped images. Tap off the excess powder and emboss with a heat tool.


From the Christmas Sweet & Sassy stamp, you'll need the snowflake stamp. Apply Emboss It Ink to the stamp and stamp randomly on the tag as desired. Reapply ink to the stamp and stamp three to four more times as desired on the tag, apply ink to the stamp as needed. Sprinkle Forever Platinum Modern Gilding Powders over the stamped images. Tap off the excess powder and emboss with a heat tool.


Foam square the circle to the middle of the tag as desired.


To finish the tag, tie a piece of twine through the top of the tag.


Here are a few closeups of the finished gift tag.


Here is the finished Don't Even Think About It Gift Tag.


Quietfire Design Supplies Used:


Other Supplies Used:

- Elizabeth Craft Designs: Pizza Box Die (Stitched Circle)
- Ranger Ink: Emboss It Dabber
- Tim Holtz for Ranger Ink: Distress Ink - Black Soot and Blending Tool with Foam
- Misc: White Cardstock, Tag and Twine

Thanks so much for joining me today and I hope that I have inspired you to recreate your own version of my Don't Even Think About It Gift Tag at home.

- Katelyn


Friday, October 16, 2015

Christmas Waves A Magic Wand - New Design Team Member!


This is Selma Stevenson and I am on Susan Tierney-Cockburn's Design Team at Elizabeth Craft Designs. {And now on our Design Team!} Suzanne's stamps and sentiment dies are a perfect match with Susan's beautiful flowers.   


This is a 5 1/2" x 6" card.  The rubber stamp used is the "Christmas Waves a Magic Wand".  It was gold embossed on a piece of white card stock 2 1/2" x 4 1/2", then backed with a piece of brushed gold card stock.

The verse reads "Christmas waves a magic wand over this world and behold everything is softer and more beautiful".  This reminds me of being out during a beautiful snowfall. 


  A piece of white card stock, 5" x 5 1/2" was embossed using the Elizabeth Craft Snowflake embossing folder.  To create dimension, I die cut snowflakes from the Elizabeth Craft Spiral Circle Pull Card, and the All Seasons Tree die sets.  The smaller snow flakes were attached over the larger snowflakes with dimensional tape.  To give them the sparkle, I dabbed each snowflake with glue and sprinkled on Elizabeth Craft Cool Diamond Silk Microfine Glitter. 

The poinsettia was created with Susan's Garden Notes Poinsettia and has the Cool Diamond Silk Microfine Glitter on the petals.


On the inside of the card, I added the Quietfire die cut Merry Christmas, from Elizabeth Craft Designs.  This sentiment was also die cut using brushed gold card stock.  To finish the inside, two more glittered snowflakes were added.


Quietfire link ::  Elizabeth Craft link


Selma lives in the state of Washington.  She's been married 55 years, has 3 children and 6 grandchildren.  Selma is retired and loves to spend her free time in her craft room designing cards.  She also enjoys reading, gardening, and traveling.  
Welcome Selma! 
Selma's beautiful creations will begin appearing here regularly starting soon! You may find her inspiring blog, Selma's Stamping Corner here.
 

Friday, September 7, 2012

Happy Family Day Card

Happy Friday Every! Thank you for stopping by my very first blog post here at the Quietfire Creations Blog. A special thanks to Suzanne the mind behind these amazing stamp. This birthday card shown above was created with one of the new stamp sets that Quietfire has just released, Happy Family Days Stamp Set #5909, just look at those curvy swirls and did you notice this stamp set matches Spellbinders S4-161 Labels One, you cam also find all of your Spellbinders die templates right here too at Quietfire.
I stamped the Family Days Stamp Set using the Happy Birthday sentiment on my My Minds Eye Indie Chic pattern paper, then die cut it using the Spellbinders Label One. Once it was cut and embossed I mounted it on a piece of Want2Scraps Label One Nestaboard, and inked the edges. I decided to embellish my birthday card with some simple hand stitching, everyone knows I love to sew on just about every project I create so this one was no exception! I used some DMC Floss and created my own stitching pattern and there you have it, a birthday card. So I hope you have enjoyed my first post here and remember to check out all of the amazing stamps at Quietfire Designs and be prepared you are going to want them all, I know I do. Until next time, Crafty Hugs, Terre!

Monday, August 13, 2012

Our Design Team!

I'd like to take this opportunity to introduce you to our Design Team members who will be playing with us until at least the end of the year.  I am so lucky (and I have to admit, sometimes intimidated) to be with this amazingly talented group of Designers!!  This is just a quick intro, there will be more in-depth features coming soon! 


Yogi Grunwald
Yogi has been designing with Quietfire rubber stamps for a loooonnggggg time! We are fellow calligraphers and have had the pleasure of meeting a number of times when I've been in Calgary.  In a workshop, Yogi's part of the room is always quiet, but wow, there is a flurry of activity happening in front of her. I think she can't work as fast as her brain can design! 
You may find her ever-changing styles and techniques posted regularly her blog, Art With Yogi.  There is never a dull moment with Yogi!


Monica Latka Black
Monica, gee, we go back a long way!  Cyberstampers!  You found me and began using my stamps in online classes. You helped me "grow up"!
Monica has beautiful colour sense and loves experimenting.  We all need to encourage her to share more!  You may visit Monica's blog at Black Cats Color Trails.


Robyn Josephs aka forrestwife
Robyn has been in my life for quite some time - before she moved to her beautiful North Carolina mountains!
If you need an idea or suggestion, throw it Robyn's way.  It's amazing what will come back to you.  Her minds works in all sorts of wonderful ways and of course, it shows in her art!  You may visit Robyn's blog at Rainbow Weaves.


Wanda Hentges
Wanda, gee what can I say?  You make great art! Wonderful colour, wonderful ideas. You are another gift to me from Cyberstampers. You are my go-to person for Tim Holtz product questions! You never fail to inspire me when I go back through photos of your designs. I will always welcome you to the Design Team when you're able.
You may see Wanda's blog at Art by Wanda.


And welcome to our new Designers shown below!  I love all of their work.  As with our "old" (sorry, guys) Designers, you'll be treated to lots of variety with these ladies.  I look forward to getting to know them much better!


Holly Eastabrook
Holly loves experimenting with techniques and combining elements in a different way than you might expect! Holly is our current Guest Designer and her sweetie of a project can be seen here. You may visit her blog Eastyart here!


Sherry Cheever
I loved Sherry from the first time I visited the blog of "Her Royal Badness".  What's not to like?!  I had the pleasure of meeting Sherry at CHA in January and I assure you, she is not bad!  I love Sherry's designs and that she resists going with the flow in her creations.
You may visit Sherry's blog at Walkin' on the Bad Side.


Alison Tyler Jones Photography
Darsie Bruno
Darsie's artwork has an elegant touch that pulled me in immediately.  Need I say more?  Just visit Darsie's Crafting with Darsie blog and you'll immediately understand what I mean!


Terre Fry
When I see Terre's work, I always get the impression that she has merely opened the tap to let out a drop of her creativity and if the floodgates open, we better stand back!  Terre must have the creative part of her brain on "Go!", so that when she gets time, it all comes together with amazing variety and creativity. I've had the pleasure of meeting Terre at CHA twice and she is wonderfully kind and patient when I have my retailer's cap on.
You may visit Terre's blog Terre's Scrap Therapy here.


I don't know about you, but I can hardly wait to see what these ladies will create!  Thanks so much for being here!


Related Posts Plugin for WordPress, Blogger...