Monday, January 12, 2015

Valentine's day....


Hello everyone,
Yvonne here with using a brandnew Quietfire Design stamp.

The Future is Uncertain - Mounted
 
It's only anout a month from now before it's Valentine's Day, so...to get in the mood I created you a Valentine's card.
Only...not in the usual color red, but in soft pastel colors.
Combinated with torn paper it give the card that vintage look I like so much...
I hope you will like it too!


How to make this card:
  • make a white  base-card size 5⅝"x7"
  • Cut some blue patterned paper to size  5¼"x6⅝" and use a distress tool to alter the edges. Then rub a Distress inkpad along the edges. Glue upon the layer upon the card base.
  • Cut white cardstock to size 4¾"x6⅛" size and alter the edges. Glue upon cardbase using 3D foam squares.
  • Cut pink patterned paper to size 4¼"x5⅝" and glue upon cardbase using 3D foam squares.
  • Stamp the Quietfire Sentiment upon white cardstock using black ink.
  • Then die-cut the sentiment using Spellbinders Regal Frame (the largest die only). Glue upon card card base using 3D foam squares.
  • Attach pink satin ribbon horizontally to the card.
  • Cut/emboss the largest two dies of the set Regal Frame from silver cardstock. Glue onto the card.
  • Embellish using self-adhesive Pearls, a bow and a pearl heart.
Used materials:

I hope you like my card and I'm looking forward (as always) to your comment!
Thanks for stopping by!

Hugs,
Yvonne

Friday, January 9, 2015

Yogi - Easel Love - Words of Love - HB card


Yogi here today with a Valentine's Birthday card... It's that time of year for me where there are lots of birthdays scrunched within the next couple months.

I die cut the largest of the Spellbinders "Labels 42 Decorative Accents" frame from white cardstock, sponged through the die using a dirty pink sponge. Stamped the largest FLOURISH using Versafine Black Onyx and clear embossed.

Used the negative of the die cut to scan and then cut a shadow layer using my electronic cutter. Hit the edges with Versafine "Toffee" and embossed with Queen's Gold embossing powder. Adhered both layers together with 3D foam tape.

Used the same scanned image to create my easel card, welding 2 frames together, selecting all, and increasing the size to 10" high so I would end up with a 5"h card when folded. Scored and folded the easel and adhered the decorative layer.

eCut the word "Love with a Flourish" as well as a shadow layer from white cardstock, inked the first layer with the Toffee and embossed with the gold. Hit the shadow layer with Distress "Picked Raspberry", then with Versamark, then adhering the first layer to the shadow layer as quickly as possible so the shadow layer was still wet enough to clear emboss. Adhered to card front.

Tied a double peg bow from 1.5"w Fuchsia gauze ribbon. adhered to card with a glue gun. Used a small left over piece to adhere under the "e" on the right side.
card closed

Die cut the 2 smaller hearts (Spellbinders "Nested Hearts")  from white cardstock, sponged edges with Picked Raspberry and clear embossed. adhered one to the other and then added a small flap on the back to create my stopper for the easel.

Cut the Happy Birthday - plain & simple sentiment in half and stamped using the black.

Stamped the "Words of Love..." quote using the black and clear embossed.

Added a mauve heart button tied with some fuchsia string and adhered using the glue gun. Added some white pearl flourishes.

Click on any image to enlarge. Enjoy.

Thursday, January 8, 2015

Love You Forever - Tina McDonald Guest Designer

Hello!! I'm Tina McDonald and I'm So thrilled to be here as a guest designer for Quietfire Design!! Today I have 3 cards to share with you using the Calligraphic Love Bits, Item #5699. My plan was to create "a" card... but when I got going, I just couldn't stop at one!! I'm STILL coming up with ideas and creating more cards with this set, so feel free to stop by my blog once in a while to see the other creations I'll be sharing throughout the month. And with Valentines Day just around the corner, my projects will have a LOVE theme to them!!

So, let's begin!!

LOVE YOU FOREVER

For my first creation, i went with clean and simple. I ADORE how elegant these stamps are,  I didn't want my design to take away from that. So I kept it simple.

How to create this:
1. Trim and score black card stock to create card base. Trim white card stock slightly smaller. Adhere. Stamp sentiment using Black ink onto bottom right corner.
2. Trim silver embossed paper and adhere to top 2/3 of the card front. Trim thin strip of black card stock and adhere along bottom of silver paper.
3. Add red mirrored heart stickers.
Supplies: Quietfire Designs  Calligraphic Love Bits, Item #5699, Bazzill black card stock, Spellbinders Whirl White card stock, DCWV Embossed Foil Paper and heart mirror stickers, Imagine Crafts/Tsukineko Memento Black Tuxedo ink, Scrapbook Adhesives by 3L Adhesive Runner


XOXO

For my second design, I went a bit more layered and colourful!! A bit more trendy in style.

How to create this card:
1. Create top fold card base. Trim black card stock slightly smaller. Adhere. Trim newsprint paper slightly smaller and adhere. Use sewing mating to stitch the edges. Sprinkle irRESISTible texture spray across card front and allow to dry.
2. Using Spellbinders standard Circles, die cut a black circle and a striped circle. Adhere together and machine stitch. Adhere to card front.
3. Cover polaroid frame with patterned paper and trim. Stamp XOXO using Versamark ink, sprinkle with black embossing powder and heat set. Adhere to card front using foam tape.
4. Diecut Spellbinders scalloped hearts and SHOOT! arrow. Adhere.
5. Finish off with small black sequins.

Supplies: Calligraphic Love Bits, Item #5699, Bazzill black card stock, DCWV Candy Cane Lane paper stack (for patterned papers), Maya Road chipboard frame, IMAGINE Crafts/Tsukineko Versamark ink, black embossing powder, Spellbinders die templates and embossing machine, Sequins, Sewing machine, Scrapbook Adhesives by 3L adhesive runner, foam tape, Beacon 3in1 craft glue

VALENTINE
For my final project for today, I have created a horizontal design. I kept with a similar colour palate but changed up my design.

How to Create this card:
1. Create card base from black card stock. Trim Kraft card stock slightly smaller and adhere. Adhere strip of black striped paper, black card stock and red ruffled ribbon across bottom. Add rikrak.
2. Stamp VALENTINE using black ink onto white card stock. Diecut using Spellbinders Standard Circles. Also die cut from black card stock  Splendid Circles die.  Adhere together, trim bottom and adhere just under red ribbon.
3. Cut/emboss Classic Hearts dies from red glitter paper. Adhere, add flowers.
4. Use red marker to colour in heart on stamped sentiment.

Supplies: Quietfire Designs Calligraphic Love Bits, Item #5699, Bazzill black and Kraft card stock, Spellbinders Whirl White card stock, DCWV Glitter paper, Candy Cane Lane Stack (striped paper), IMAGINE Crafts/Tsukineko Memento Black Tuxedo ink, Dual Tip Marker (Lady Bug), Score Tape, Beacon 3in1 adhesive. Zva Creative flowers

I had SO much fun creating these projects for todays post!! I am looking forward to sharing again with you later in the month!! Special thanks to Suzanne for this opportunity to use her GORGEOUS stamps!!
Until next time,
Happy Creating!!
Tina McDonald


Wednesday, January 7, 2015

The Best Kiss!

Sherry here today and I have a card to share using the new Quietfire Design stamp, The Best Kiss!


The sentiment was stamped in hydrangea ink (to match the paper) and die cut with a rectangle die template.  Coordinating paper was used for the layer behind the sentiment and the background layer for the designer paper.  The base for the sentiment was die cut/embossed from a frame die template.


The flowers were die cut with different sizes of circles that were then misted with water, scrunched up and layered.


Thanks for stopping by and joining me today!
SHERRY SIGNATURE


Project Supplies:

Monday, January 5, 2015

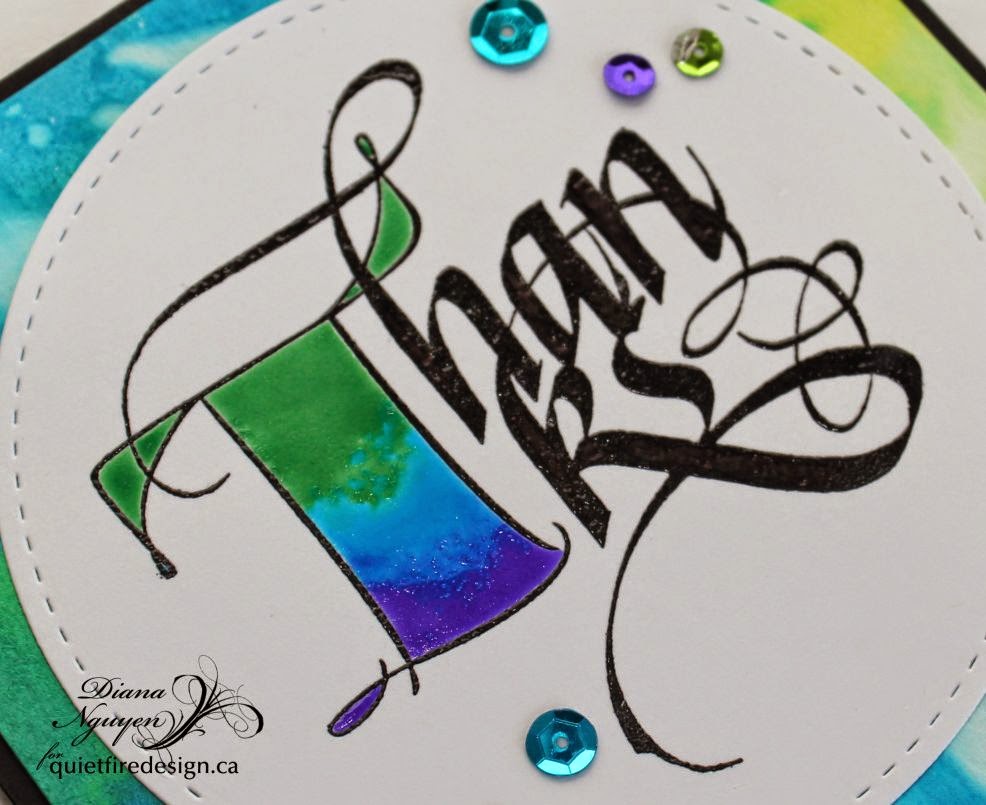
Thanks - Fill 'er Up T with Food Coloring and Oil

Good morning!  I hope your New Year is off to a wonderful start.  It's been go-go-go for me and I haven't had a chance to sit my kids down to write out all their Thank You cards.  I hope you got some wonderful goodies as well as made some wonderful memories for Christmas.  Today I am sharing with you a special Thank You card - this is great for someone who may not have just given you a great gift but also the gift of love and time.    

My background is made by dropping drops of oil on watercolor paper and then adding drops of diluted food coloring around it.  By swirling it around gently, you get a wonderful effect.  I love it - and the kids enjoyed it too!  I think it just makes the card more special for both the giver and the recipient when the kids are involved with the making of their own Thank You cards.  It does take a while for the oil to dry so give it plenty of time!  I then heat embossed my Thanks - Fill 'er Up T with fine detail black embossing powder and then die-cutting that out with a stitched circle die.


To fill up my T, I used my Sakura Glaze pens.  These work best if you just dot them onto your paper than rolling them as you would a regular pen.  The ink is very thick and once dried has a lovely glaze (hence the name!) to them.  And since they do stay wet a little longer than regular ink, it was fun to blend them together a little bit.  Here I just used the green, light blue, and indigo colors.   Neat effect, don't you think?  Finally, just in case my oil decided to go through the watercolor paper, I popped up my circle lie with foam tape to give it some distance as well as some dimension to the card.  I then added sequins that matched my background to tie it all in together.  I hope you like it!


Thanks - Fill 'er Up T

May you have a wonderful and blessed New Year!  Thank you so much for looking!


Sunday, January 4, 2015

Thoughts for the New and One Last Look at the Old


I'm starting this post with a gentle thought for the new year!  I hope 2015 finds you happy and healthy and creatively inspired!


I'd like to take this opportunity to thank the amazing Quietfire Design Team and to share some of my favourites from them over the last year. It was really difficult to choose just one and turned out to be a lot harder than I imagined!  I am honoured to be able to work and create with these wonderful ladies.  They make me laugh, they make me cry (especially when they don't like a flourish!) and they make me think in ways I haven't. Click on each image to see it larger.

Diana Nguyen
Holly Eastabrook

 
Jutta Maraun

Kathy Jo Wood

 
Robyn Josephs
Sherry Cheever

Teresa Horner

Terre Fry

Yogi Grunwald

Yvonne van de Grijp

And we can't forget our important affiliates!


Becca Feeken
Wanda Hentges


And there is even more to share. Our fabulous 2014 Guest Designers!
I'd like to thank them once again for sharing their beautiful creations and inspiring us. We were very lucky to have you join us!


Nina Brackett
Tammy Tutterow

Sara Naumann

Judi Kauffman

Julia Dunnit


We sometimes gather guest designers into our fold. Both Yvonne van de Grijp and Diana Nguyen were guest designers this year and they are now part of our design team! We're so happy to have you.

To each and every one of you, I wish you all the best for the coming new year!  Create without Limits!
Suzanne


Friday, January 2, 2015

Love is Friendship Valentine's Day card

 
Hello All!  Happy 2015! Kathy Jo here to share a shabby Valentine's Day card using Quietfire's stamp, Love is Friendship:
Love is Friendship Set on Fire
The papers used were from Graphic 45's Time to Flourish except the postcard which was Place in Time. The edges were distressed using my Zutter and distress ink applied.  Stickles was applied at will.  
The lace heart and corners were die cut using Spellbinders die set Lace Hearts.   
 The heat embossed stamped sentiment fit the post card perfectly!
The flowers were from my stash and wrapped in antiqued seam binding. Pearls were added to the heart die cut.
The card may look like it took a lot of time to make but it really came together surprisingly quickly.  Perhaps it was due to an over abundance of tea consumed. :)  Whatever the reason, I really do like the stamped sentiment on the post card.  It looks beautiful!

Thanks for stopping by!  Enjoy your Friday and weekend!
Hugs,
Kathy Jo
Related Posts Plugin for WordPress, Blogger...